Last Updated on December 18, 2025 by Dee
There’s something irresistibly charming about cat faces—those big expressive eyes, tiny button noses, and adorable whiskers that seem to hold infinite personality. Whether you’re sketching your own feline friend, creating cute illustrations for cards, or just doodling for fun, learning how to draw a cat face is a skill that opens up endless creative possibilities.
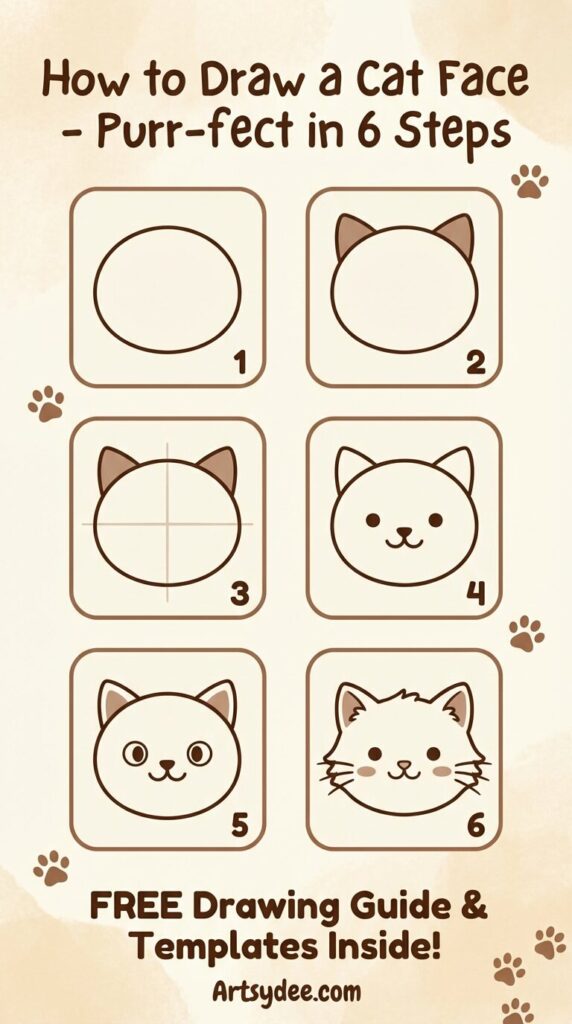
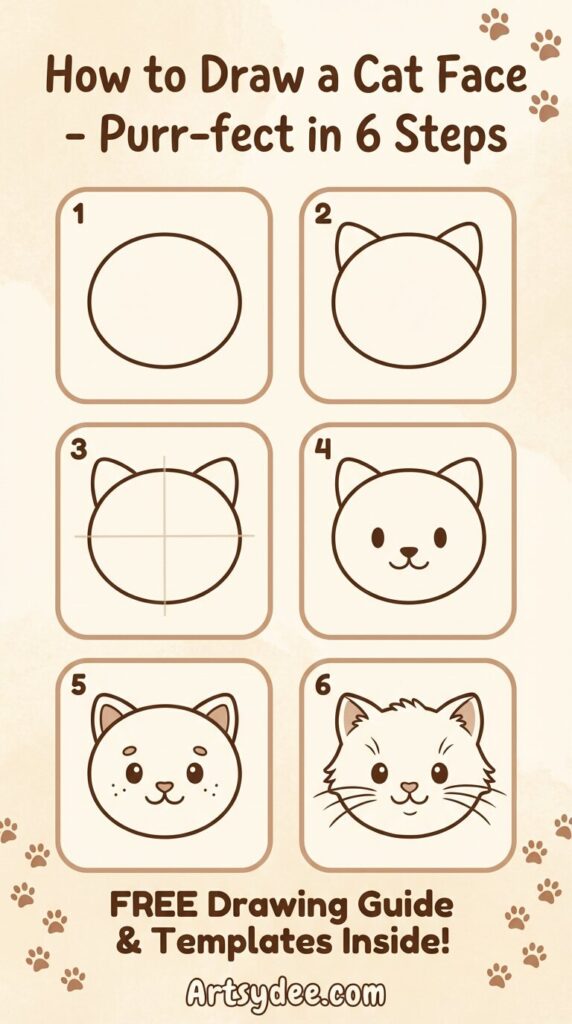
This simple 6-step tutorial breaks down cat face drawing into easy-to-follow steps that anyone can master. From basic circles to fluffy fur details, you’ll discover how to capture that quintessential cat charm on paper. Perfect for animal lovers, sketchbook practice, pet portraits, and adorable art projects.
Download the free drawing guide & tracing templates at the end of this post!
What You’ll Need to Draw a Cat Face
Gather your favorite drawing tools and get ready to create some purr-fect feline faces.
Suggested Supplies:
- Drawing pencils for sketching basic shapes
- Prismacolor Premier colored pencils for rich fur colors
- Ohuhu Honolulu dual tip acrylic markers for bold, vibrant cats
- Kneadable eraser for gentle corrections
- Blending sticks for smooth fur shading
- Sketchbook with good paper
This post contains affiliate links. If you purchase through these links, I may earn a small commission at no extra cost to you. Thanks for supporting Artsydee!
Markers for coloring work beautifully for creating colorful cartoon cats, while alcohol markers are perfect for blending realistic fur patterns.
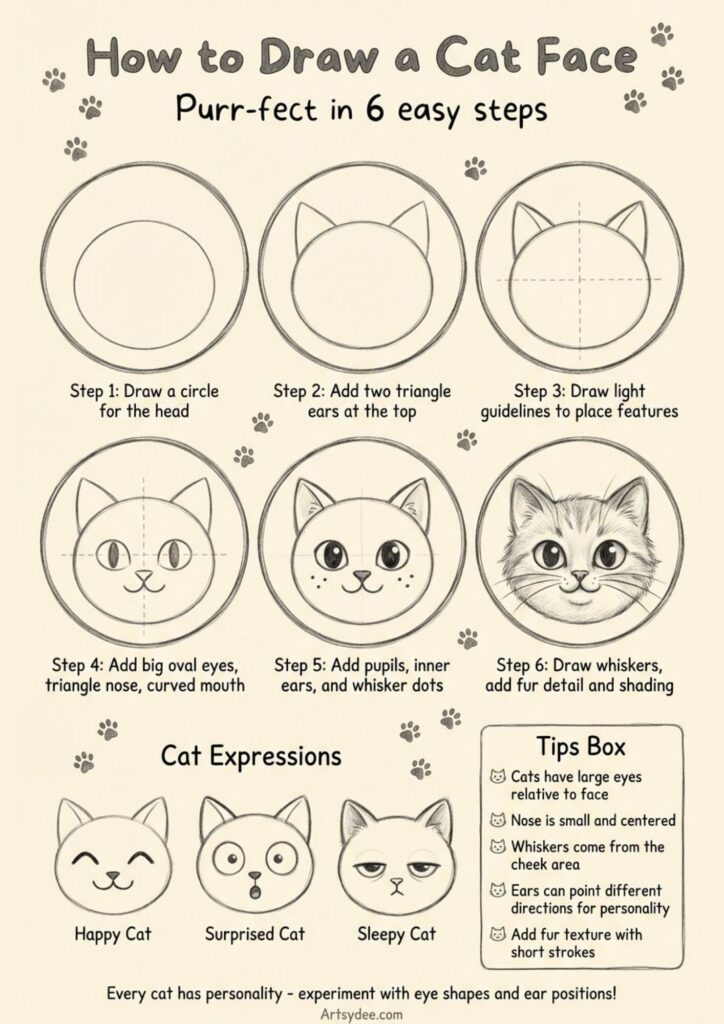
Step 1: Draw a Circle for the Head
Start with the foundation—a simple circle for the cat’s head. This doesn’t need to be a perfect circle drawn with a compass. In fact, a slightly hand-drawn circle gives your cat more character and charm.
Draw it whatever size feels right for your page. Larger circles give you more space to add details, while smaller circles work great for quick sketches or when you’re drawing multiple cats.
Keep your lines light at this stage—you’ll be adding to and refining this shape, so you want to be able to adjust things easily.
Step 2: Add Two Triangle Ears at the Top
Now give your cat its signature pointy ears. At the top of your circle, draw two triangular shapes positioned symmetrically on either side. These triangles should point slightly outward, not straight up—cats’ ears angle away from each other naturally.
The size of the ears can change your cat’s whole personality. Larger, more prominent ears create a kitten-like, alert appearance. Smaller, more delicate ears suggest a mature, calm cat. Medium-sized ears work for most general cat drawings.
Space the ears evenly and make sure they’re roughly the same size. Asymmetry can work for a playful, quirky look, but symmetrical ears tend to look more balanced and pleasing.
Step 3: Draw Light Guidelines to Place Features
Before adding facial features, draw two light intersecting lines—one vertical down the center of the face and one horizontal across the middle. These guide lines help you position the eyes, nose, and mouth symmetrically.
Think of it like creating a coordinate system on your cat’s face. The vertical line ensures the eyes are evenly spaced on either side, and the horizontal line shows you where to place them so they’re not too high or too low.
These guidelines are temporary scaffolding—you’ll erase them later, so keep them light and sketchy.
Positioning tip: Cat eyes sit relatively low on the head compared to where you might instinctively place them. The horizontal guideline should be slightly below the center of your circle.
Step 4: Add Big Oval Eyes, Triangle Nose, and Curved Mouth
Time to bring your cat to life with facial features.
Eyes: Draw two large oval shapes on either side of your vertical guideline, positioned along the horizontal line. Cats have proportionally large eyes compared to their face size—this is part of what makes them so adorable and expressive.
The ovals should angle slightly upward toward the outer edges, giving that characteristic cat eye shape. Leave plenty of space between the eyes—about one eye-width apart works well.
Nose: Below and centered between the eyes, draw a small upside-down triangle for the nose. Keep it tiny and centered on your vertical guideline. Cat noses are delicate and shouldn’t dominate the face.
Mouth: From the bottom point of the nose triangle, draw two small curved lines going down and then curving outward—like a gentle smile or an upside-down “Y” shape. This creates that sweet cat mouth.
Step 5: Add Pupils, Inner Ears, and Whisker Dots
Now add the details that give your cat personality and depth.
Pupils: Inside each eye, draw vertical oval or slit-shaped pupils. You can make them thin slits for an alert, focused cat, or rounder pupils for a relaxed, friendly expression. Add a tiny white highlight spot in each eye (or leave a small area uncolored) to make the eyes sparkle.
Inner ears: Inside each triangular ear, draw a smaller triangle or curved shape to represent the inner ear. Cats have distinct inner ear tufts and structure that add realism.
Whisker dots: On either side of the nose and mouth area (the muzzle), add small dots arranged in gentle curved rows. These are where the whiskers emerge from. Typically, add 3-4 dots on each side of the face.
Step 6: Draw Whiskers, Add Fur Detail and Shading
This final step brings your cat from a simple drawing to a dimensional, furry face.
Whiskers: From those whisker dots you drew, extend long, delicate curved lines outward. Cat whiskers are longer than you might think—they should extend well beyond the face circle. Draw them with confidence in smooth, slightly curved strokes. They shouldn’t be perfectly straight or too wavy—just gentle curves that flow naturally.
Fur texture: Add short, directional strokes along the outer edge of the face circle to suggest fur. These tiny lines should follow the direction fur naturally grows—outward from the center of the face. Don’t outline the entire face with solid lines; instead, use these short fur strokes to create a softer, more natural edge.
Pay special attention to the cheeks—add fluffy texture here with small curved strokes. Cat faces are wider at the cheeks, giving them that adorable puffy-cheeked look.
Shading: Add subtle shading to create dimension. The areas under the ears, around the lower part of the face, and beneath the chin typically have shadow. Use light, layered strokes rather than heavy pressure. If you’re working with watercolor techniques, add soft washes of color to build up depth.
Cat Expression Variations
Once you’ve mastered the basic cat face, experiment with different expressions by adjusting eye and mouth shapes:
Happy Cat: Draw closed, upside-down U-shaped eyes (like happy crescents) and a wide curved smile. Ears pointing slightly forward. This creates that blissful, content cat expression.
Surprised Cat: Make the eyes perfectly round and wide with large circular pupils. Add a small “O” shaped mouth. Ears perked straight up. This captures that startled, “what was that?!” cat moment.
Sleepy Cat: Draw half-closed eyes (horizontal ovals or just curved lines suggesting closed lids). Make the pupils barely visible or closed entirely. Ears relaxed and slightly drooping. Mouth very subtle or absent. Add a few “z” symbols nearby for extra sleepy effect.
Grumpy Cat: Lower, narrowed eyes with an unamused expression. Draw the pupils as narrow slits. Angle the mouth downward in a displeased frown. Ears flat or angled backward. This creates that hilariously grumpy cat look.
Tips for Drawing Realistic Cat Faces
Want your cats to look more authentic? Keep these golden nuggets in mind:
Cats have large eyes relative to their face. Don’t be shy about making the eyes big—this is key to that adorable cat look.
The nose is small and centered. Keep the triangle nose delicate and positioned right in the middle of the face.
Whiskers come from the cheek area. They don’t emerge directly from the nose—they sprout from the muzzle/cheek area on either side of the face.
Ears can point in different directions for personality. Forward ears suggest alertness or curiosity. Sideways or backward ears indicate caution or irritation. Play with ear position to convey mood.
Add fur texture with short strokes. Instead of solid outlines, use many short, directional lines to suggest fluffy fur. This single technique dramatically improves the realism of your drawings.
Inner ear details matter. Don’t just draw empty triangles—add that inner ear structure for authenticity.
Eye shape affects expression dramatically. Wide, round eyes look innocent and surprised. Narrowed, almond-shaped eyes look suspicious or content. Adjust eye shape to completely change your cat’s personality.
Adding Color and Patterns
Cats come in an amazing variety of colors and patterns. Here are some classic options:
Tabby: The most common pattern. Add stripes on the forehead (often forming an “M” shape), stripes radiating from the eyes, and bands of color. Use browns, oranges, grays, or cream colors.
Tuxedo: Black and white pattern with a white chest, white paws, and often a white facial blaze. The face has a formal, dressed-up appearance.
Calico: Patches of orange, black, and white in an irregular pattern. Each patch should be distinct, not blended.
Siamese: Light cream body with darker “points” on the face (ears, nose, around eyes). Use soft browns or grays for the points.
Solid colors: Black, white, gray, orange, or cream with no patterns. Add shading to show dimension even without patterns.
Tortoiseshell: Mottled mix of orange and black (or cream and gray) without distinct patches. Creates a beautiful, complex appearance.
When coloring, remember to add highlights and shadows to make your cat three-dimensional, even if you’re working with flat cartoon styles.
Creative Ways to Use Your Cat Face Drawings
Your cat drawings can become:
- Pet portraits of your own beloved cats
- Greeting cards for cat lovers and friends
- Bookmarks with different cat expressions
- Stickers for planners, journals, and water bottles
- Decorative elements in bullet journals and art journals
- Children’s book illustrations or storytelling art
- Pattern designs with multiple cat faces repeating
- Digital avatars for social media profiles
- Embroidery patterns transferred to fabric
- Coloring pages for kids and adults
Scan your finished cat drawings and turn them into digital clipart, printables, or design elements for various creative projects.
Fun Cat Drawing Challenges
30 Cat Faces Challenge: Draw one cat face every day for a month, each with a different expression or pattern. Watch your skills improve dramatically.
Emotion Wheel: Draw 8-12 cat faces arranged in a circle, each showing a different emotion—happy, sad, angry, surprised, sleepy, curious, playful, and grumpy.
Breed Study: Research different cat breeds and try drawing their distinct facial features—Persian’s flat face, Maine Coon’s large ears, Sphynx’s angular features.
Pattern Practice: Draw the same basic cat face multiple times, giving each one a different coat pattern to practice variety.
Download Your Free Cat Face Drawing Guide (at the end of this post!)
Ready to fill your sketchbook with adorable feline faces?
Inside you’ll find step-by-step visual instructions, multiple expression guides, pattern references, and traceable templates for practice. Print as many as you like and create an entire clowder of creative cats.
Whether you’re drawing your own pets, creating cute illustrations, teaching kids, or just enjoying some relaxing creative time, this tutorial makes cat face drawing accessible and fun for everyone.
Now grab your pencils and get drawing—your perfect cat face is just a few steps away! 🐱
What’s your favorite cat expression to draw? Share your feline art and tag me—I’d love to see your purr-fect creations!