Last Updated on November 23, 2025 by Dee
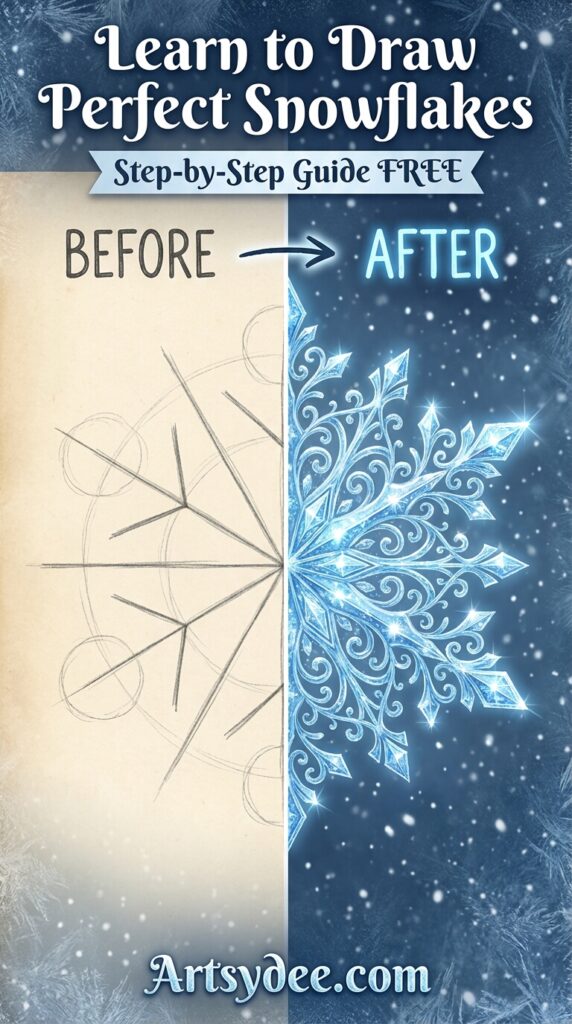
There’s something enchanting about snowflakes—those delicate, crystalline wonders that transform the world into a winter wonderland. Each one is unique, intricate, and absolutely magical. Whether you’re creating winter holiday cards, decorating a journal, or just embracing the cozy season, learning how to draw a snowflake is a skill that opens up endless creative possibilities.
This simple 5-step tutorial breaks down snowflake drawing into easy-to-follow steps that anyone can master. From simple six-pointed designs to elaborate geometric patterns, you’ll discover how to capture winter’s icy beauty on paper. Perfect for seasonal crafts, sketchbook practice, gift tags, and window decorations.
Download the free drawing guide & tracing templates at the end of this post!
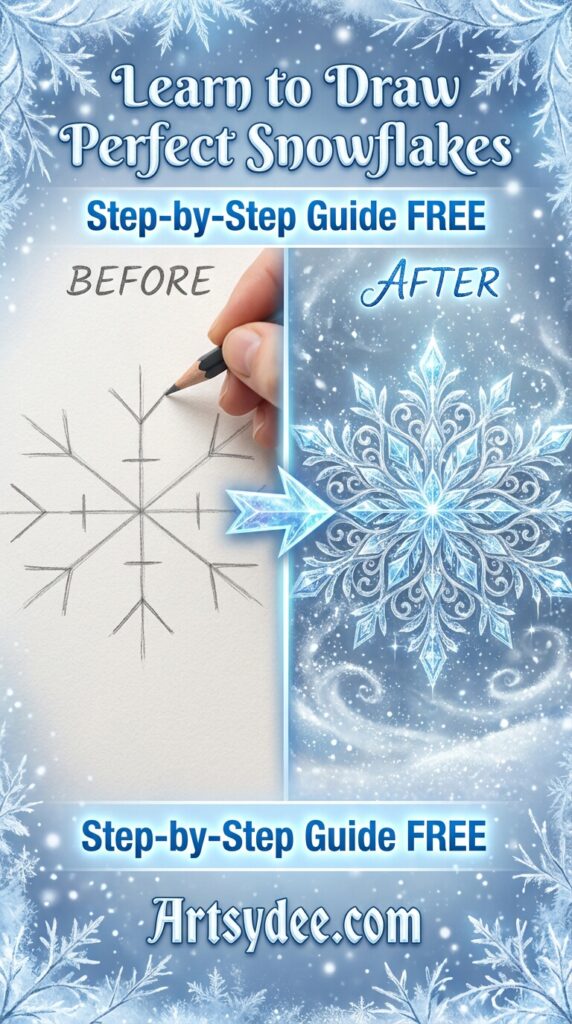
Table of Contents
What You’ll Need to Draw Snowflakes
Gather your favorite drawing tools and get ready to create some winter magic. The beauty of snowflake drawing is that you can keep it simple with just a pencil, or go all out with shimmering details.
Suggested Supplies:
- Drawing pencils for precise lines and delicate details
- Prismacolor Premier colored pencils in icy blues, silvers, and whites
- Ohuhu Honolulu dual tip acrylic markers for bold winter designs
- Kneadable eraser for gentle corrections
- Blending sticks for soft shading effects
- Sketchbook with smooth paper
This post contains affiliate links. If you purchase through these links, I may earn a small commission at no extra cost to you.
White gel pens or paint pens work beautifully on dark paper for dramatic snowflakes. If you’re using markers for coloring, try layering light blues and purples for an iridescent effect. Watercolor techniques also create stunning, ethereal snowflakes with soft washes of winter colors.
The Science Behind Snowflake Symmetry
Here’s a fascinating fact that’ll make your drawing more authentic: all snowflakes have exactly six arms—never five or eight. This six-fold symmetry happens because of the molecular structure of ice crystals. Water molecules bond at 120-degree angles, creating that perfect hexagonal shape.
No two snowflakes are exactly alike in nature, but they all follow the same basic rule: whatever happens on one arm happens on all six arms. Keep this in mind as you draw, and your snowflakes will look naturally beautiful.
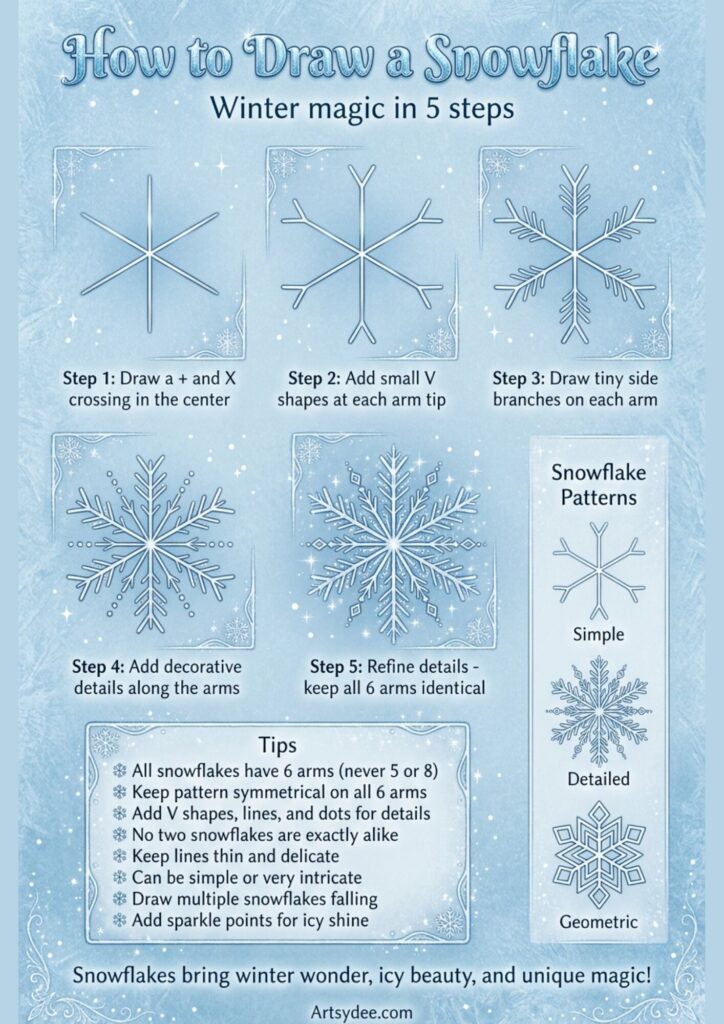
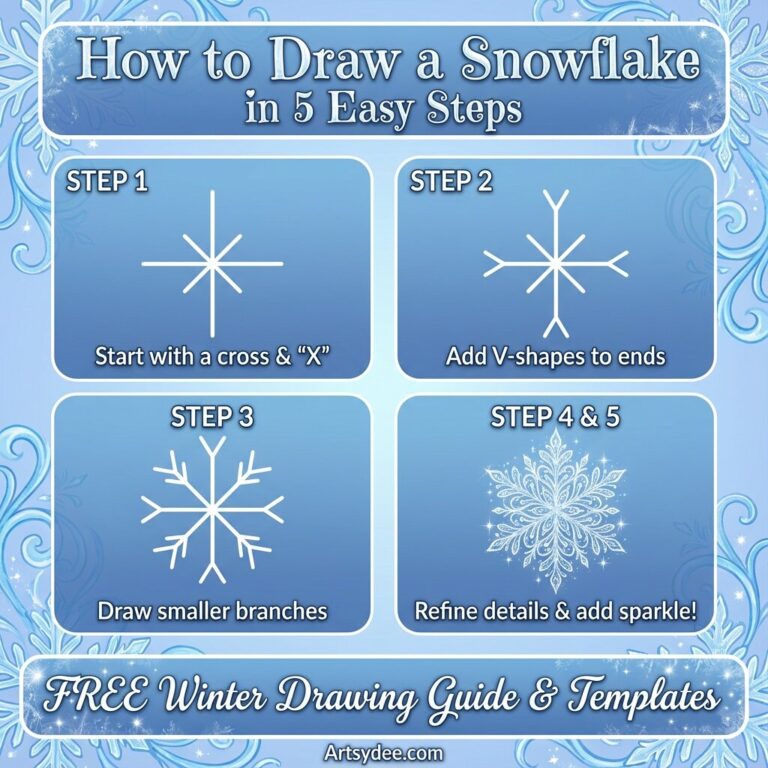
Step 1: Draw a + and X Crossing in the Center
Start by drawing a vertical line, then cross it with a horizontal line to form a plus sign (+). Make sure they intersect exactly in the middle—this is your snowflake’s center point.
Next, add an X shape over your plus sign, creating diagonal lines that also pass through the center. You should now have six evenly-spaced lines radiating from the center point, like the spokes of a wheel.
Pro tip: Use very light pencil strokes for these initial guide lines. You can either erase them later or incorporate them as part of your snowflake’s design.
Step 2: Add Small V Shapes at Each Arm Tip
At the end of each of your six main arms, draw a small V shape. Think of it like a tiny branching fork—the V can point outward or curve slightly, giving your snowflake that natural ice-crystal look.
Keep these V shapes consistent across all six arms. They don’t need to be perfect, but they should be roughly the same size and angle. This creates the symmetry that makes snowflakes so visually satisfying.
You can make your Vs narrow and pointed for delicate snowflakes, or wider and more open for bolder designs.
Step 3: Draw Tiny Side Branches on Each Arm
Now comes the part that makes your snowflake feel real. Along each of the six main arms, add small side branches—little lines that stick out at angles, like tiny pine needles or fern fronds.
Start close to the center and work your way out. You might add 2-4 side branches per arm, depending on how detailed you want your snowflake to be. Alternate sides as you go, or keep them symmetrical—both look natural.
Remember: whatever you draw on one arm, repeat on all six arms. This is the key to authentic snowflake symmetry.
Design tip: Keep your side branches thin and delicate. Real ice crystals have incredibly fine structures, so avoid thick, heavy lines that will make your snowflake look clunky.
Step 4: Add Decorative Details Along the Arms
Here’s where your snowflake becomes uniquely yours. Between the main structural elements, add decorative details that enhance the design:
- Small dots or circles along the arms
- Diamond shapes near the center
- Tiny stars or cross-hatches
- Curved lines that echo the V shapes
- Small circles that look like frozen bubbles
You can also add dotted lines radiating from the center between your main arms—these create the illusion of additional light rays and make your snowflake appear more three-dimensional.
Layer details without overcrowding. Leave some empty space—this “negative space” actually makes the intricate parts stand out more.
Step 5: Refine Details & Keep All 6 Arms Identical
Take a step back and look at your snowflake. This final step is about consistency and refinement.
Go through each arm and make sure the details match. If arm #1 has a small diamond shape 1 inch from the center, arms #2-6 should have the same diamond in the same spot. This uniformity creates that satisfying symmetry our eyes love in snowflakes.
Clean up any wobbly lines, erase guide marks if needed, and add final touches like tiny dots or highlights. You can outline your snowflake with a slightly thicker line to make it pop, or keep everything delicate and light.
Snowflake Pattern Variations to Try
Once you’ve mastered the basic structure, experiment with these snowflake styles:
Simple Snowflake: Just the basic six arms with minimal branching. Clean, elegant, and perfect for beginners or when you need lots of snowflakes quickly.
Detailed Snowflake: Multiple layers of branches, intricate patterns between arms, and elaborate decorative elements. These take longer but create stunning, one-of-a-kind designs.
Geometric Snowflake: Use precise shapes like hexagons, triangles, and diamonds arranged symmetrically. These have a modern, almost mathematical beauty and work wonderfully for contemporary designs.
Frosty Organic Snowflake: Irregular edges, organic curves, and nature-inspired details. Less rigid than geometric styles but still following the six-arm rule.
Tips for Drawing Realistic Snowflakes
Want your snowflakes to look like they just drifted from the winter sky? Follow these golden nuggets:
All snowflakes have 6 arms—never 5 or 8. This is non-negotiable in nature, so keep it consistent for realism.
Keep patterns symmetrical on all 6 arms. Whatever detail you add to one arm should appear on all six.
Add V shapes, lines, and dots for details. These small elements create visual interest and mimic real ice crystal structures.
No two snowflakes are exactly alike. Feel free to experiment with different patterns and details on each snowflake you draw.
Keep lines thin and delicate. Real ice crystals are incredibly fine and intricate, so avoid thick, heavy strokes.
Snowflakes can be simple or very intricate. Start simple and build complexity as you gain confidence.
Draw multiple snowflakes falling. Create a whole winter scene with snowflakes of varying sizes and levels of detail.
Add sparkle points for icy shine. Tiny dots or white highlights around your snowflake suggest light reflecting off ice crystals—pure magic.
Adding Color and Special Effects
While snowflakes are typically white or clear, adding color makes them perfect for art projects and creative designs.
For traditional winter snowflakes: Use light blues, silvers, icy purples, and whites. Layer these colors to create depth and dimension. Alcohol markers in cool tones work beautifully for this effect.
For magical artistic snowflakes: Try rainbow colors, metallic gold and silver, or even warm colors like pink and peach for sunrise-lit snow.
Background magic: Draw your snowflakes on dark blue, navy, or black paper using white gel pens or paint markers. The contrast is absolutely stunning and makes your snowflakes look like they’re floating in a night sky.
Add shimmer with glitter glue or metallic markers on the tips and center. Use white gouache or acrylic paint to add tiny highlights that catch the light. You can even splatter white paint across your finished snowflakes for a blizzard effect.
Creative Ways to Use Your Snowflake Drawings
Your snowflake drawings can become so much more than practice sketches:
- Winter greeting cards for holidays, Christmas, or New Year’s
- Gift tags and wrapping paper with hand-drawn snowflake patterns
- Window decorations drawn on white paper and taped to windows for festive displays
- Coloring pages for kids’ winter activities and classroom projects
- Embroidery patterns traced onto fabric for winter crafts
- Vinyl cut designs for DIY window clings and decorations
- Wall art matted and framed individually or arranged in a winter gallery wall
- Journal headers for bullet journals, planners, and winter-themed pages
- Cookie decorating templates for royal icing snowflake cookies
Scan your finished snowflakes and turn them into digital brushes for Procreate, printable stationery, or repeating patterns for fabric and wallpaper designs.
Fun Snowflake Drawing Activities
Snowflake Symmetry Challenge: Fold paper in half three times, cut out shapes along the edges, then unfold to reveal a symmetrical snowflake. Now try to recreate what you cut using the drawing method.
Giant Snowflakes: Use poster board or large paper to create oversized snowflakes for winter parties, classroom decorations, or photo backdrops.
Snowflake Family: Draw a “family” of snowflakes with different personalities—Mama Snowflake with elaborate details, Baby Snowflake with simple lines, and quirky cousin snowflakes with unique patterns.
Mindful Snowflake Meditation: Drawing repetitive, symmetrical patterns is incredibly relaxing. Put on some gentle music and lose yourself in creating intricate snowflake designs—it’s winter art therapy.
Download Your Free Snowflake Drawing Guide
Ready to fill your pages with winter wonder?
Inside you’ll find step-by-step visual instructions, multiple snowflake pattern variations, and traceable templates for practice. Print as many as you like and create an entire blizzard of beautiful, unique snowflakes.
Whether you’re decorating for the holidays, teaching kids about winter science and art, or simply enjoying some cozy creative time, this tutorial makes snowflake drawing accessible and fun for everyone.
Now grab your pencils and let the snow fall. ❄️
What’s your favorite snowflake pattern? Share your winter creations and tag me—I’d love to see your icy masterpieces!