Last Updated on November 23, 2025 by Dee
Stars are more than just celestial objects—they’re symbols of wishes, dreams, magic, and achievement. From gold stars on school papers to shining stars in the night sky, these five-pointed shapes appear everywhere in art, design, and decoration. Yet surprisingly, many people struggle to draw a symmetrical star freehand.
This simple 4-step tutorial reveals the secret to how to draw a star perfectly every single time. No more lopsided points or wonky shapes—just clean, symmetrical, professional-looking stars that you can draw quickly and confidently. Perfect for New Year’s wishes, celebration art, sketchbook doodles, greeting cards, and decorative designs.
Download the free drawing guide & tracing templates at the end of this post!
What You’ll Need to Draw Stars
Gather your favorite drawing tools and prepare to master one of the most useful shapes in art and design.
Suggested Supplies:
- Drawing pencils for precise construction lines
- Prismacolor Premier colored pencils in golds, silvers, and vibrant colors
- Ohuhu Honolulu dual tip acrylic markers for bold, bright stars
- Kneadable eraser for removing guide lines
- Blending sticks for smooth shading
- Sketchbook with smooth paper
This post contains affiliate links. If you purchase through these links, I may earn a small commission at no extra cost to you. Thanks for supporting Artsydee!
Gold and silver metallic markers or gel pens work beautifully for magical, shimmering stars. Alcohol markers create stunning gradient effects from bright centers fading to darker points.
The Secret to Perfect Star Symmetry
Here’s what makes the difference between a wobbly amateur star and a crisp professional one: five symmetrical points with consistent angles.
A five-pointed star (pentagram) has specific geometry:
- Five points equally spaced around a circle
- Inner points meet to form a pentagon at the center
- Each point has the same angle (approximately 36 degrees)
- The lines connecting the points create the classic star shape
Once you understand this structure, you can draw perfect stars at any size, in any medium.
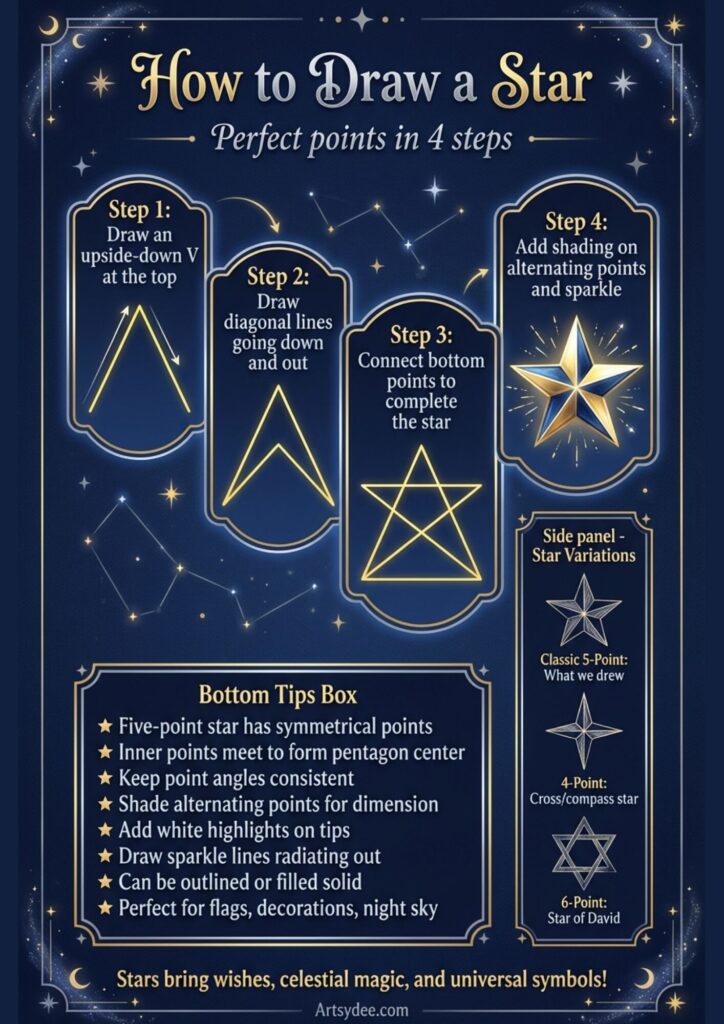
Step 1: Draw an Upside-Down V at the Top
Start with a simple upside-down V shape at the top of your drawing area. This forms the first point of your star.
Make sure both lines of the V are the same length and meet at the same angle. The point should be relatively sharp—not too wide and flat, but not needle-thin either. Aim for that classic star point angle.
Angle tip: If the V is too wide, your star will look flat and stubby. If it’s too narrow, your star will look needle-like and awkward. Aim for a moderate angle that looks balanced.
This first V is crucial because it sets the standard for all the other points.
Step 2: Draw Diagonal Lines Going Down and Out
From each end of your V, draw diagonal lines that go down and outward—think of them heading toward the bottom corners of your imaginary star.
These lines should angle outward at roughly 45 degrees (a bit less steep than that, actually). Don’t bring them all the way down yet—stop about halfway down your intended star height.
The key here is symmetry: both lines should be the same length and angle out at the same degree. Take your time to get this right.
Step 3: Connect Bottom Points to Complete the Star
Now for the satisfying part—connecting those diagonal lines to form the bottom points of your star.
From the end of your left diagonal line, draw a line that goes across and slightly upward toward the right. This creates the left bottom point of your star.
From the end of your right diagonal line, draw a line that mirrors the first one, going across and slightly upward toward the left. This creates the right bottom point.
Finally, connect these two points with a slightly upward-curving line across the bottom—this completes your star shape and forms that characteristic pentagon in the center where all the inner points meet.
Check your work: Stand back and look at your star. All five points should be roughly the same size and angle. The inner pentagon should look relatively symmetrical.
Step 4: Add Shading on Alternating Points and Sparkle
This is where your flat star becomes dimensional and magical.
Adding dimension through shading: Choose alternating points of your star (for example, the top point, bottom left, and bottom right) and add shading to those sections. Leave the other two points (in this example, the middle left and middle right) lighter or unshaded.
This creates the illusion that your star is three-dimensional—like some points are catching more light while others are in shadow. Use your pencil, markers, or colored pencils to add graduated shading that’s darker toward the edges and lighter toward the center.
Adding sparkle: Draw radiating lines shooting out from your star—short lines, long lines, or both—to create that classic “twinkling” effect. These sparkle lines make your star look luminous and magical, like it’s actually glowing.
Add small dots or tiny stars around your main star for extra celestial atmosphere.
Star Variation Styles
Once you’ve mastered the classic five-pointed star, try these variations:
Classic 5-Point Star: What we just drew—the most recognizable and versatile star shape. Perfect for flags, decorations, and celebration art.
4-Point Star (Cross/Compass Star): Draw a vertical line, then a horizontal line crossing through the center. Connect the four endpoints with slight curves inward to create a four-pointed star that looks like a sparkle or compass rose.
6-Point Star (Star of David): Draw two overlapping equilateral triangles—one pointing up, one pointing down—to create this six-pointed star. It’s symmetrical, balanced, and appears in religious and cultural contexts.
8-Point Star: Similar to the 4-point star but with additional diagonal points added between each main point. These appear in Islamic art, quilting patterns, and navigation symbols.
Shooting Star: Draw your regular star, then add a long, sweeping tail trailing behind it, suggesting motion and direction. Taper the tail from wide to narrow for a realistic comet effect.
Hollow/Outline Star: Draw just the outline of your star without filling it in. These work beautifully for patterns, backgrounds, and sophisticated designs.
Tips for Drawing Perfect Stars
Want your stars to really shine? Keep these golden nuggets in mind:
Five-point stars have symmetrical points. Consistency is everything—all five points should look like siblings, not distant cousins.
Inner points meet to form a pentagon center. This is the “hub” of your star and should be relatively regular in shape.
Keep point angles consistent. Use the first point as your template and match the others to it.
Shade alternating points for dimension. This simple trick makes your stars look three-dimensional instead of flat.
Add white highlights on tips. A tiny white dot or line at each point makes your star look shiny and dimensional.
Draw sparkle lines radiating out. These energy lines make your star look like it’s actually twinkling and glowing.
Stars can be outlined or filled solid. Both styles are useful for different design applications.
Perfect for flags, decorations, and night sky scenes. Stars are incredibly versatile symbols.
Adding Color and Special Effects
Stars can be rendered in countless color combinations:
Classic gold stars: Use warm yellows, golds, and orange tones. Add brown or darker gold shading on alternating points, and bright yellow or white highlights on the tips. These are perfect for achievement awards, Christmas decorations, and celebration designs.
Silver stars: Cool grays, silvers, and icy blues create sophisticated, elegant stars. These work beautifully for winter themes, New Year’s Eve, and modern minimalist designs. Add some fireworks drawings to give it an extra special celebratory vibe!
Rainbow stars: Use a different bright color on each point, or create a gradient that flows through the entire star. Psychedelic and joyful—perfect for kids’ art and cheerful celebrations.
Celestial stars: Deep navy or black stars with white or light blue highlights look like stars you’d see in the night sky. Add tiny white dots around them for distant starlight.
Metallic magic: Gold and silver metallic markers, pens, or paints create stars that actually catch and reflect light. Gorgeous for greeting cards and special occasion art.
Try watercolor techniques with salt for a sparkly, crystalline effect. The salt absorbs the pigment in interesting patterns that look like twinkling starlight.
Creative Ways to Use Your Star Drawings
Your star drawings can become:
- New Year’s wish cards with stars representing hopes and dreams
- Achievement certificates with gold stars for recognition
- Night sky scenes with constellations and starscapes. Combine them with snowflakes for wintery scenes!
- Holiday decorations for Christmas trees, cards, and wrapping paper
- Patriotic designs for flags, Fourth of July art, and national celebration themes
- Rating systems for reviews, recommendations, or favorites
- Bullet journal elements for headers, dividers, and decorative accents
- Children’s reward charts with stars marking accomplishments
- Astrology and zodiac art featuring celestial themes
- Magic and fantasy illustrations with glowing, mystical stars
Scan your hand-drawn stars and turn them into digital brushes, clipart, patterns, or stickers for both print and digital use.
The Symbolism of Stars in Art and Culture
Stars carry deep meaning across cultures and contexts:
- Achievement and excellence: Gold stars have represented success since ancient times
- Guidance and direction: The North Star has guided travelers for centuries
- Hope and wishes: “Wish upon a star” captures our dreams and aspirations
- Celestial wonder: Stars represent the infinite universe and our place within it
- Divinity and spirituality: Many religions use stars as sacred symbols
- Fame and recognition: “Star” performers shine brightest in their fields
Understanding this symbolism helps you use stars more meaningfully in your artwork.
Star Drawing Challenges and Activities
Constellation Creation: Draw the classic five-pointed star multiple times to create famous constellations like the Big Dipper, Orion, or Cassiopeia. Connect them with faint lines and label them.
Star Size Study: Draw stars in graduated sizes from tiny to huge across your page. This exercise helps you maintain proper proportions at any scale.
Night Sky Scene: Create a complete nighttime landscape with a dark sky filled with stars of various sizes and brightness levels. Add a moon, maybe some clouds, and silhouettes of trees or buildings below.
Three-Dimensional Star: Draw your star, then add guidelines showing depth and dimension, as if it’s a 3D star ornament. Add shading to show which surfaces face the light and which are in shadow.
Star Pattern Design: Fill an entire page with overlapping stars of different sizes. Color them in a pattern or gradient for a beautiful, decorative result.
Download Your Free Star Drawing Guide
Ready to make some magic?
Download your free printable star drawing guide and tracing templates here!
Inside you’ll find step-by-step visual instructions for the classic five-pointed star plus multiple variations (4-point, 6-point, shooting stars, and more), along with traceable templates for practice.
Whether you’re creating New Year’s wish art, designing celebration cards, teaching kids to draw, or adding celestial magic to your creative projects, this tutorial makes star drawing simple and satisfying for everyone.
Now grab your pencils and reach for the stars! ⭐
What will you wish upon your stars? Share your starry creations and tag me—I’d love to see your celestial art!