Last Updated on June 23, 2026 by Dee
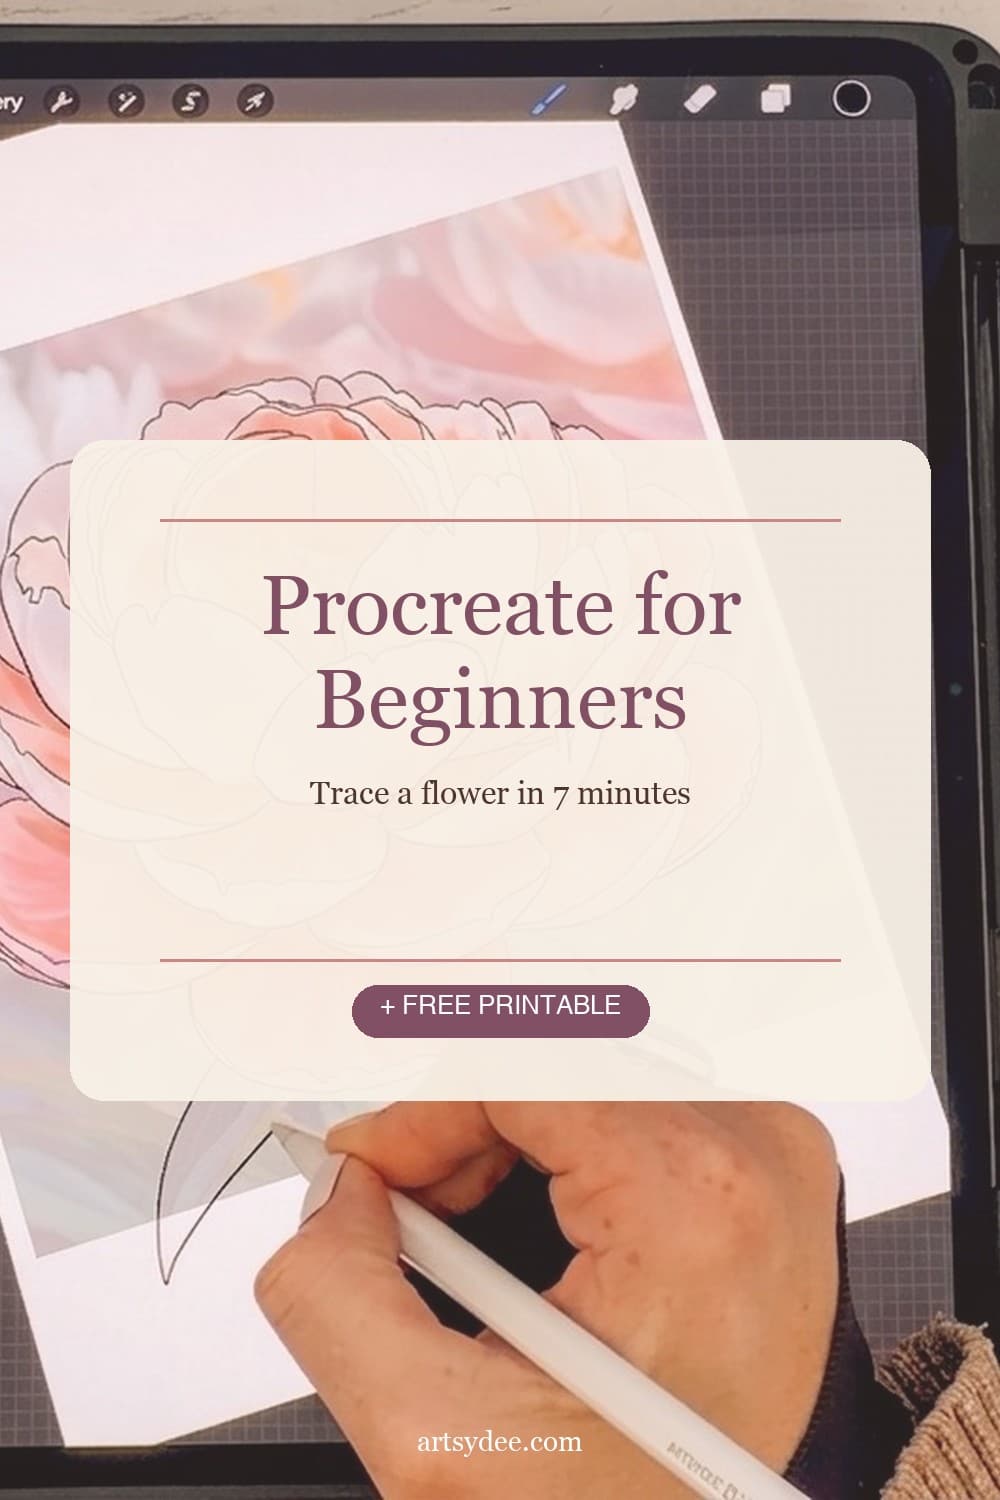
If the blank canvas freaks you out every time you open Procreate, this is the easiest way through it. I’m going to show you exactly how I trace a real photo in Procreate — using a gorgeous peony as our subject — and walk you through every setting, every layer trick, and the one rule that turns a trace into a stylised drawing instead of a photocopy.
Tracing isn’t cheating. It’s how most of us built our confidence with line work, and it’s still my go-to trick when I want a clean flower sketch for a watercolour template or a digital art journal page without spending an hour drawing from scratch.
The whole thing takes under eight minutes in the video, and the result is a crisp peony lineart you’d happily frame, colour in, or use as a repeat motif.
I’ve got a Free Peony Procreate Tracing Pack right after the table of contents – that’s the exact Procreate file I’m using in the tutorial, so you can follow along layer-for-layer!
🎬 Love video tutorials? Subscribe to my YouTube channel for a new Procreate or watercolour tutorial every week.
Table of Contents
🎁 Free Peony Procreate Tracing Pack
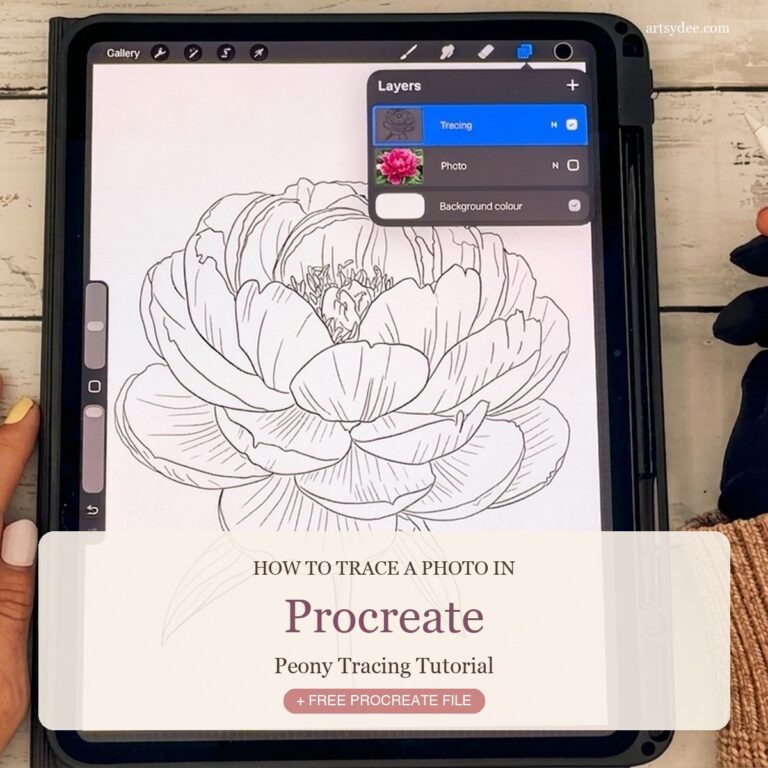
Inside this pack you’ll get the exact Procreate file I use in the video — the peony reference photo pre-imported, the tracing layer ready to go, and a printable quick-start card so you can start tracing the second it lands on your iPad.
- ✨ The high-res peony reference photo (PNG)
- ✨ A layered
.procreatefile — photo on its own layer, tracing layer set up - ✨ Quick-start tutorial card
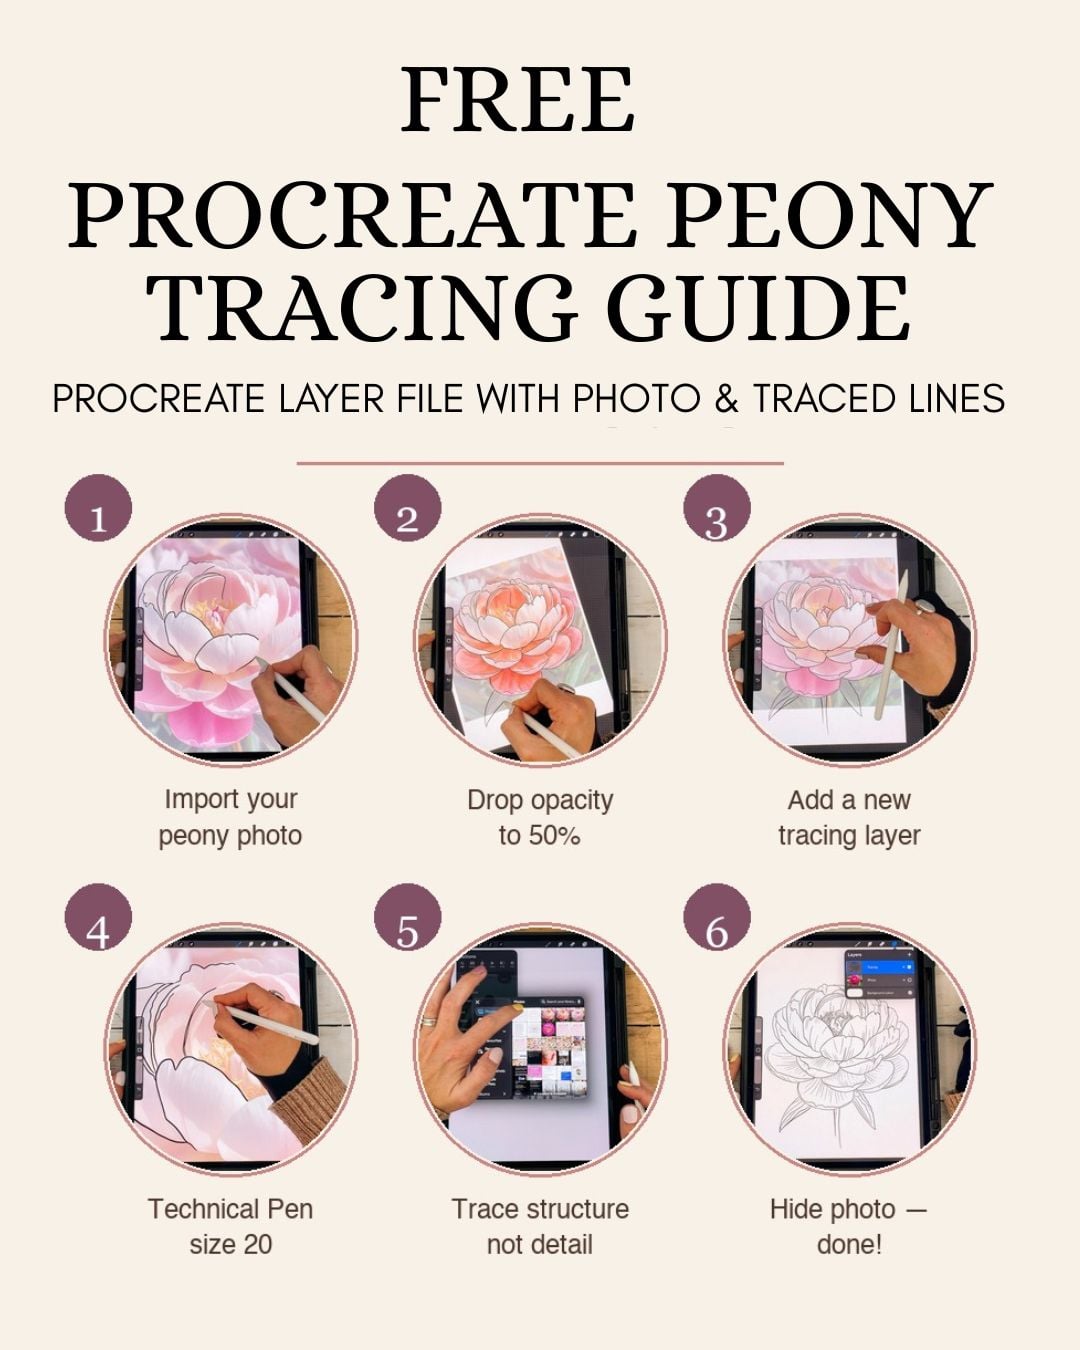
Bonus: here’s the step-by-step tutorial card from inside the pack — save it or pin it for later!
🌸 Love Procreate? Get Weekly Drops on My Patreon
If this kind of Procreate tutorial is your happy place, you’d really enjoy my Patreon. It’s where I drop new Procreate resources every single week — stamp sets, brush packs, colour palettes, Procreate files, and seasonal watercolour templates — along with members-only tutorials and behind-the-scenes peeks.
You can join at the tier that suits you, and you’ll get instant access to the current month’s resources plus the full archive. Come and have a peek at my Patreon →
Why Tracing in Procreate Is the Fastest Way to Level Up Your Flower Drawings
Quick Answer: Tracing a photo in Procreate teaches your hand the shape of a flower — its proportions, petal overlaps, and structure — without asking you to invent those shapes from scratch. After a few traces, you’ll start to internalise the patterns, and freehand drawings get much easier.
Here’s the thing nobody tells you when you’re starting out with digital art: most professional iPad artists and illustrators trace. Not every drawing, but often enough. It’s not a shortcut — it’s a training method.
A peony is especially good to start with because it’s got that overlapping-petal structure that’s genuinely tricky to draw from imagination. Once you’ve traced one, you’ll see the”rosette” shape everywhere: in roses, in camellias, in garden ranunculus. One trace → four flowers you can now draw more confidently.
What You Need Before You Start
You don’t need much. If you’ve already got Procreate and a decent flower photo, you’re 90% of the way there.
- iPad + Apple Pencil — any iPad that runs Procreate works. I use an iPad Pro with the 2nd-gen Apple Pencil because I like the flat side for gripping. Honestly though, the 1st-gen Pencil and a basic iPad Air are completely fine for tracing.
- Procreate — the one-time £12.99 purchase is the best creative app investment you’ll ever make.
- A flower photo — your own, or the free peony one I’m giving you in the pack above.
- A paper-like screen protector (I swear by Paperlike) (optional but lovely) — if the glassy iPad feel throws you off, a matte screen protector gives you that paper-drag sensation. It completely transforms how your lines feel on the iPad.


This post contains affiliate links, which means I may earn a small commission at no extra cost to you if you make a purchase. I only recommend things I genuinely use.
👆 Enjoyed this tutorial? Subscribe to Artsydee on YouTube for a new Procreate or watercolour tutorial every week.
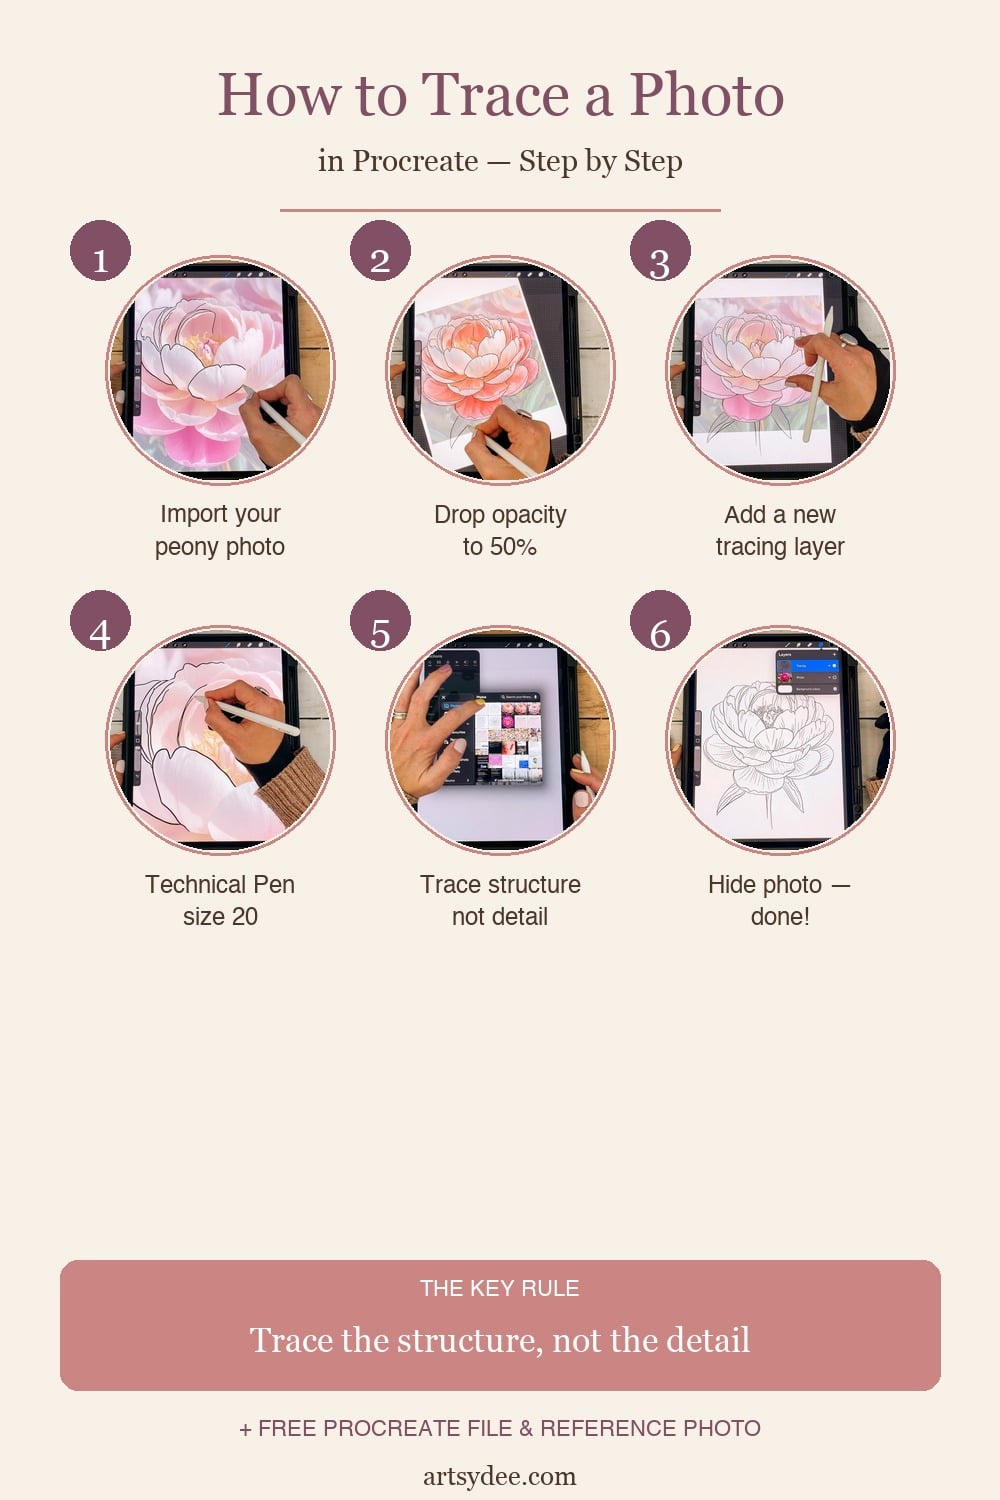
Step 1: Open a New Canvas in Procreate (0:32 in the video)
Quick Answer: Tap the + icon in the top right of the Procreate Gallery, then pick a canvas size. A4 (2480 × 3508 px) at 300 DPI is a solid all-rounder if you might print your finished piece later.
Open up Procreate and tap the + in the top right of the Gallery. You’ll see a list of canvas presets — Screen Size, Square, A4, 4K, and anything custom you’ve saved. For flower tracing, I like A4 because it gives you plenty of room to zoom in on petal detail without losing resolution.
If you’re brand new to Procreate and those numbers are overwhelming, just tap Screen Size. It’s a perfectly fine starting canvas.
Step 2: Import and Resize Your Reference Photo (0:43 in the video)
Quick Answer: Tap the wrench icon → Add → Insert a photo. Choose your peony (or any flower) image from your Photos library. Then use a two-finger pinch to resize it and drag to position it on the canvas.
Once your canvas is open, tap the wrench icon (top left) → Add → Insert a photo. Pick the peony photo from the free pack, or use your own flower shot.
Procreate will drop the photo onto the canvas and give you a Transform handle. Pinch to zoom with two fingers to get it to roughly fill the canvas, and drag it into position. Don’t stress about being perfect — you can always nudge it later.
Step 3: Reduce the Photo Opacity to 50% (1:16 in the video)
Quick Answer: Open the Layers panel (the stacked squares icon, top right), tap your photo layer once, and a little opacity slider appears. Drag it down to around 50%. This makes the photo faint enough that your traced lines will stand out on top.
This is the move that makes the rest of the tutorial actually work. If your photo is at 100% opacity, your traced lines will get lost in the busy colour. Drop it down to ~50% and you’ll be able to see exactly where your pen is going.
Tap the Layers panel icon (looks like two stacked squares, top right), then tap the”N” next to your photo layer. That opens the Opacity slider — drag it left until you’re at about half.
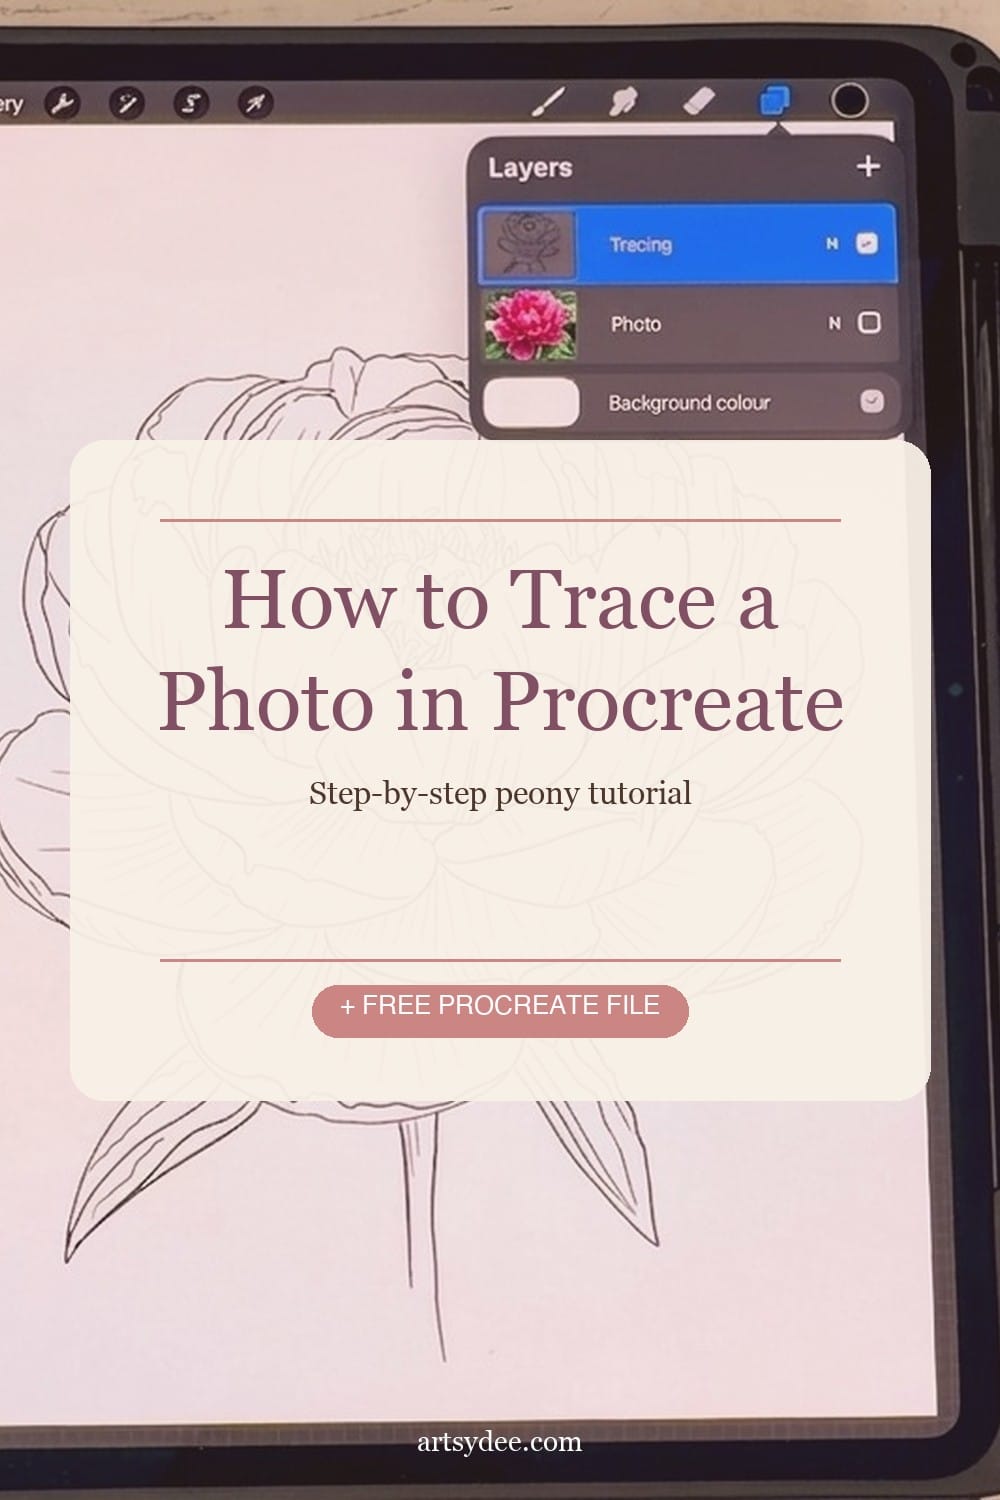
Step 4: Set Up Your Tracing Layer (1:46 in the video)
Quick Answer: Tap the + in the Layers panel to create a new empty layer above your photo. Rename both layers —”Photo” for the reference and”Tracing” for your new blank layer — so you always know which one you’re drawing on.
Here’s the layer trick that saves beginners hours of confusion: always trace on a separate layer from your reference photo.
Tap the + button at the top of the Layers panel to add a new blank layer. Make sure this new layer sits above your photo layer — that way your lines will appear on top of the reference.
Then rename both layers so you don’t get lost. Tap the layer → Rename → type”Photo” for the reference and”Tracing” for the blank one. Future-you will thank you when you’re fifteen layers deep in a complicated piece.
Step 5: Pick the Technical Pen and Dial In Your Settings (2:24 in the video)
Quick Answer: Use the Procreate Classic library → Inking → Technical Pen. Set Streamline to 60%, Stabilization to 50%, and brush size to 20. These settings give you clean, confident lines even if your hand is a bit shaky.
The Technical Pen is my go-to for any kind of lineart — it stays consistent no matter how fast or slow you move the Pencil, and it looks really crisp when printed or exported.
My exact settings:
- 🖌️ Brush: Procreate Classic → Inking → Technical Pen
- ➰ Streamline: 60% (smooths out the wobble without feeling laggy)
- 🛟 Stabilization: 50% (catches any hand tremor)
- 📏 Size: 20 (at A4 canvas — scale up or down for different canvas sizes)
Streamline and Stabilization are the secret ingredients. If you’ve been drawing clean lines at the art store for years and your Procreate scribbles look wobbly, it’s almost always because these two settings are at zero. Turn them up and watch your line work transform.
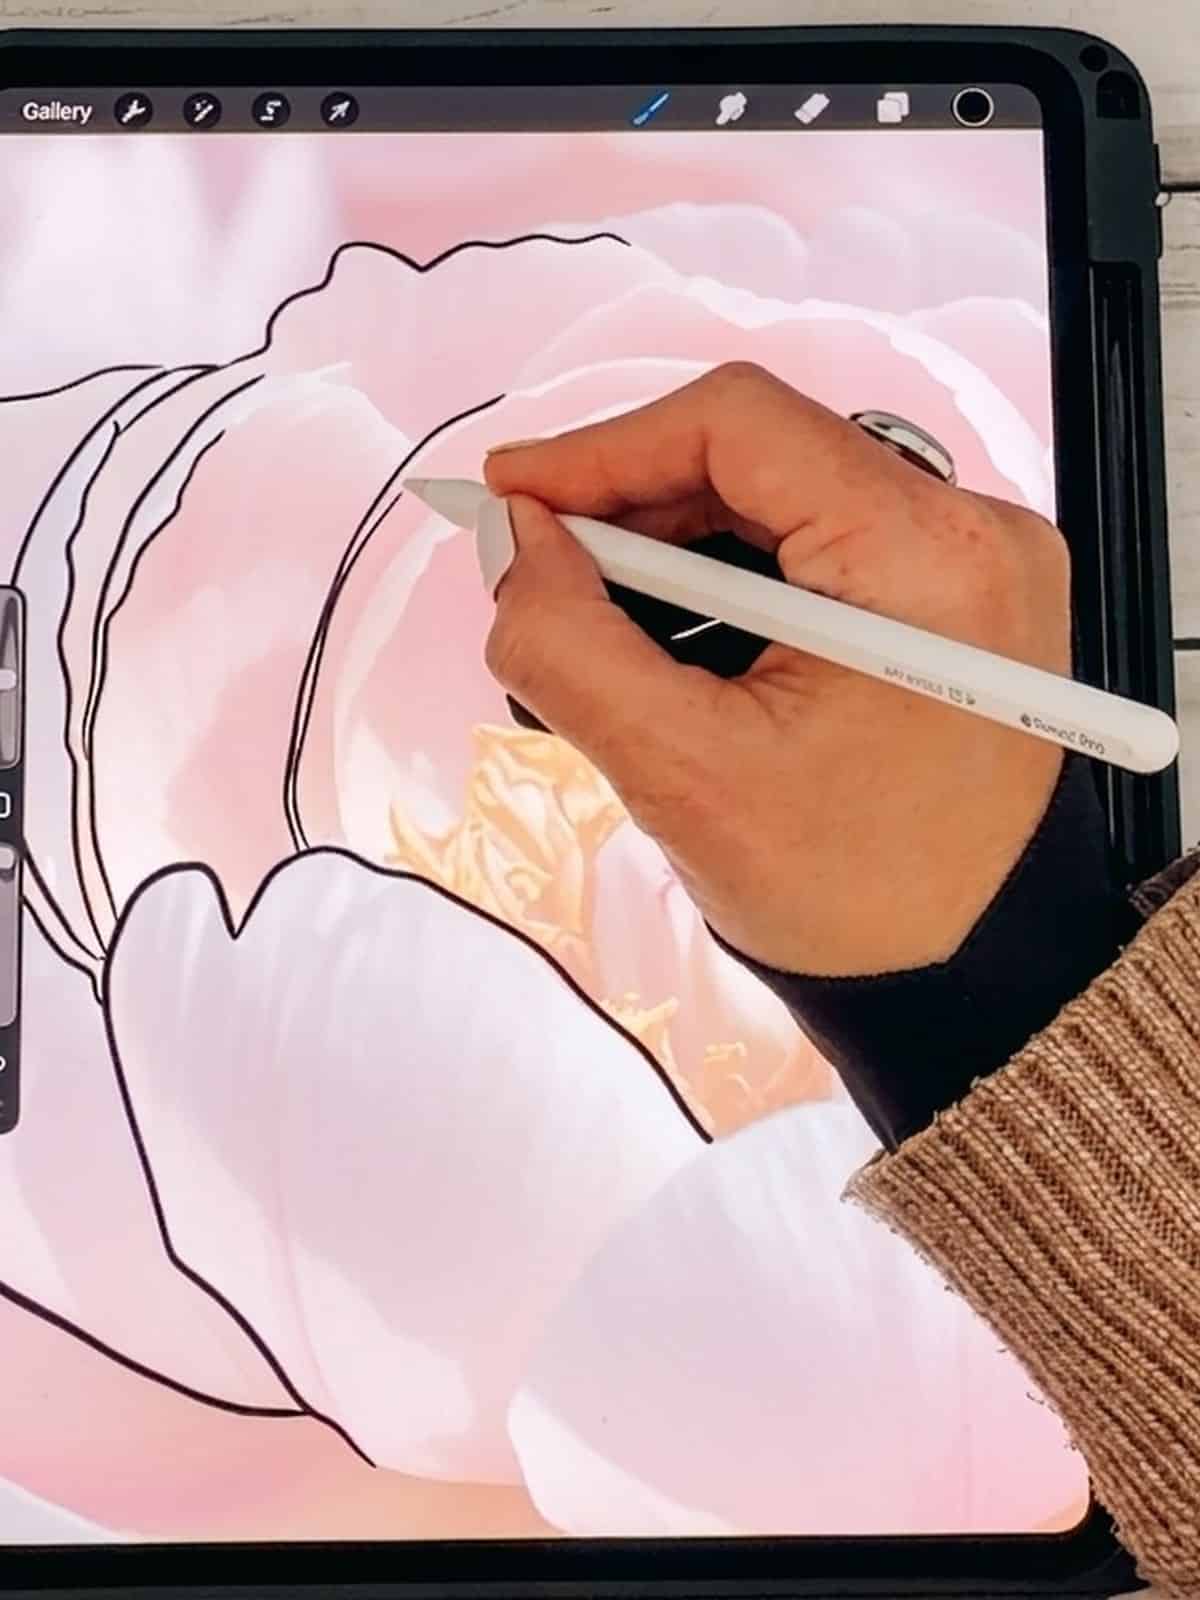
Step 6: Trace the STRUCTURE, Not the Detail (3:37 in the video) 🌸
THE key rule of this whole tutorial: Trace the structure, not the detail. Leave out every tiny crinkle and texture — that’s what turns a trace into a stylised drawing instead of a photocopy.
This is the bit most beginners get wrong. They try to trace every single line they see in the photo — every vein, every shadow, every crumpled edge — and end up with a drawing that looks fussy and lifeless.
What to trace:
- ✅ The overall petal outlines
- ✅ Where petals overlap each other (these overlap lines are what give the flower its three-dimensional feel)
- ✅ Major structural curves — the”spine” of a leaf, the base of a petal
- ✅ The centre of the flower (just the shape, not every stamen)
What to leave OUT:
- ❌ Tiny crinkles and wrinkles on individual petals
- ❌ Subtle shadows and gradients (lines can’t capture those anyway)
- ❌ Background leaves and stems that aren’t part of the main flower
- ❌ Every tiny vein — pick 2 or 3 dominant ones per leaf, skip the rest
Trust me on this. The first few times I traced, I tried to capture everything, and my drawings looked overcrowded. The moment I started leaving things out, the drawings started looking like art.
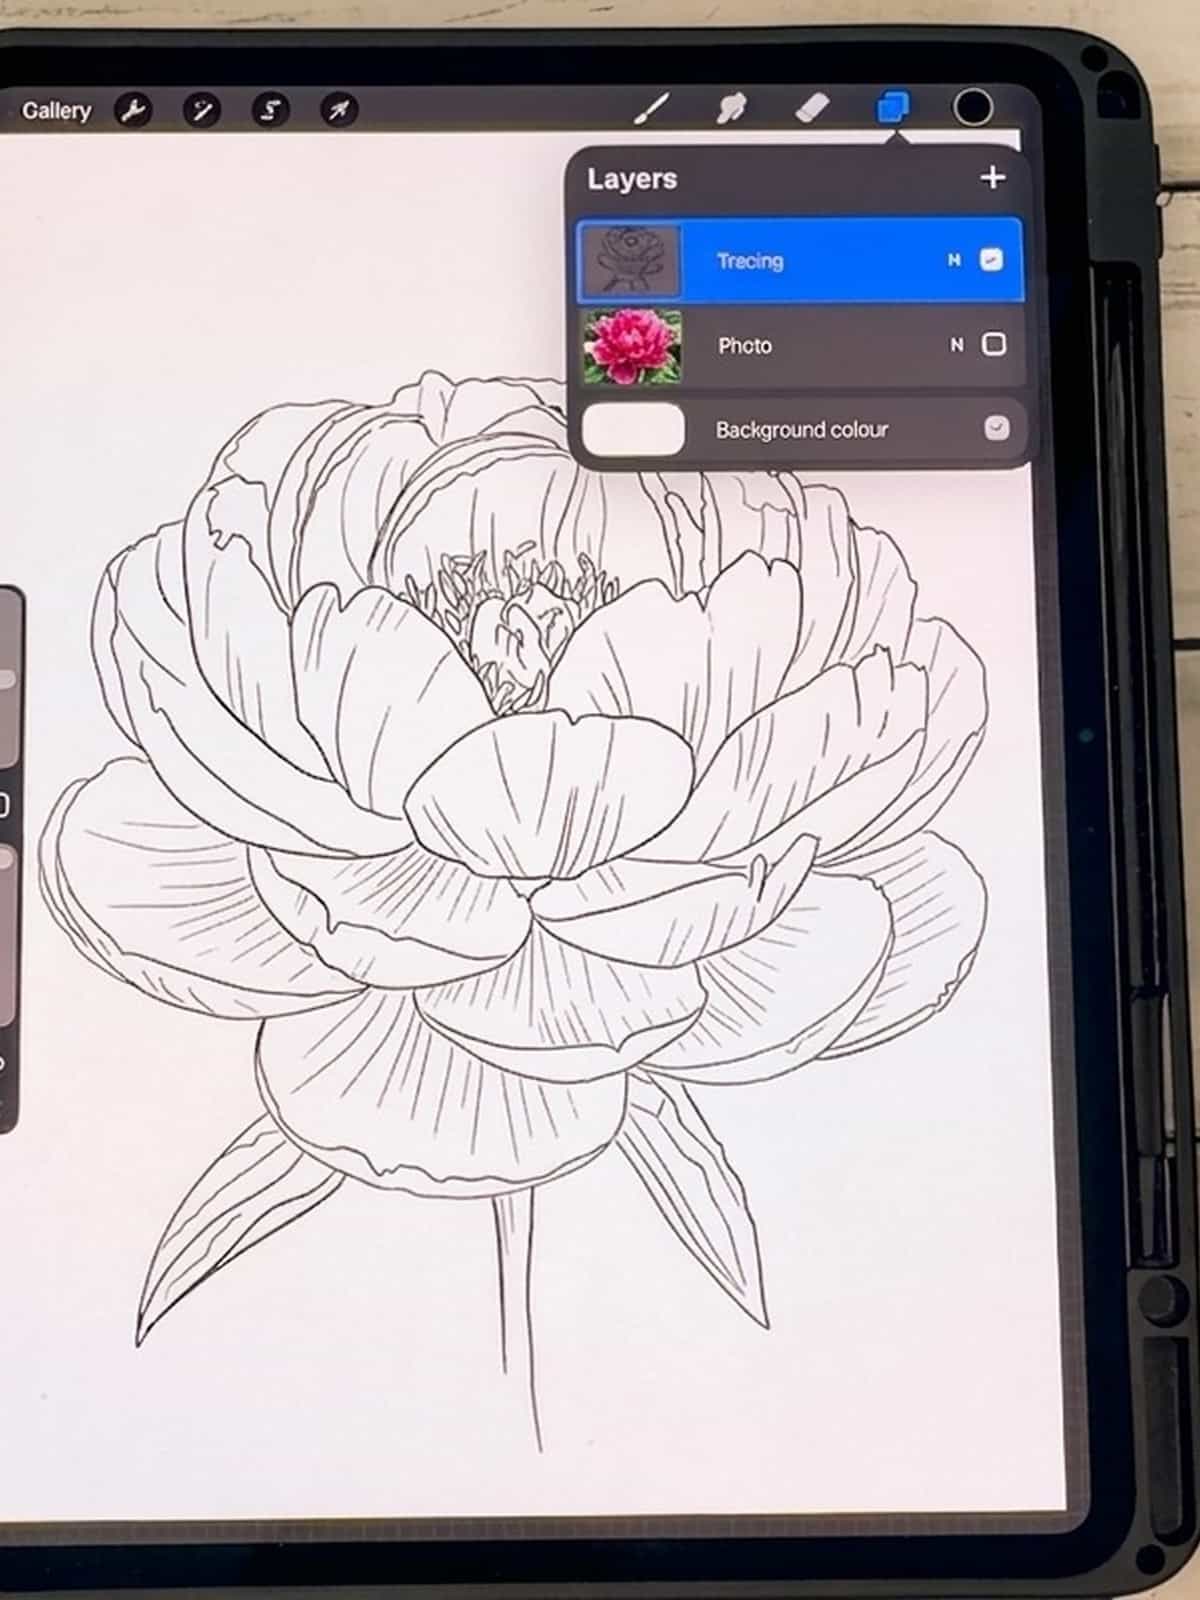
Step 7: Check Your Lineart Without the Photo (5:18 in the video)
Quick Answer: Once you’ve traced the main structure, tap the checkmark next to the Photo layer in the Layers panel to hide it. Now you can see your lineart on its own — this is the moment of truth.
Every few minutes while you’re tracing, hide the photo layer and have a look at just your lines on a blank canvas. This is the single best habit for improving your tracing.
When you can only see your lines:
- You’ll spot gaps that need closing
- You’ll notice lines that are too heavy or too light
- You’ll see which areas still need more detail and which are already working
Tap the checkmark next to”Photo” in the Layers panel to toggle visibility. Tap it again to bring the photo back when you want to keep going.
Pro tip: Rotate your screen for steadier lines. If a curve feels awkward because of the angle, rotate the whole canvas with a two-finger twist so the line goes in a direction your hand naturally wants to move. Tracing left-to-right if you’re right-handed feels much steadier than top-to-bottom.
Closed Shapes vs Open Shapes (The Colouring-Later Trick)
Here’s something I only figured out after years of Procreate work: the way you close your shapes determines whether you’ll be able to easily colour them later.
- 🔒 Closed shapes = lines that fully meet at every edge, with no gaps. Great for using ColorDrop (Procreate’s paint bucket) to fill areas with flat colour instantly.
- 🌿 Open shapes = lines that leave gaps or end in little flicks. Better for a loose, sketchy style where you don’t plan to colour in the flat fills.
If you know you want to paint this peony later (on a new layer, of course), leave every petal as a closed shape — make sure those outlines meet. If you want that airy sketchbook feel, a few open shapes here and there add lightness.
For a peony specifically, I recommend closed shapes on the main petals and open shapes on the leaves and centre details. Best of both worlds.
The Finished Lineart (7:12 in the video)
When you’re done, your finished peony should look like a clean, confident stylised flower — not a photocopy of the photo. The structure is all there, but the tiny details you’ve skipped give it that hand-drawn, artistic feel.
From here, you’ve got options:
- Export as PNG with a transparent background → use it in your watercolour templates, junk journal kits, or print it as lineart
- Colour it digitally on a new layer under the tracing layer (use ColorDrop if your shapes are closed)
- Print it out and watercolour it on real paper — this is my favourite!
- Turn it into a repeat motif → duplicate, scale, rotate, and you’ve got a beautiful pattern

🛍️ Love Procreate? Check Out My Shop
If you want even more Procreate goodies, head over to my Payhip shop — I’ve got Procreate stamp packs, flower brushes, colour palettes, and more. Or join my Patreon for fresh Procreate drops every week.
FAQ
Is tracing in Procreate cheating?
No. Tracing is a recognised training method used by illustrators, animators, and fine artists for centuries. It teaches your hand the shapes and proportions of your subject, which speeds up your freehand drawing progress. The only caveat: never sell or publish traced work as”original illustration” of someone else’s copyrighted photo — always use reference photos you own, have licence for, or that are in the public domain.
What’s the best Procreate brush for tracing?
The Technical Pen (Procreate Classic library → Inking) is my top pick for crisp, consistent lineart. Set Streamline to 60% and Stabilization to 50% for the smoothest lines. Other solid options: Studio Pen (same library) for slightly softer edges, and Monoline (under Calligraphy) if you want a super-uniform mechanical feel.
Can I trace any photo or are there copyright rules?
Always use photos you own, photos you have explicit licence to use, or photos in the public domain / Creative Commons Zero. Tracing a random photo off the internet and publishing the result can be a copyright issue. Safe sources: your own photos, Unsplash/Pexels (always check each photo’s licence), and the reference photo included in my free Peony Procreate Tracing Pack above — you can use that one freely for personal projects.
How do I reduce the opacity of a photo in Procreate?
Tap the Layers panel icon (top right — two stacked squares), then tap the”N” next to your photo layer. A small opacity slider will appear — drag it left to reduce. Around 50% works perfectly for tracing.
Why does my tracing look stiff or lifeless?
Almost always it’s because you traced too much detail. Trace the structure, not the detail — leave out tiny crinkles, subtle shadows, and every single vein. The moment you start skipping detail, your drawings will look more artistic and less like photocopies.
Which iPad is best for Procreate beginners?
Honestly, any iPad that supports an Apple Pencil is fine for Procreate. The iPad (10th gen) is the most affordable entry point, the iPad Air hits a sweet spot for most creatives, and the iPad Pro is overkill unless you’re doing huge canvases or animation. You do NOT need the top-of-the-range iPad to trace flowers.
Final Thoughts
Tracing a photo in Procreate isn’t a shortcut — it’s one of the best ways to build confidence with digital lineart. Do it three or four times and you’ll notice your freehand drawings start to improve too, because your hand has learned the shape language of whatever you’ve been tracing.
Grab the free Peony Procreate Tracing Pack above, open it on your iPad, and have a go. Then come back and tell me how it went — I love seeing what everyone makes with these tutorials.
Want to see these techniques in action? Head over to my YouTube channel where I share step-by-step Procreate and watercolour tutorials every week. Hit subscribe so you don’t miss the next one!
Let’s Be Creative Friends
- 💌 Get new tutorials delivered to your inbox — sign up on my blog
- 📌 Find more on Pinterest @artsydee
- 🎬 Subscribe to my YouTube channel for weekly tutorials
You Might Also Like
- Easy Watercolor Sketchbook Ideas
- 100 Sketchbook Prompts
- Simple Watercolor Ideas for Beginners
- Loose Watercolor Flowers — the perfect follow-up if you want to paint your traced peony
- Mushroom Drawing
📌 Pin this for later!