Last Updated on July 12, 2026 by Dee
There’s something almost magical about drawing a flower. You start with a few wobbly lines, add some petals, and suddenly the page feels alive. If you’ve ever wanted to learn how to draw flowers step by step but felt intimidated by all those overlapping petals and delicate stems, I promise it’s way more approachable than it looks.
Flowers are one of the most forgiving subjects you can sketch. Petals don’t need to be perfectly symmetrical. Stems can curve however they like. And honestly? The slight imperfections are what make a hand-drawn flower feel charming rather than clinical. Nature isn’t symmetrical either, so your sketch is already more realistic than you think.
In this post, I’m walking you through easy step-by-step tutorials for seven different flowers — from classic roses and daisies to lavender stems and a full wildflower bouquet. Each one breaks down into simple shapes that anyone can follow, even if you haven’t picked up a pencil since school.
I’ve put together a free set of Flower Drawing Step-by-Step Templates for you — plus my Botanical Sketch Reference Cards as a little bonus. Just pop your email into the box below and I’ll send them straight to your inbox.
Table of Contents
Free Flower Drawing Step-by-Step Templates
These printable templates break each flower into numbered steps so you can follow along at your own pace. Print them out, keep them next to your sketchbook, and trace or copy each stage until the shapes feel natural. Templates for roses, daisies, tulips, sunflowers, and more — perfect for building confidence one petal at a time.
👉 Pop your email into the box near the top of this post and I’ll send these templates (plus the bonus reference cards) straight to your inbox — free!
Want Weekly Drawing Resources?
If you love these free printables, you’ll absolutely love my Patreon. Every week I share new drawing resources — sketch templates, reference cards, step-by-step tutorials, and creative prompts. You get instant access to a growing library of creative resources the moment you join.
It’s the best way to keep your sketchbook practice fresh with new inspiration every single week. Join me on Patreon here →
Why Flowers Are Perfect for Learning to Draw
Quick Answer: Flowers are ideal drawing subjects for beginners because they’re built from simple, repeating shapes — circles, ovals, and curved lines — and slight imperfections actually make them look more natural and beautiful.
When you’re learning to draw, the biggest enemy isn’t lack of talent — it’s the fear of getting it wrong. Flowers knock that fear right out. A petal that’s slightly too big? That’s a more expressive bloom. A stem that wobbles? It looks organic. Unlike faces or buildings where proportions really matter, flowers give you room to breathe.
Most flowers break down into circles, ovals, and simple curves. A rose is a spiral with petals fanning out. A daisy is a circle surrounded by elongated ovals. Once you see the basic geometry, everything clicks. If you enjoy foundational exercises, my sketch ideas for beginners post has a whole collection of approachable subjects.
There’s also something genuinely calming about drawing flowers. The repetitive motion of sketching petals slows your brain down in the best way. It’s meditative. And when you’re done, you’ve got something lovely to show for it.
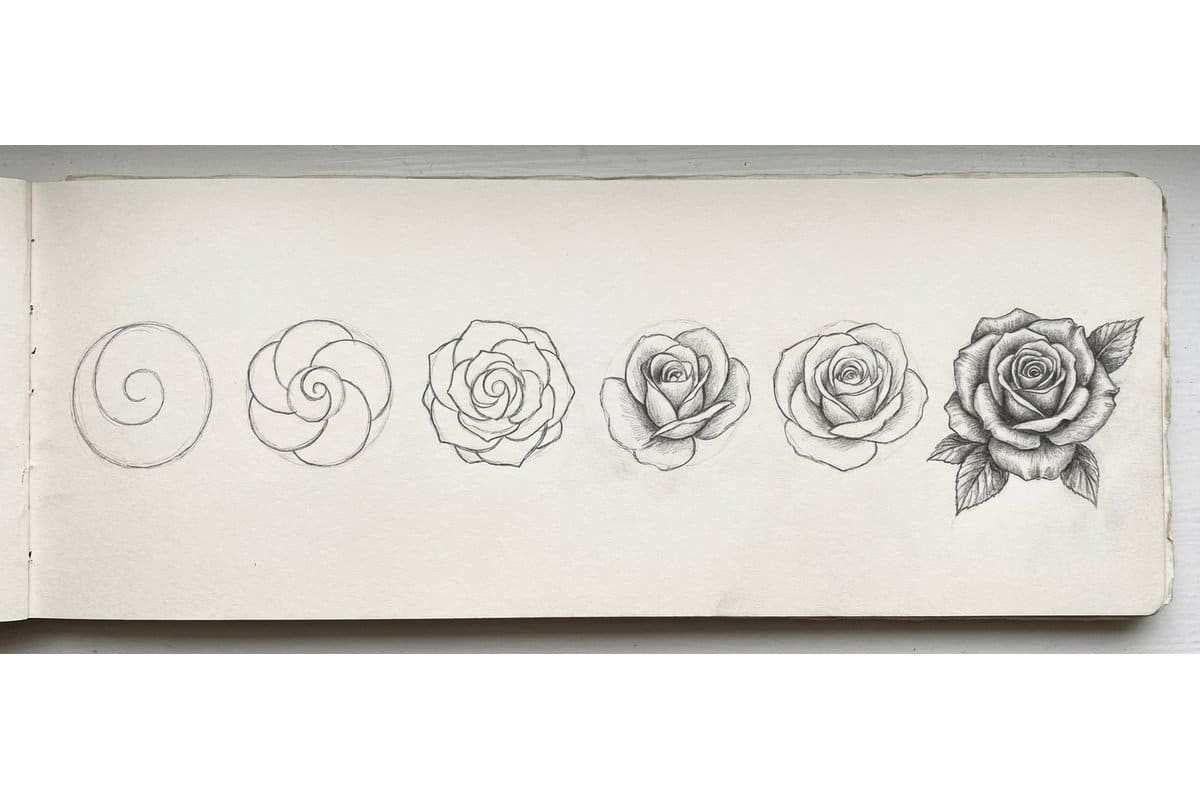
How to Draw a Rose (Simple Circle Method)
Quick Answer: Start with a small spiral in the centre, then build outward with curved petal shapes that get larger as they radiate from the core. The circle method uses a light guide circle to keep your proportions balanced.
Roses look complicated, but they’re really just layers. Here’s how to draw flowers step by step using the circle method.
Step 1: Draw a light circle as your size guide — keep it loose, you’ll erase it later. Step 2: In the centre, draw a small, tight spiral. This is the heart of the rose. Step 3: Around the spiral, add U-shaped curves that partially overlap, getting bigger as you work outward. Step 4: At the edge of your guide circle, add larger petals that curl back at the tips. Step 5: Add a stem and a couple of leaves with pointed oval shapes. Erase the guide circle, and you’ve got yourself a rose.
A good Staedtler graphite pencil set makes layered drawing much easier — use a harder pencil (2H) for guide circles and a softer one (2B or 4B) for final lines. For more floral projects, check out my loose watercolor flowers tutorial.
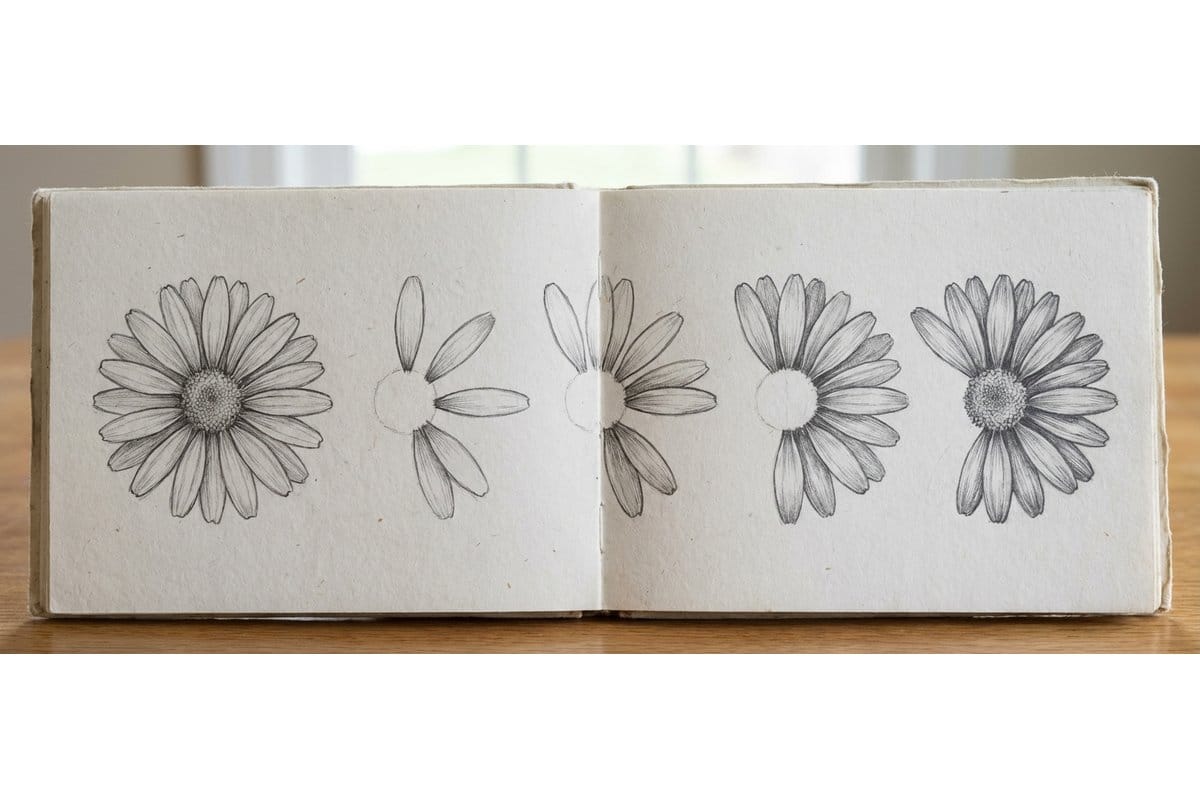
Easy Daisy Drawing Tutorial
Quick Answer: Draw a small circle for the centre, then add elongated oval petals radiating outward like rays of sunshine. Daisies are one of the simplest flowers to sketch and look great even with uneven petals.
If roses feel like a stretch right now, start with daisies. They’re the friendliest flower to draw — just a happy circle surrounded by petals.
Step 1: Draw a small circle for the centre. Step 2: Add elongated petals radiating outward, slightly rounded at the tips and narrower where they meet the centre. Step 3: Work your way around, spacing petals fairly evenly. Don’t stress about perfection — real daisies aren’t symmetrical either. Step 4: Add a curved stem and two or three leaves with slightly serrated edges.
Want to fill an entire sketchbook page with these? My 100 sketchbook prompts post has loads of ideas for turning simple subjects like daisies into full creative sessions.
Drawing Tulips Step by Step
Quick Answer: Tulips are drawn using a simple U-shape for the cup of the flower, then adding overlapping petals at the top. Their clean, elegant form makes them satisfying to sketch quickly.
Tulips have this gorgeous simplicity to them — just a cup shape on a long stem. They’re perfect for practising smooth, confident lines because there aren’t many of them. Every mark counts, which actually teaches you a lot about intention in your drawing.
Step 1: Draw a U-shape, slightly narrower at the bottom. Step 2: At the top, add two curved lines meeting in gentle points — these front petals should overlap slightly, creating that classic tulip silhouette. Step 3: Behind the front petals, add one or two more petal tips peeking out for depth. Step 4: Draw a straight, sturdy stem and one or two large pointed leaves that wrap partway around it.
Tulips look especially stunning in a row — try drawing three or five at slightly different heights for a simple but striking composition. If you’d like to take these into paint, my easy watercolor flowers tutorial walks through a beautiful loose tulip painting technique.
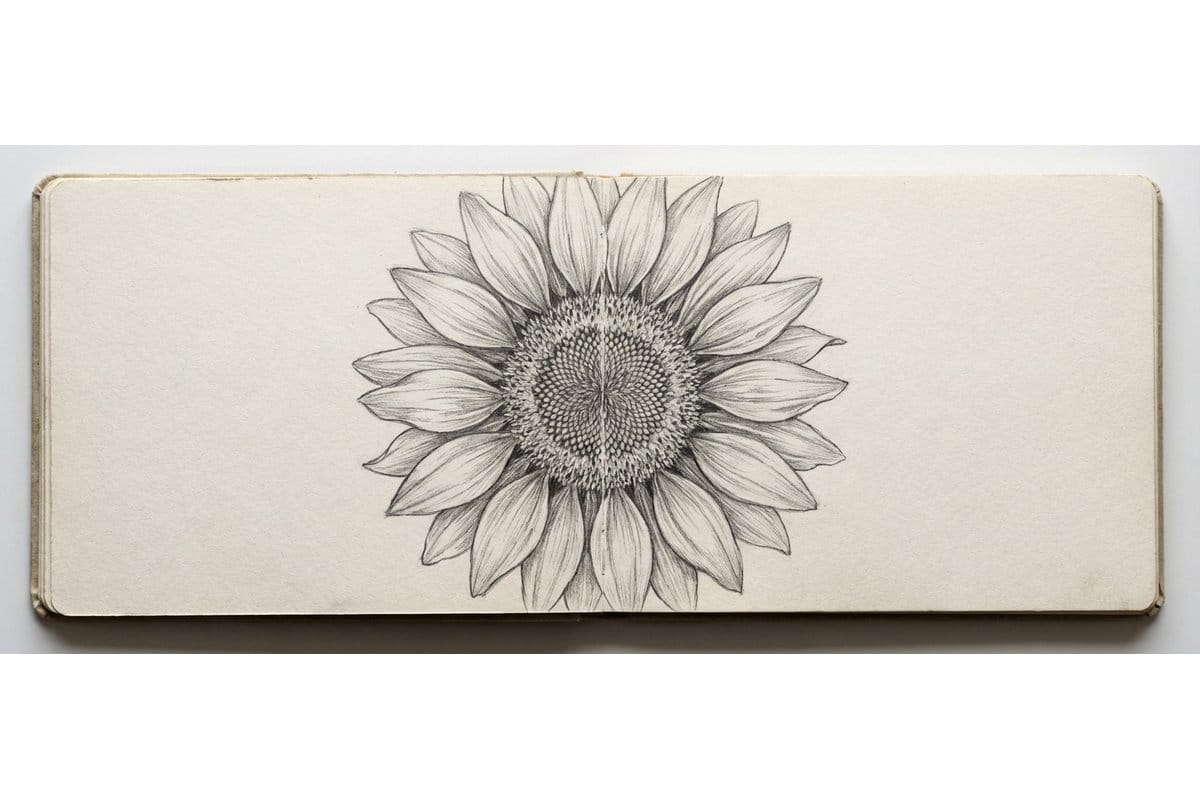
How to Sketch a Sunflower
Quick Answer: Sunflowers use the same daisy technique but with a much larger centre circle and shorter, more densely packed petals. Adding a crosshatch pattern inside the centre gives them that iconic seed-head texture.
Sunflowers are big, bold, and satisfying to draw. The secret is making the centre much larger than you’d expect — the seed head takes up a good third of the whole flower face.
Step 1: Draw a large circle for the seed head — about a third of your finished sunflower size. Step 2: Add a slightly larger circle around it for the inner petal ring. Step 3: Draw longer, pointed outer petals radiating outward. Layer a second row between the first for fullness. Step 4: Fill the centre with a crosshatch or spiral pattern — even a loose grid captures that seed texture beautifully. Step 5: Add a thick stem and broad, heart-shaped leaves with visible veins.
For detailed centre patterns, I recommend a Sakura Pigma Micron pen set — fine tips for intricate detail without smudging, and they layer beautifully over pencil guides.
Lavender Stems (Simple Linear Drawing)
Quick Answer: Lavender is drawn with a single curved stem line topped with small, stacked oval buds. It’s one of the easiest and most elegant flowers to sketch and looks gorgeous in groups.
Lavender is possibly the most beginner-friendly flower you can draw. It’s a curved line with little ovals clustered at the top. And because lavender grows in bunches, you can fill an entire page with stems and it looks gorgeous.
Step 1: Draw a long, slightly curved line with a gentle lean. Step 2: At the top third, add tiny ovals in pairs on either side, working upward. Each pair should sit slightly closer together, creating a tapered bud shape. Step 3: At the tip, add a few single buds coming to a point. Step 4: Add two or three thin, narrow leaves low on the stem.
Draw five to seven stems at different heights and angles, and you’ve got a beautiful lavender bunch. This makes a lovely addition to a beginner sketchbook practice — you can finish a whole page in under ten minutes.
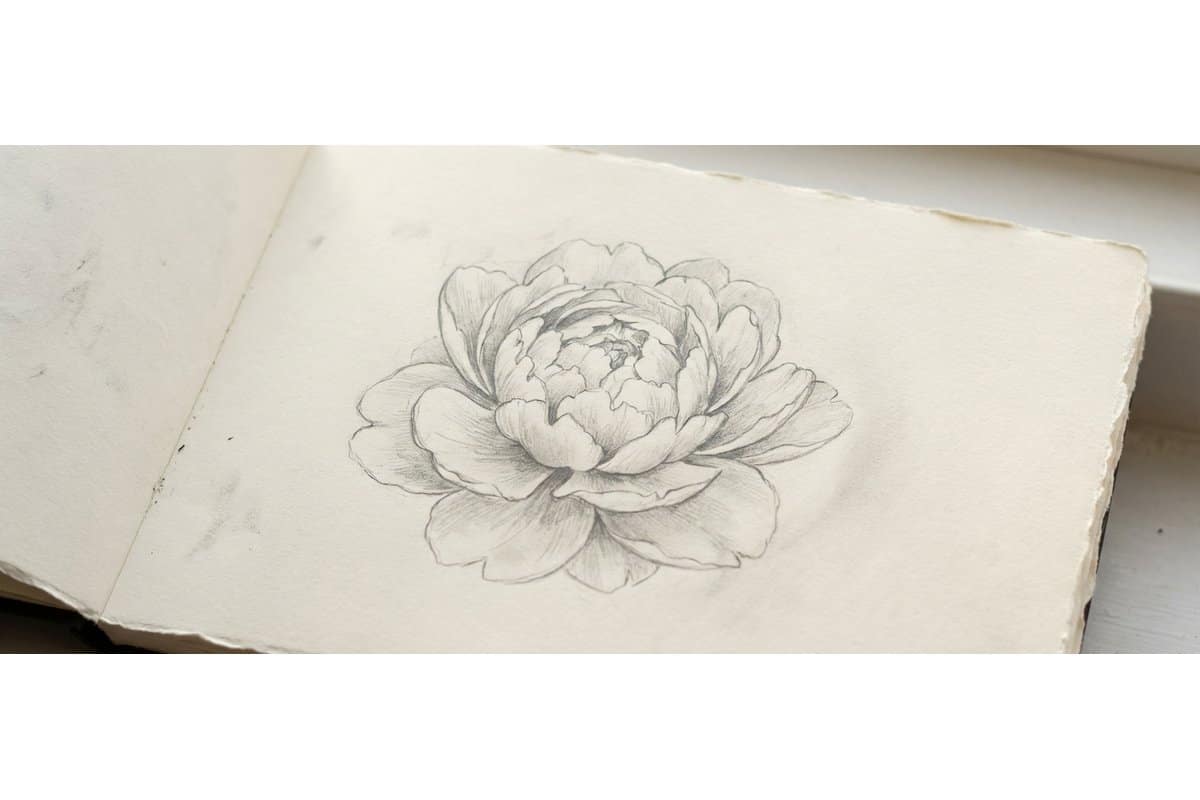
Peony Sketch: Layered Petals Made Easy
Quick Answer: Peonies are drawn starting from a small centre cluster and building outward with ruffled, overlapping petals. The key is keeping the inner petals tight and the outer petals loose and open.
Peonies look intimidating because of all those petals — but here’s the thing: the chaos IS the peony. You’re not aiming for perfection. You’re capturing that lush, ruffled feeling. The messier you go, the better it looks.
Step 1: Draw a small, tight cluster of rounded shapes in the centre — these are the innermost petals. Step 2: Around the cluster, add medium petals with wavy edges. Let them overlap generously. Step 3: For the outer ring, draw larger petals with ruffled, uneven edges — some curling back, some folding over each other. Step 4: Add a short stem and broad leaves with a divided, three-lobed shape.
If you’d like to see peonies in a looser, painterly style, my loose watercolor flowers post shows how those same ruffled petals translate beautifully into wet-on-wet technique. The pencil version here is a great warm-up before picking up a brush.
Creating a Wildflower Bouquet Sketch
Quick Answer: A wildflower bouquet combines several simple flower types at different heights and angles, held together with a loose stem bundle. Start with the largest flowers and fill gaps with smaller blooms and foliage.
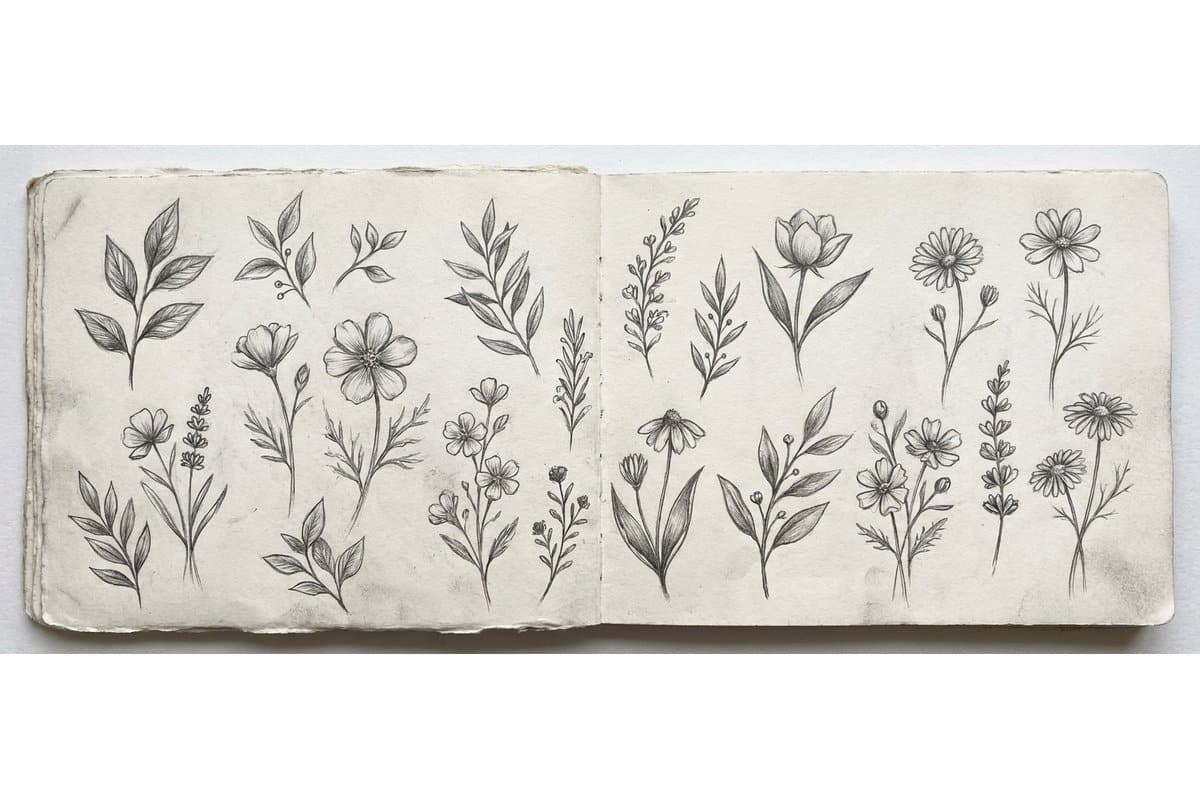
Now that you’ve practised individual flowers, it’s time to bring them together. A wildflower bouquet sketch is one of the most rewarding drawings you can do because it combines everything you’ve learned into a single, beautiful composition.
Step 1: Lightly sketch the overall shape — a loose triangle or dome, wider at the top, narrowing where stems gather. Step 2: Place your largest flowers first as the focal point, slightly off-centre. Step 3: Fill gaps with smaller flowers — lavender stems, tiny buds, and berry clusters. Step 4: Add greenery — different leaf shapes, fern fronds, and trailing stems for fullness. Step 5: Draw the stems gathering at the bottom, tied with ribbon or twine.
A Strathmore 400 Series Sketch Pad gives you enough space and tooth for all this layered detail. Want to paint your bouquet after sketching? My easy watercolor flowers tutorial shows you how.
My Favourite Drawing Supplies
You don’t need fancy gear to draw beautiful flowers, but the right supplies do make a difference. Here are the drawing tools I reach for most often — the ones I actually use, not just the ones that look good on a shelf.

| 
| 
|
This post contains affiliate links, which means I may earn a small commission at no extra cost to you if you make a purchase. I only recommend products I genuinely love and use myself!
Free Botanical Sketch Reference Cards
These reference cards sit next to your sketchbook while you draw. Each card covers a different botanical element — petal shapes, leaf types, stem structures, and flower anatomy — so you can check your proportions at a glance without opening a full tutorial.
👉 These reference cards come bundled free with the templates — just pop your email into the box near the top of the post and I’ll send everything straight to your inbox!
FAQ
What is the easiest flower to draw for beginners?
Daisies and lavender stems are the easiest flowers to draw if you’re just starting out. Daisies use simple circles and ovals, while lavender is essentially a curved line with tiny buds. Both look beautiful even with imperfect lines, which makes them brilliant confidence builders.
How do you draw realistic flowers step by step?
Start by observing the flower’s basic geometry — circles, ovals, and curved lines. Sketch guide shapes lightly, then build petals layer by layer. Pay attention to how petals overlap and change angle from centre to edge. Adding subtle shading where petals tuck behind each other takes a drawing from flat to realistic.
What pencils are best for drawing flowers?
A simple set ranging from 2H (for light guide lines) to 4B or 6B (for dark, expressive final lines) covers everything you need for flower sketching. An HB pencil works well for general drawing, and a kneaded eraser lets you lighten lines without damaging the paper.
How long does it take to learn to draw flowers?
You can draw a recognizable flower in your very first session — within 10-15 minutes of following a tutorial. Getting comfortable drawing from imagination takes a few weeks of regular practice, maybe a page or two each day. The more you draw, the more your hand remembers the shapes naturally.
Can I use these flower drawing tutorials for watercolor painting too?
Absolutely. These pencil tutorials teach shapes and structures that translate directly into watercolor, ink, or any medium. Many artists sketch lightly in pencil first and paint over the guide lines. My easy watercolor flowers tutorial walks you through the painting side.
Final Thoughts
Learning how to draw flowers step by step isn’t about creating textbook-perfect botanical illustrations. It’s about finding a subject that’s forgiving, beautiful, and endlessly varied — one you can return to again and again.
Start with whatever flower catches your eye. Draw it once, draw it again, then try another. Before long, you’ll have a whole garden growing across your sketchbook pages. And if you get stuck, those free templates and reference cards are right here waiting.
Pick up your pencil and draw one flower today. Just one. See what happens.
Let’s connect! Follow along for more drawing tutorials, creative inspiration, and free printables:
- Pinterest: pinterest.com/artsydee
- YouTube: youtube.com/@artsydee — Weekly art tutorials and creative walkthroughs!
You Might Also Like
- Sketch Ideas for Beginners
- 100 Sketchbook Prompts
- Loose Watercolor Flowers Tutorial
- Easy Watercolor Flowers Tutorial
Pin this for later!
