Last Updated on June 23, 2026 by Dee
Updated: April 2026
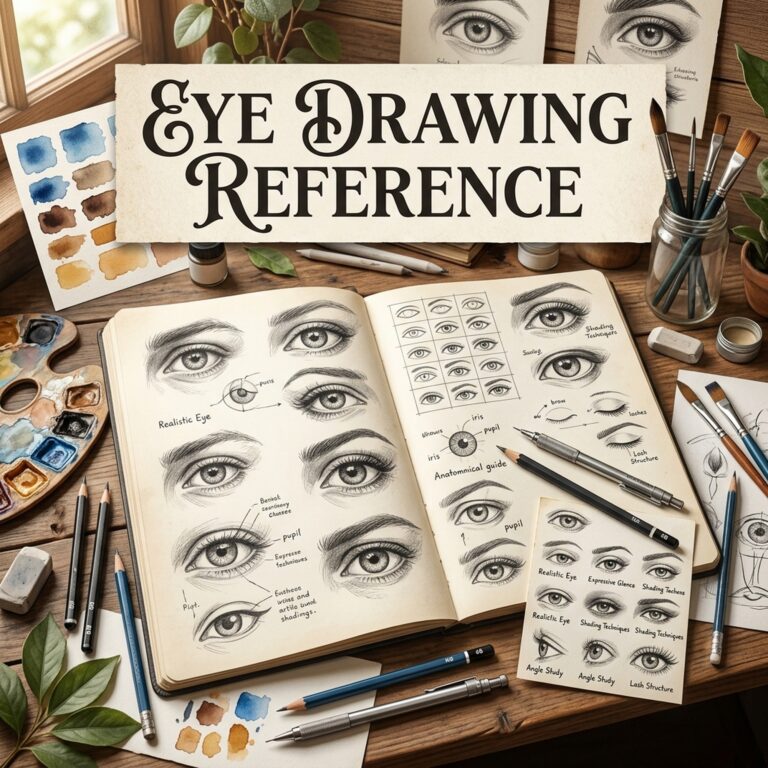
Eyes are the first thing we notice in any portrait. They carry so much emotion and personality — and getting them right can make or break a drawing.
The good news? Eyes follow predictable patterns. Once you understand the basic anatomy and can spot the differences between eye shapes, drawing them becomes genuinely enjoyable. It pairs beautifully with my hand drawing reference guide if you want to expand your portrait practice. It’s one of those subjects where a good reference sheet changes everything.
I’ve put together this collection of eye drawing references, anatomy guides, and free templates so you’ve got everything in one place. Whether you’re drawing your first pair of eyes or you want to push your portrait skills further, these references will help.
Get your FREE Eye Drawing Reference Guide Here 👇🏻
Why Eye Drawing References Matter
Even experienced portrait artists work from eye references. The human eye is deceptively complex — slight changes in the lid shape, pupil size, or lash direction completely change the expression. If you’re building a daily practice, try pairing a few eye sketches with the prompts in my easy sketchbook ideas. Working from reference isn’t cheating — it’s how professionals nail the details.
A good eye reference helps you:
- Understand the anatomy (iris, pupil, tear duct, lid crease)
- Capture realistic light reflections and depth
- Draw different eye shapes accurately
- Express emotion through subtle lid and brow changes
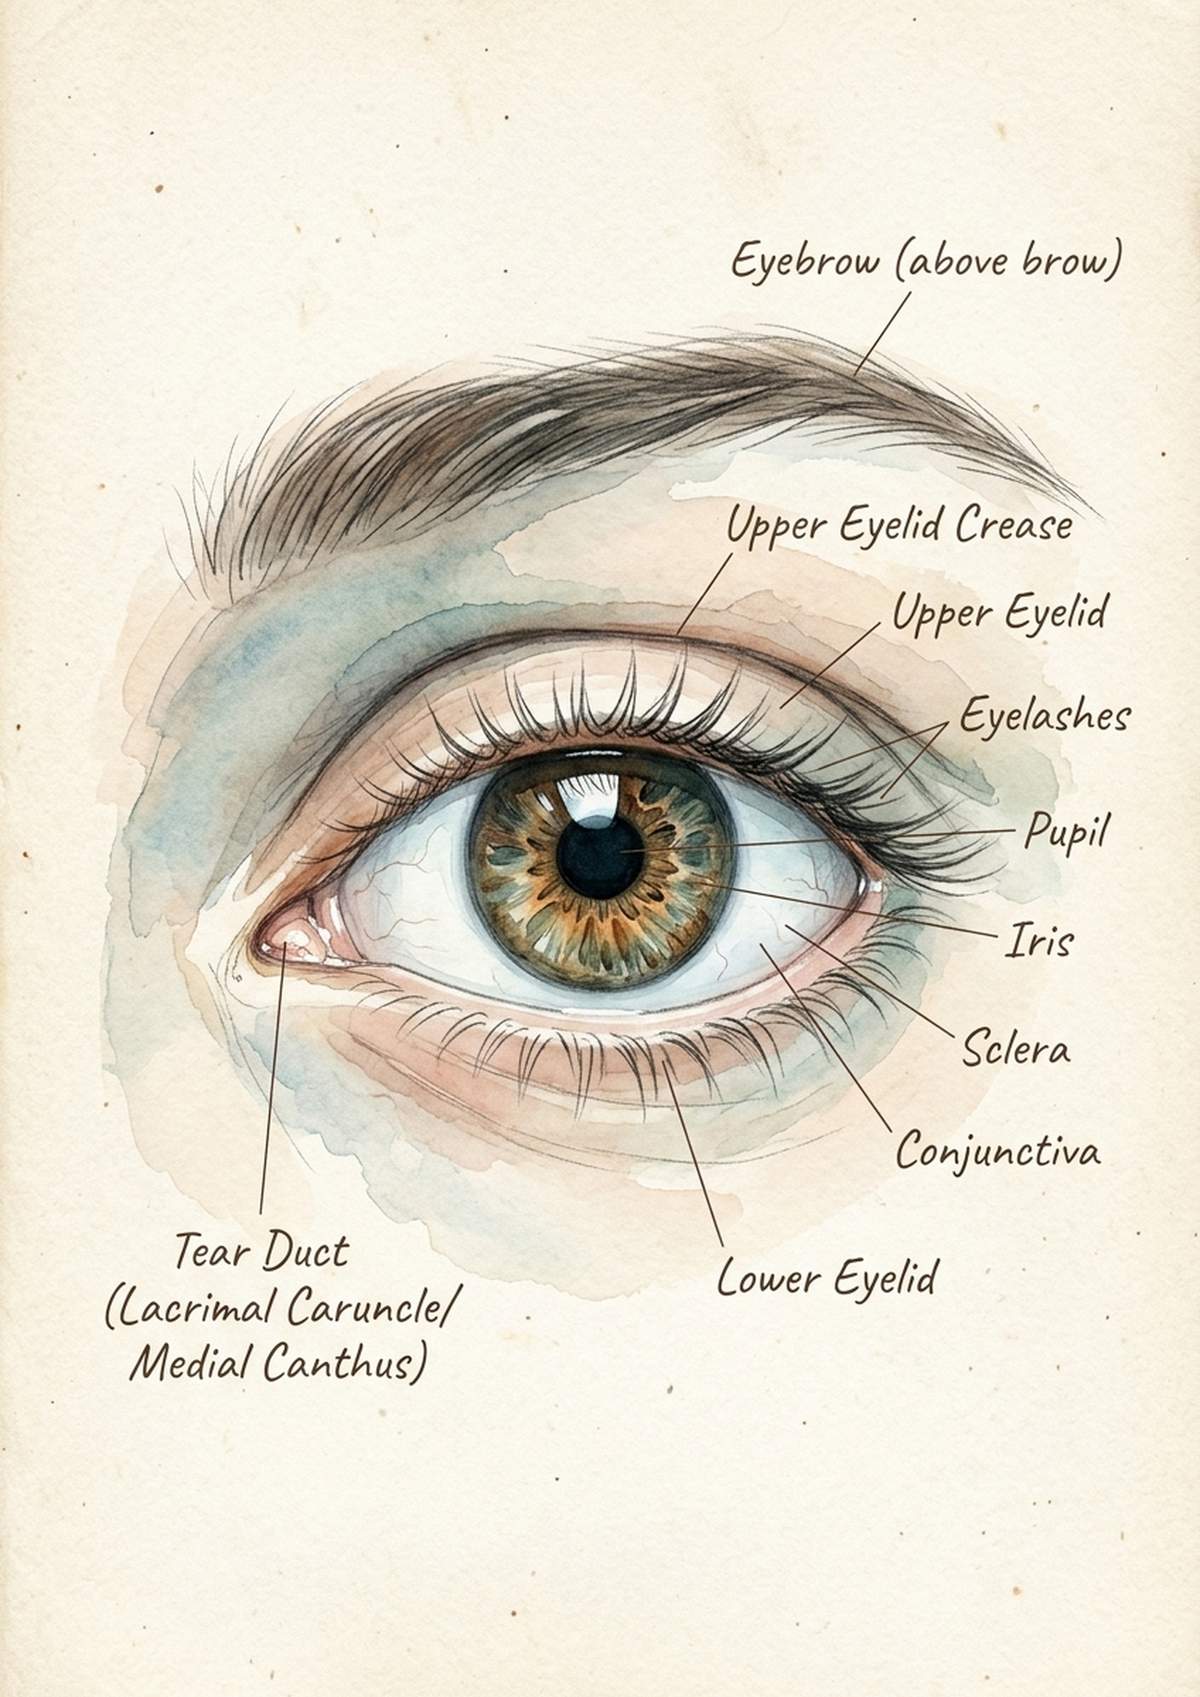
Eye Anatomy Basics for Artists
Before drawing any eye, it helps to know the key landmarks. You don’t need a biology degree — just these essentials:
- The eyeball is a sphere sitting in a socket — remember this when shading
- The iris is a circle (usually partly hidden by the upper lid)
- The pupil sits dead centre of the iris and changes size with light
- The upper lid has more curve and weight than the lower lid
- The tear duct (inner corner) is lower than the outer corner in most eyes
- Lashes grow outward from the lid edge — they fan, they don’t stick straight out
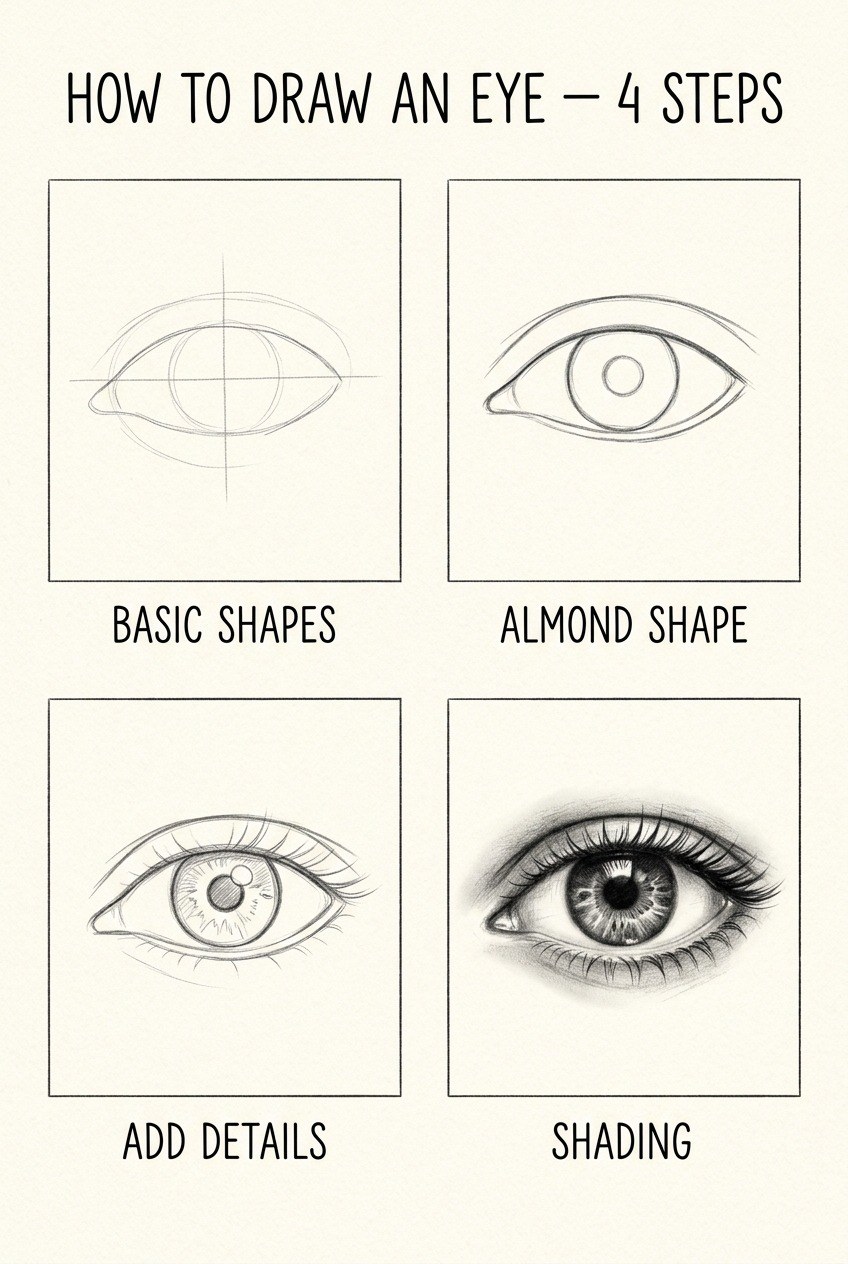
Once you can identify these landmarks, breaking down any eye becomes much more manageable. Start with the sphere, add the almond shape, position the iris, then refine. The same worked-example approach is in my how to draw flowers step by step tutorial.
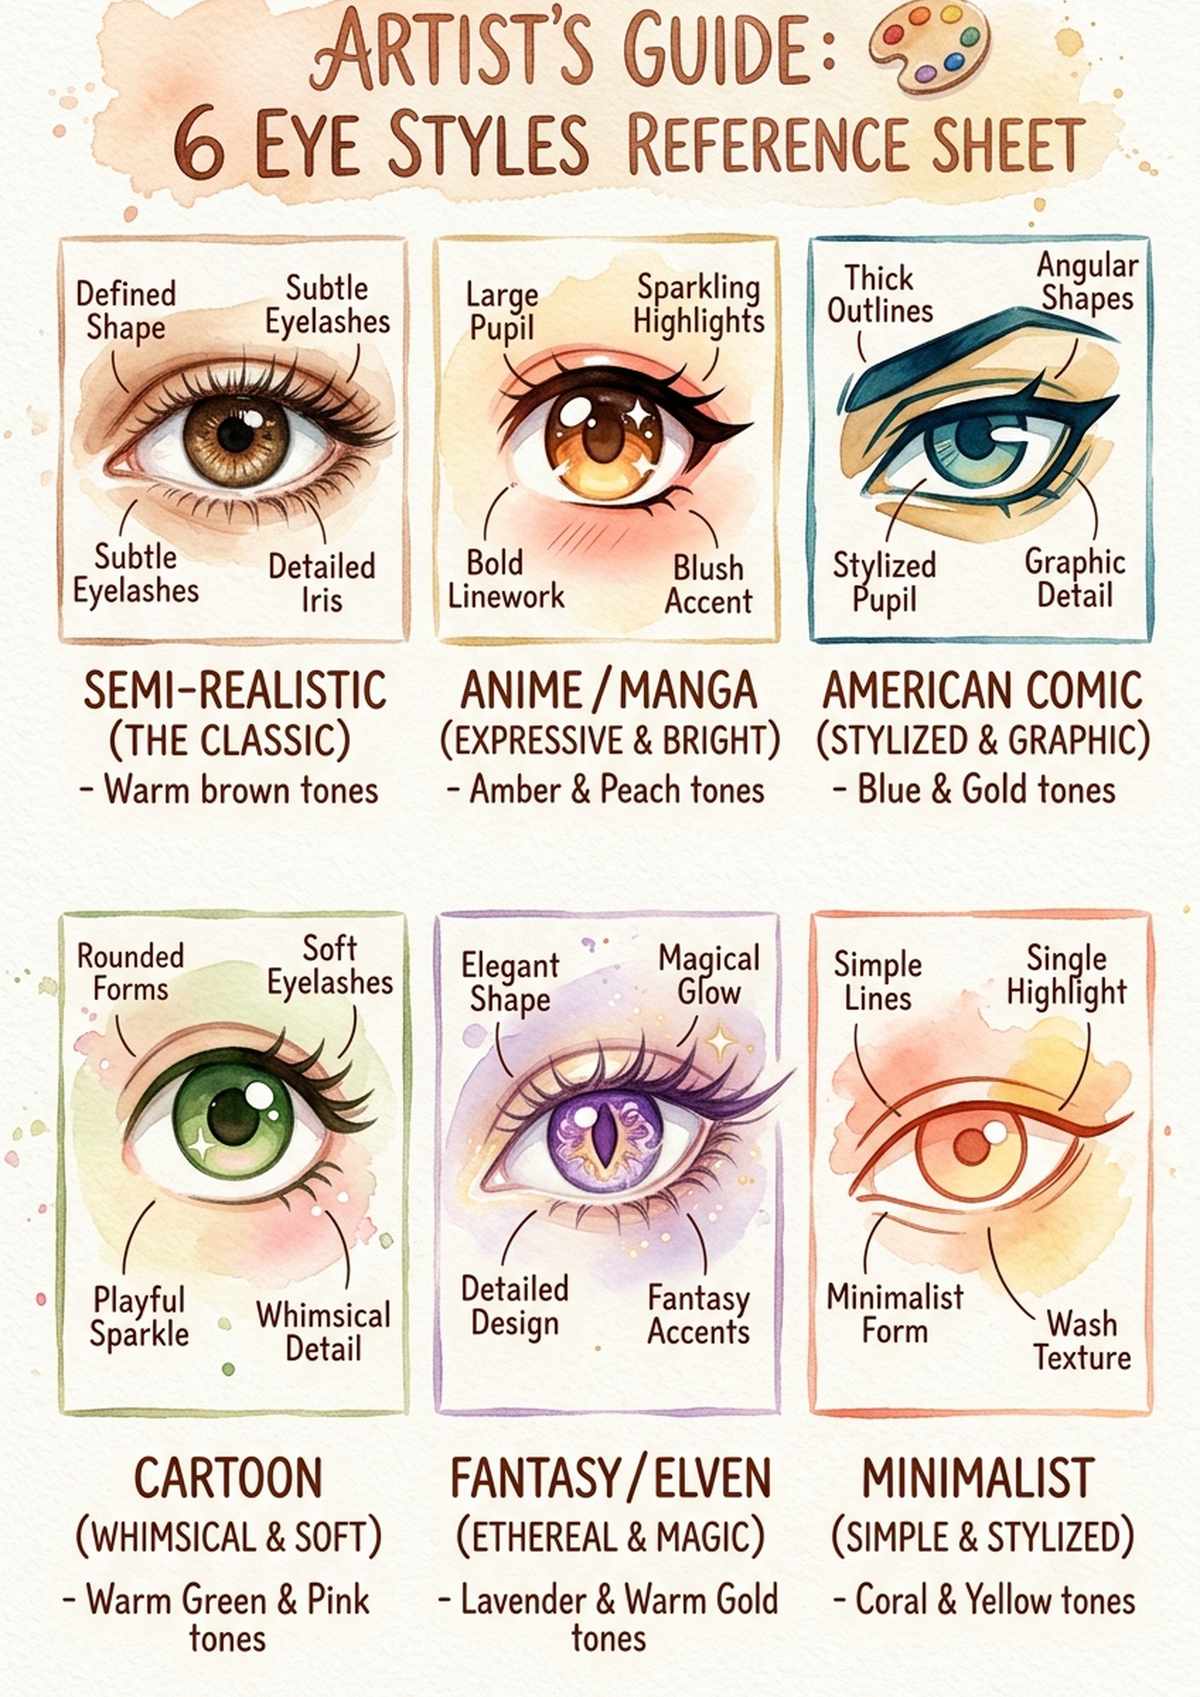
Easy Eye Styles to Start With
If you’re new to drawing eyes, start with these simpler approaches before tackling photorealistic detail (and if you’re new to realistic drawing in general, my easy drawing ideas for beginners is a gentler on-ramp):
- Basic front-facing eye — simple almond shape with circle iris. The foundation of everything.
- Closed eye — just a curved line with lashes. Deceptively useful for peaceful expressions.
- Side profile eye — triangle shape, good for understanding the depth of the socket.
- Anime style eye — large, simplified, great for loosening up and having fun.
- Eye pair — drawing both eyes together teaches you symmetry and spacing.
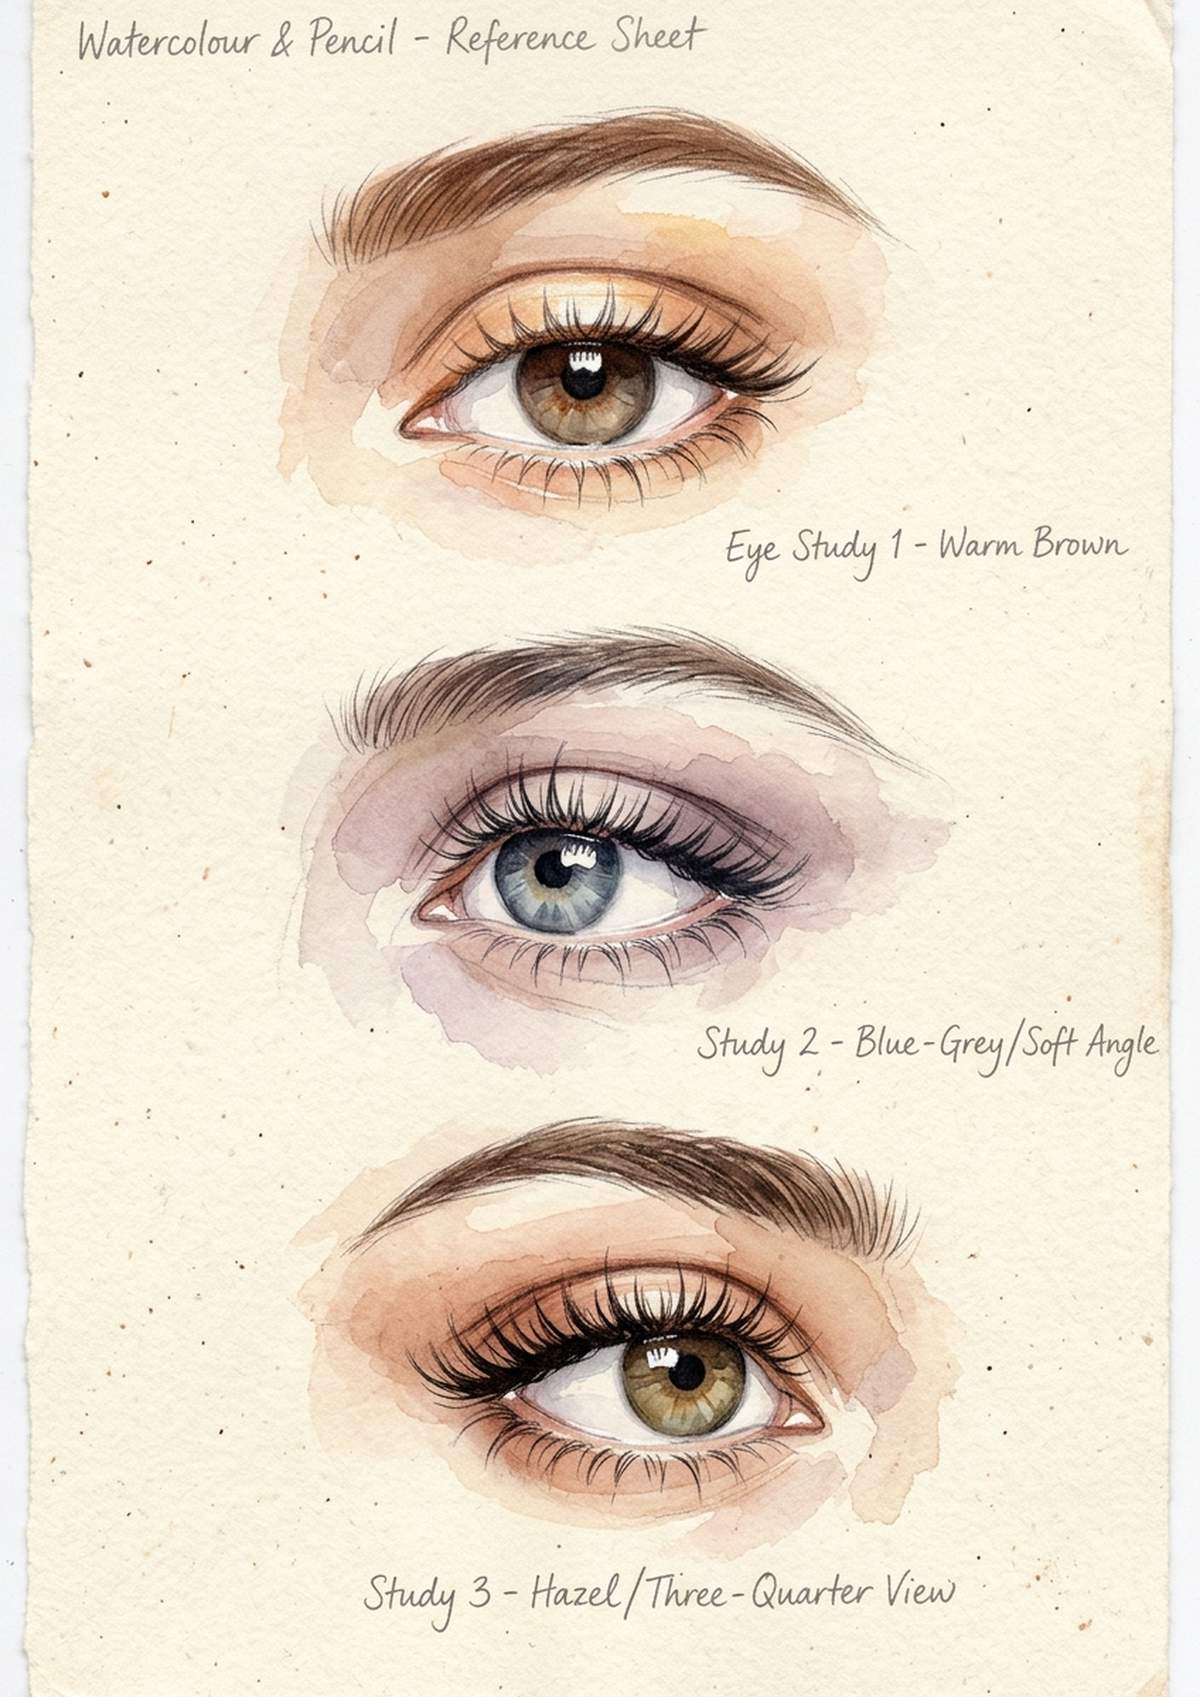
Female Eye References
Female eyes in art are often drawn with more emphasis on lashes and a slightly more open, expressive shape. The key differences to watch for:
- Longer, more defined eyelashes (especially upper)
- More defined eyebrow arch
- Slightly larger iris relative to the visible eye area
- Softer, more curved lid lines
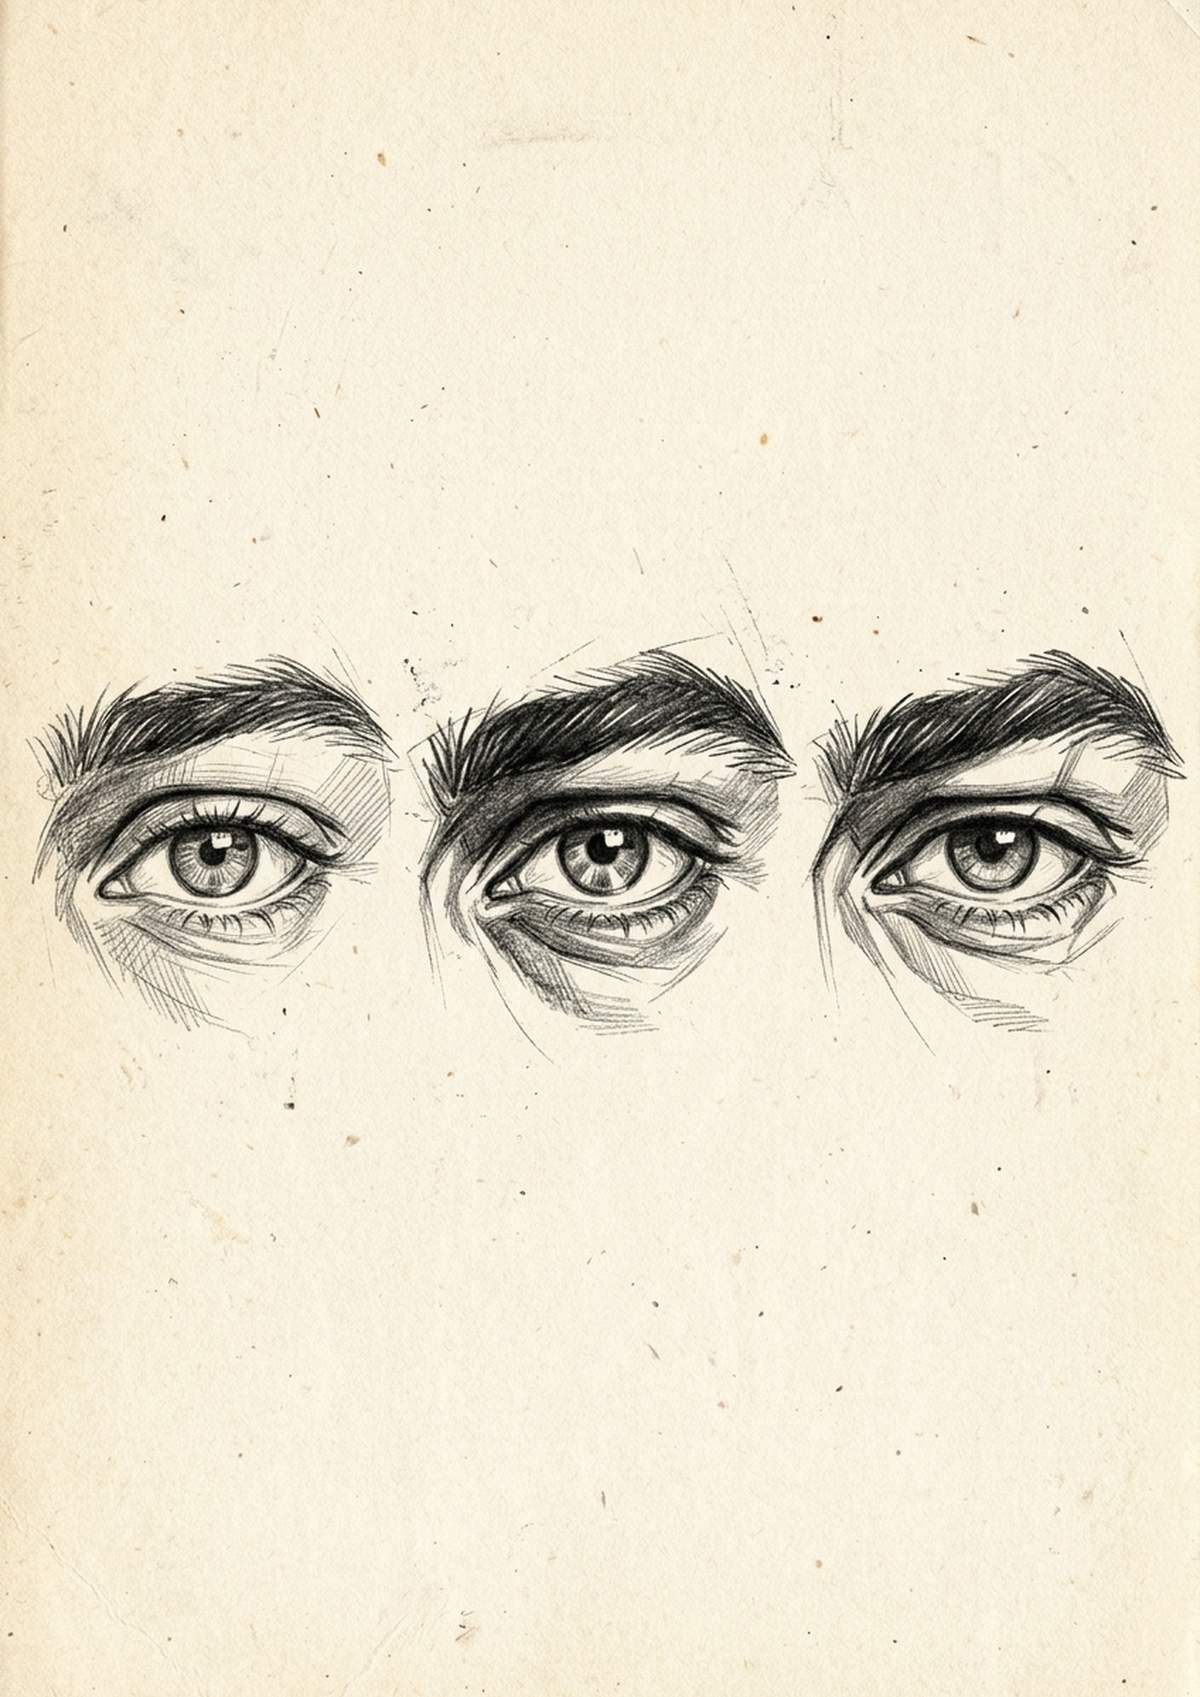
Male Eye References
Male eyes tend to have stronger brow presence and less lash emphasis. When drawing masculine eyes:
- Heavier, straighter brow line closer to the eye
- Less visible eyelash detail
- More angular lid shapes
- Deeper set appearance with more shadow under the brow
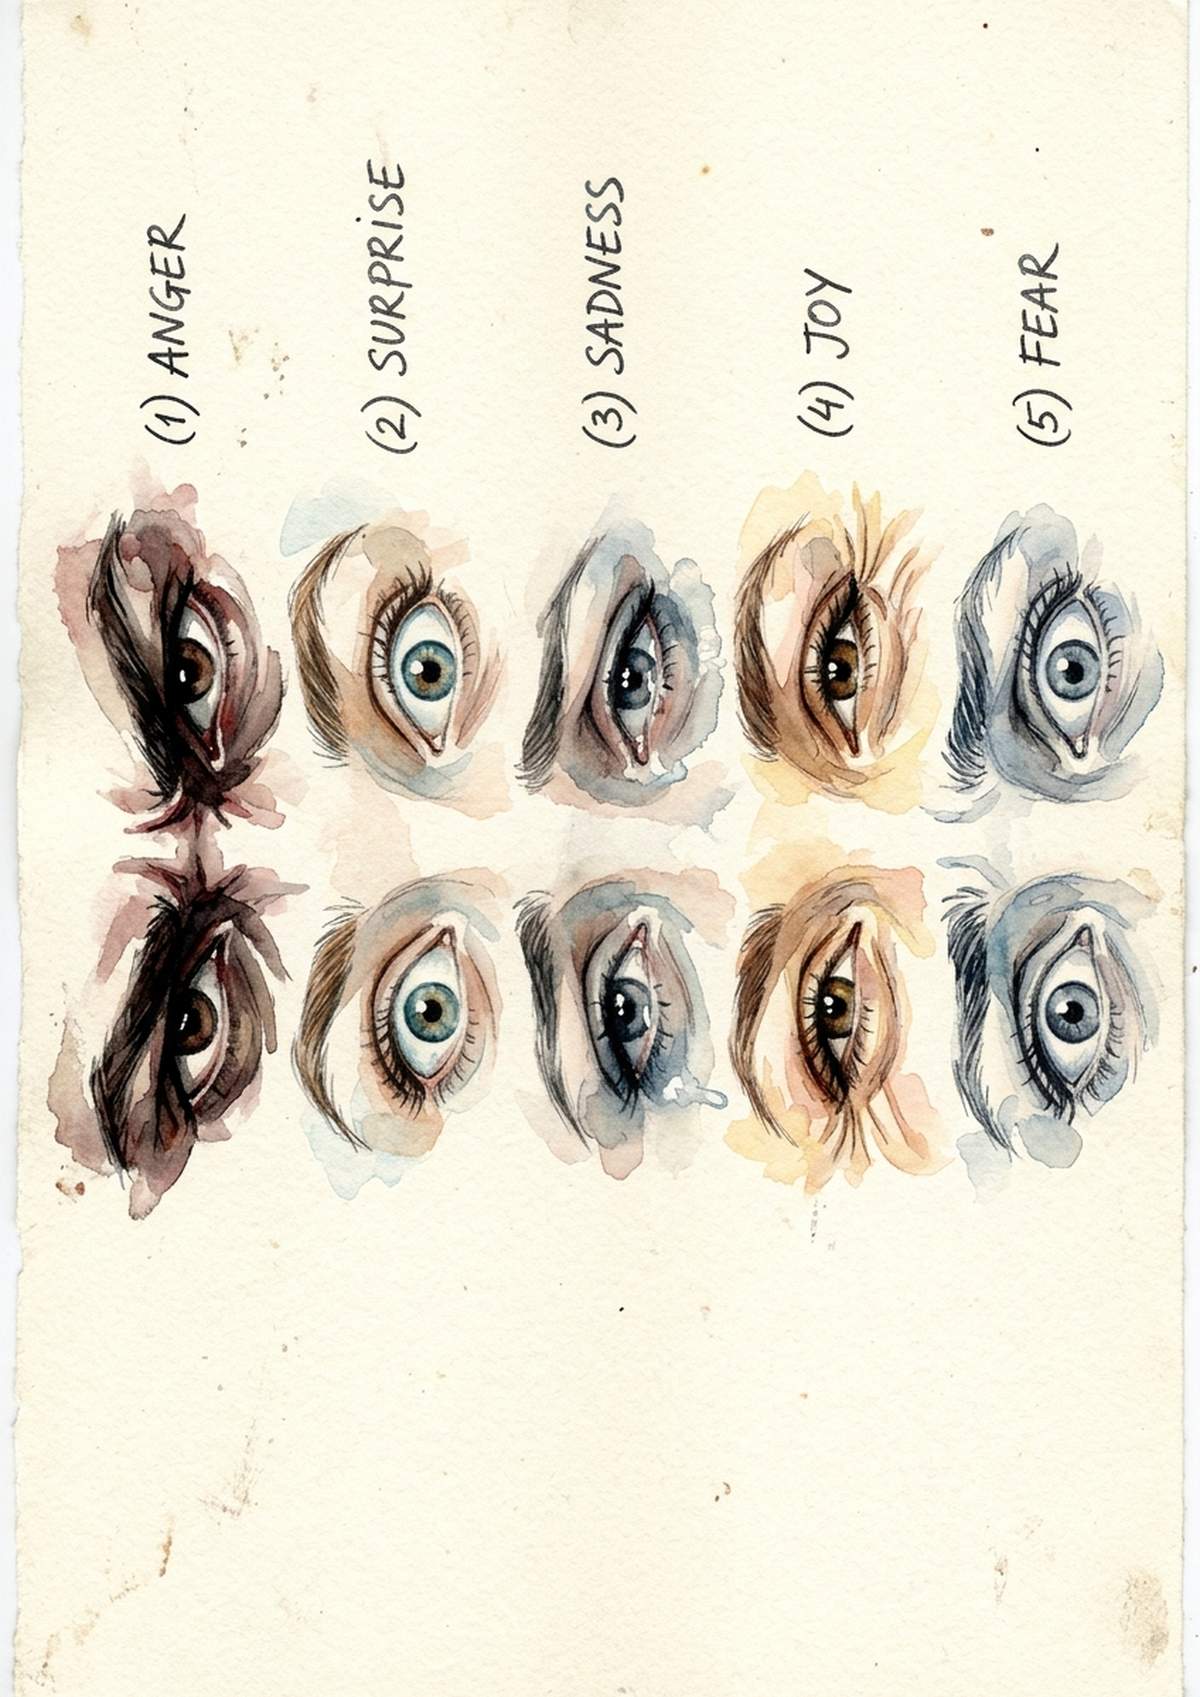
Eye Expressions and Emotions
Eyes are the emotional powerhouse of the face. A slight narrowing communicates suspicion. Wide-open lids signal fear or surprise. The key is in the relationship between the lid, the iris, and the brow — change one and the whole expression shifts.
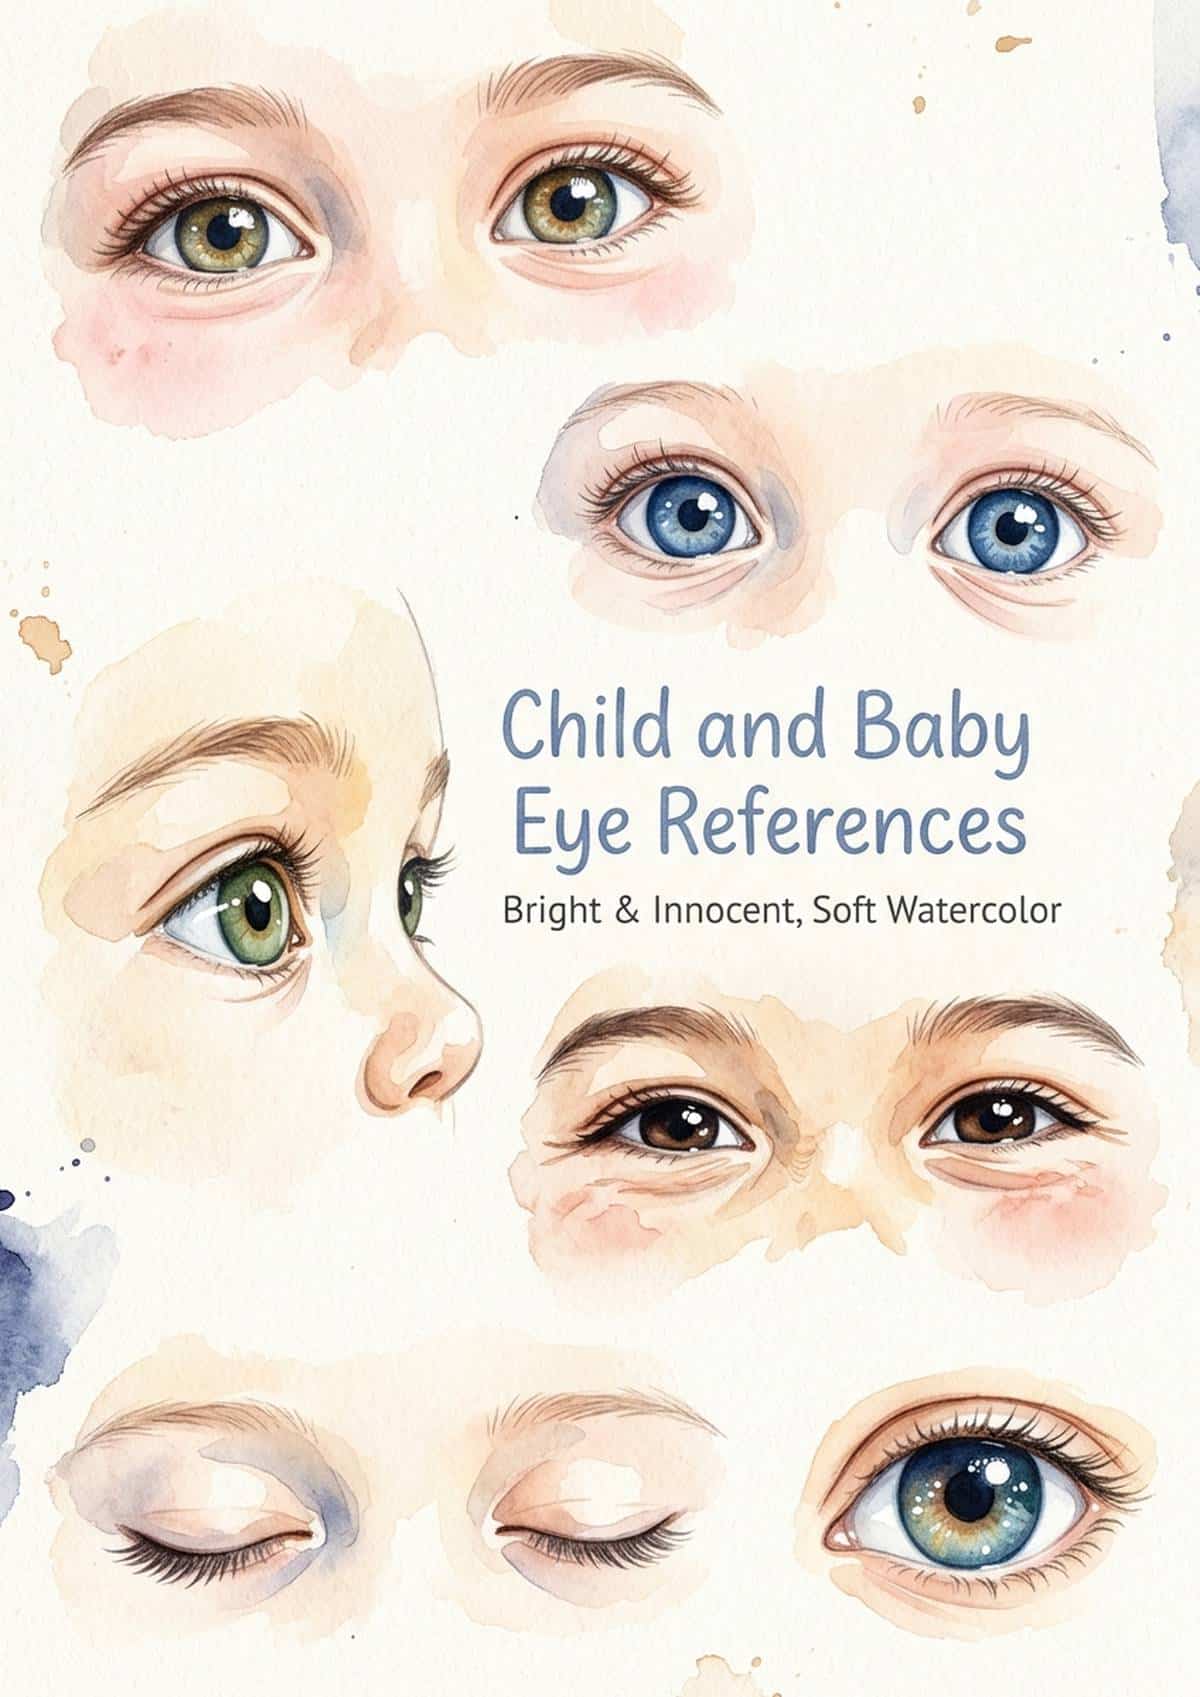
Drawing Children’s Eyes
Children’s eyes are proportionally much larger relative to their face. The iris takes up more of the visible eye area, giving that wide, innocent look. Lashes are softer, brows are lighter, and there’s less visible lid crease. Getting these proportions right instantly makes a face read as young.
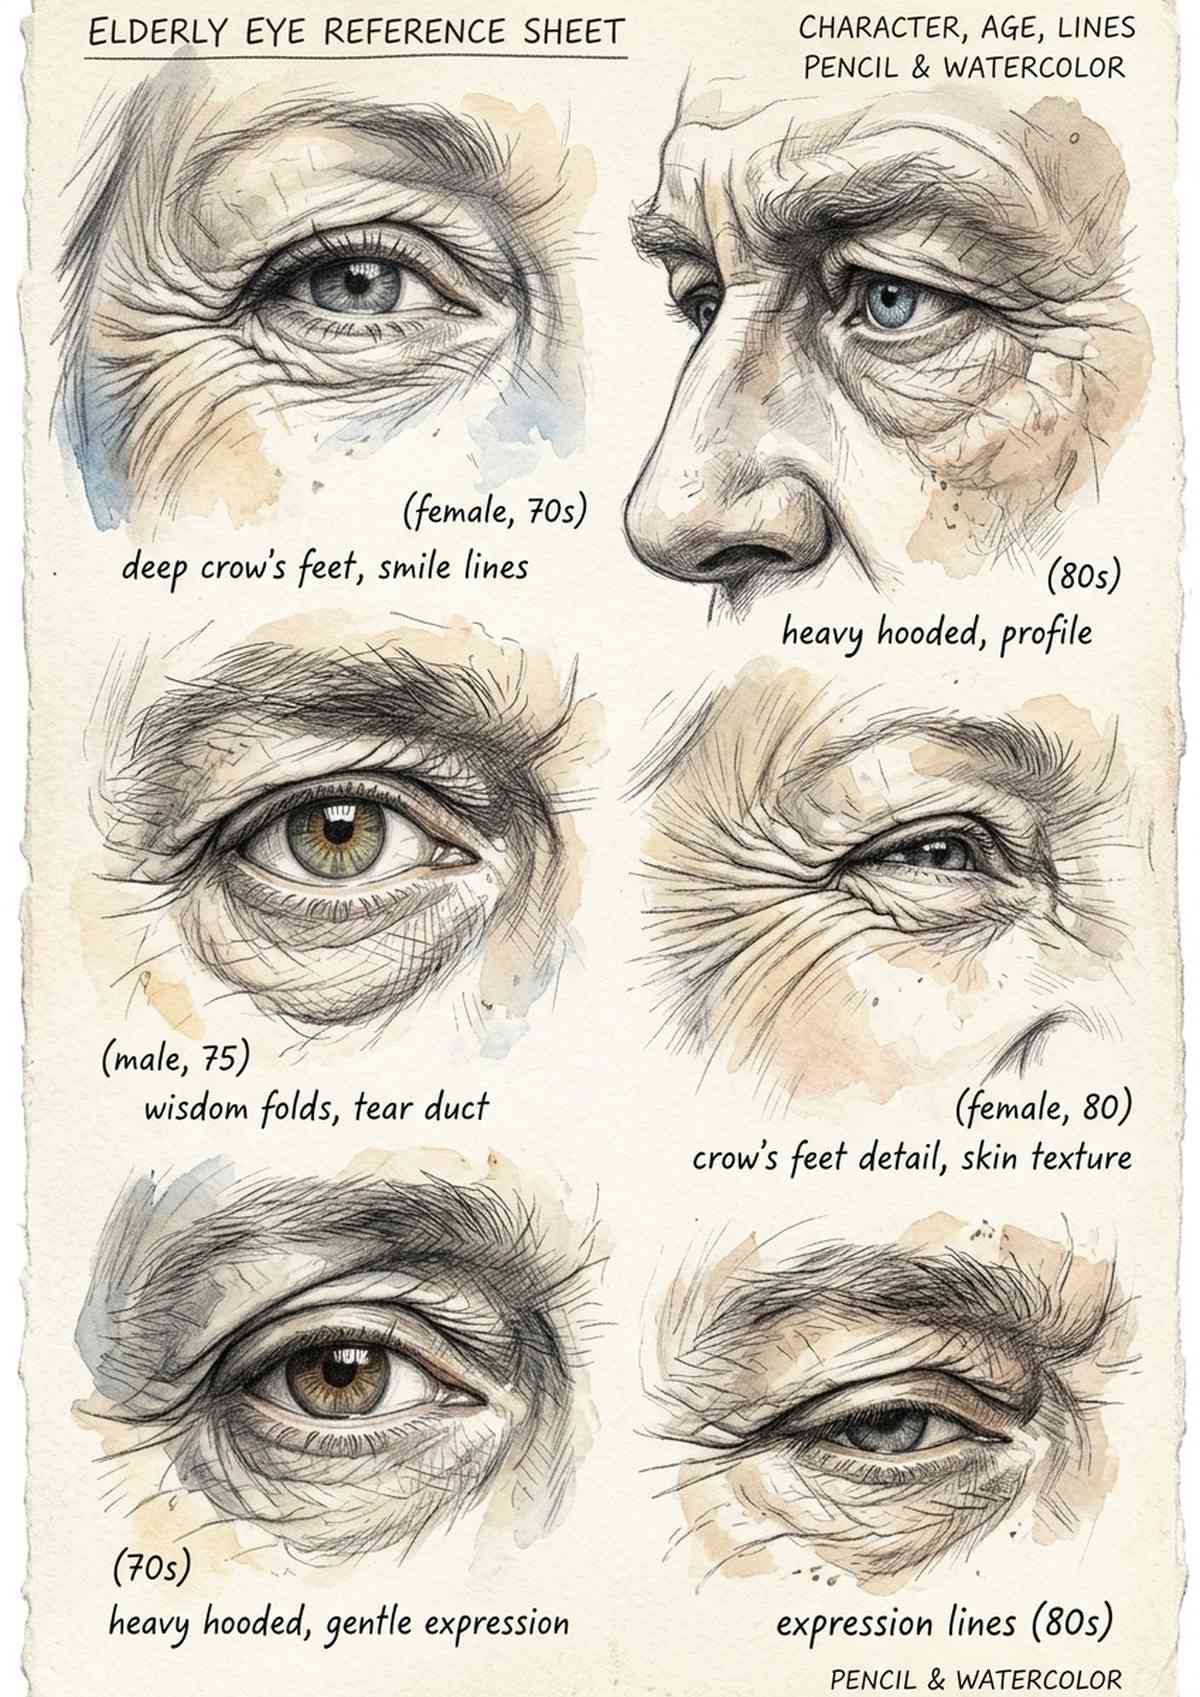
Elderly Eyes — Drawing Character
Older eyes tell the most wonderful stories. Hooded lids, crow’s feet, slightly drooping outer corners — these details add incredible depth and character. Don’t smooth them away. The wrinkles and texture around aged eyes are what make portrait drawings feel alive and honest.
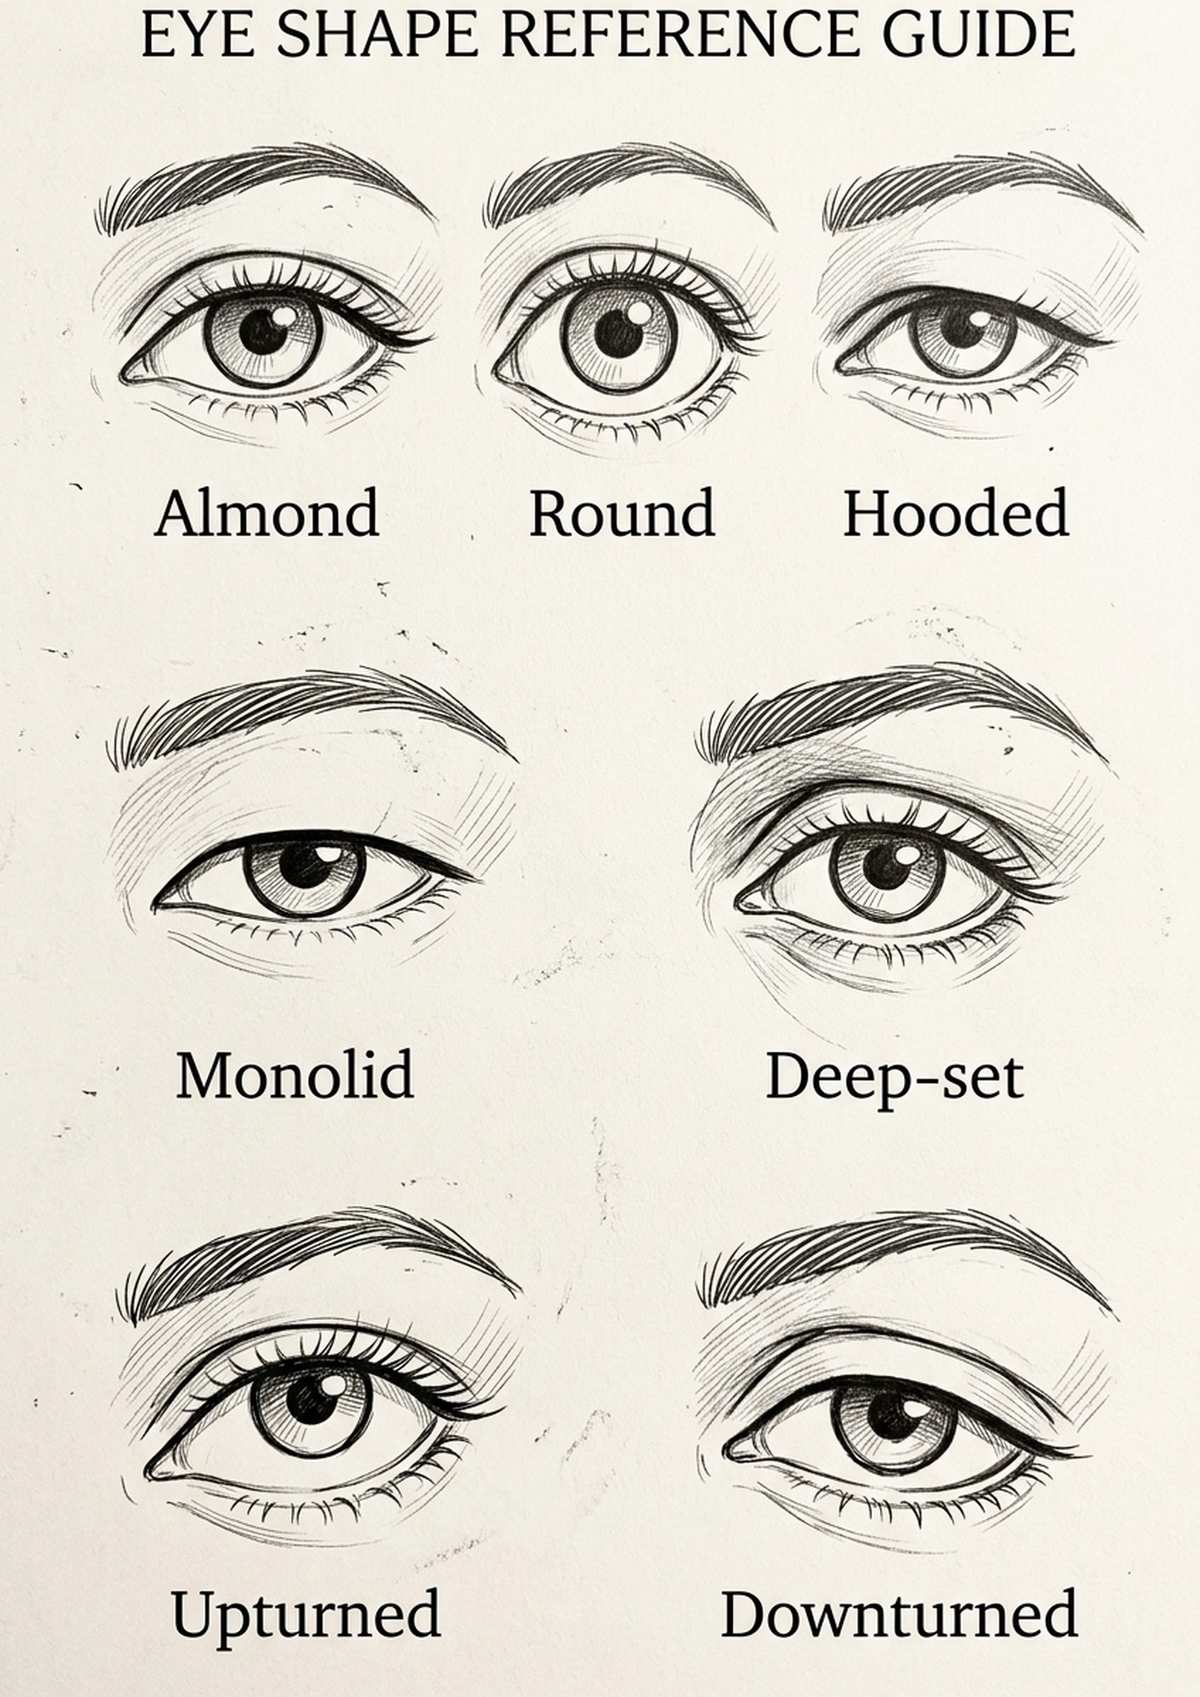
Different Eye Shapes
Not all eyes are the same shape, and recognising the differences is essential for drawing diverse, realistic portraits. Almond, round, hooded, monolid, deep-set, upturned, downturned — each has distinct characteristics in how the lid sits, how much iris is visible, and where the crease falls.
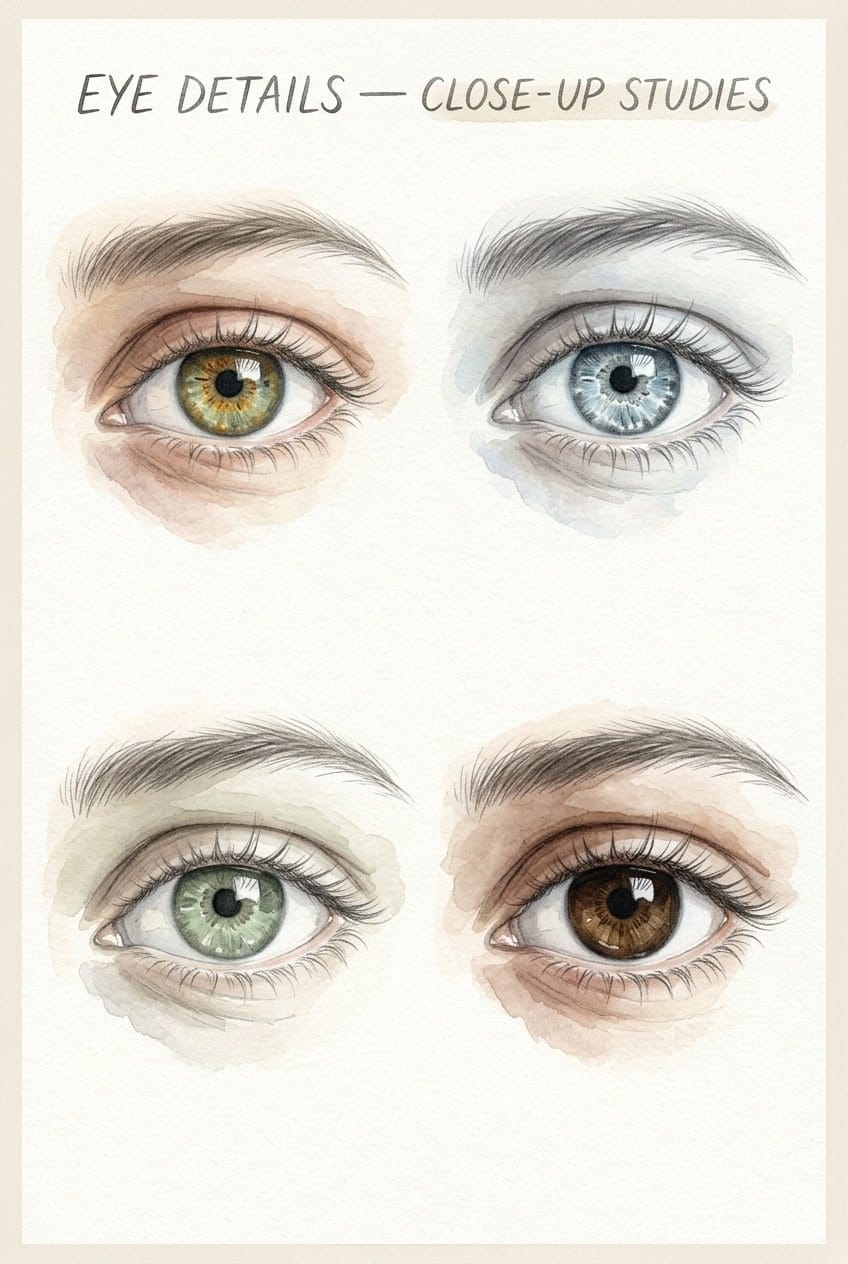
Eye Details Up Close
The magic of a realistic eye drawing is in the details — the patterns in the iris, the way light reflects off the wet surface, the subtle colour shifts in the whites, the direction each lash curves. Studying these close-up details is what takes your eye drawings from good to genuinely impressive.
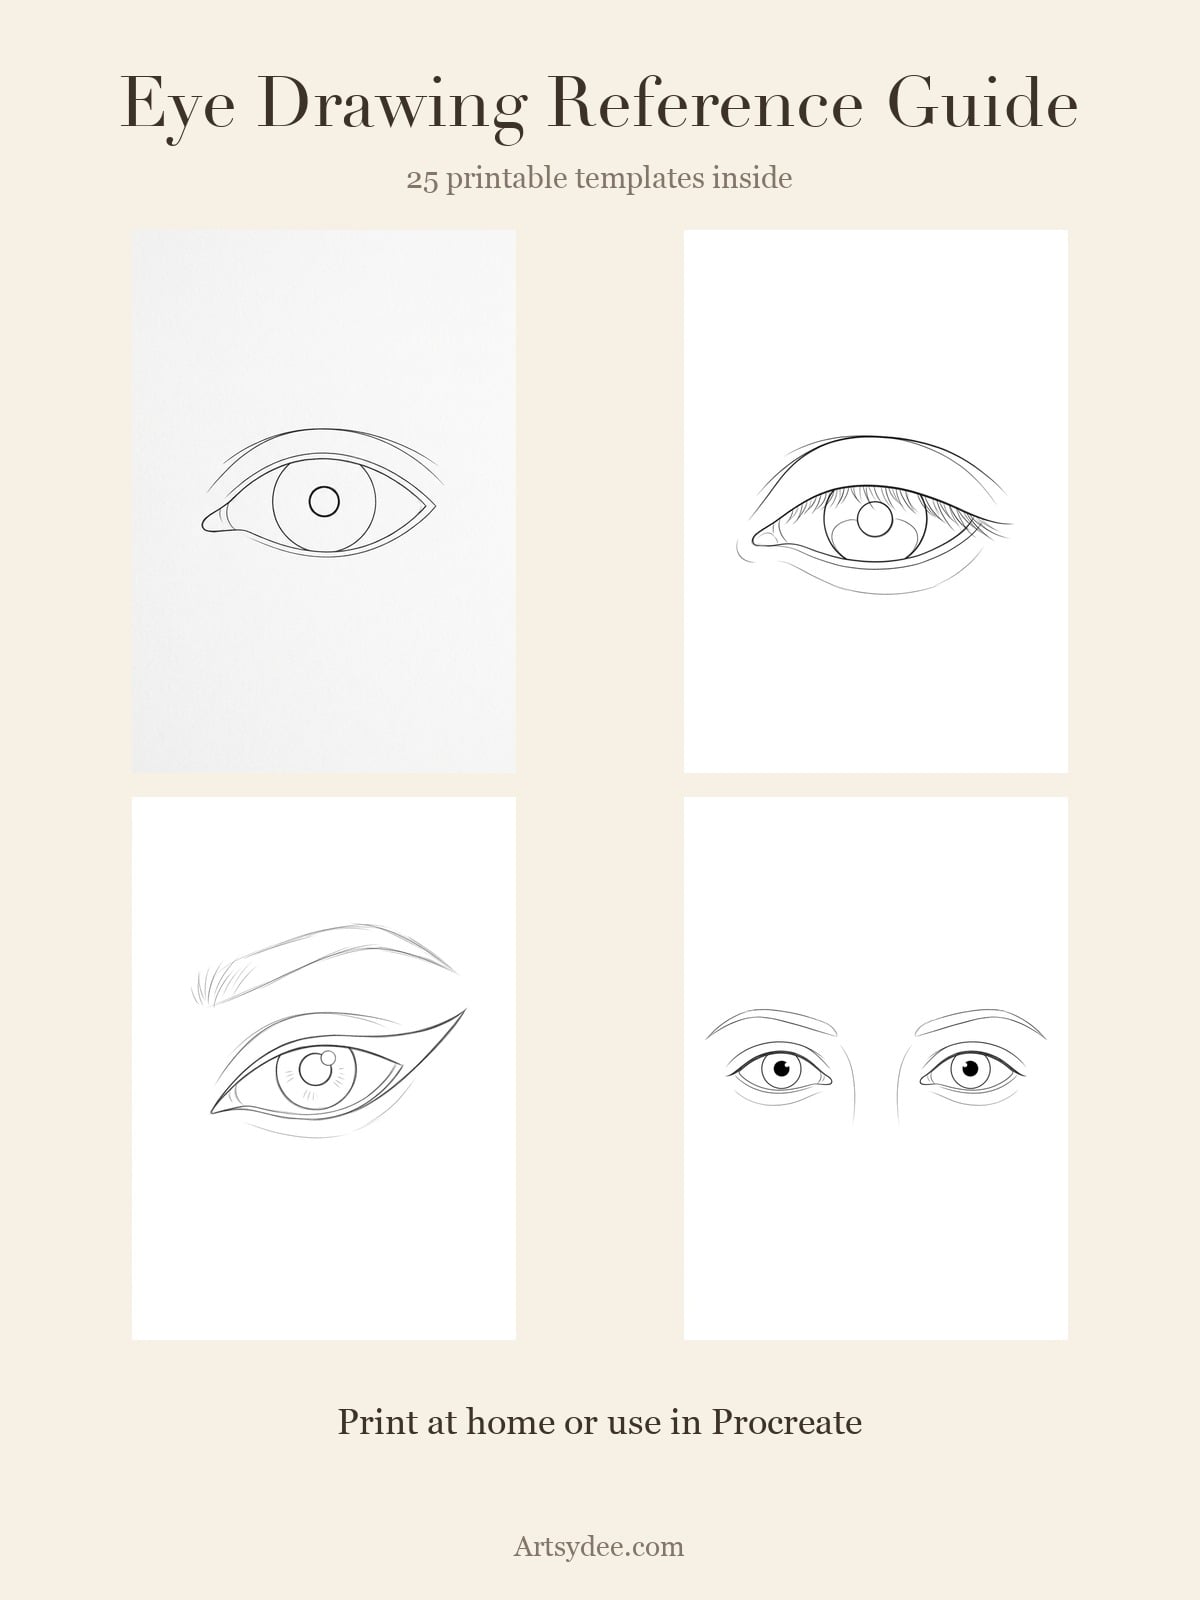
Free Eye Drawing Templates
I’ve created a set of 25 eye drawing templates that you can trace, paint over, and use as practice guides. Each template is a clean line drawing of a different eye style — from basic front-facing eyes to anime styles to detailed realistic eyes.
Want a free taster? Grab my free Eye Drawing Reference Guide — it includes 10 eye reference images plus a free template to get you started.
Get your FREE Eye Drawing Reference Guide Here 👇🏻
For the full 25-template pack, check out the Eye Drawing Templates Pack — perfect for watercolour practice, sketchbook work, or just building your eye-drawing confidence.
Tips for Drawing Better Eyes
- Start with the sphere. Remember the eyeball is round — this affects how lids curve and how shadows fall.
- Study your own eyes. Use a mirror. Tilt your head, change your expression, watch how the lids move.
- Draw eyes daily. Even 5-minute sketches of different eye shapes builds confidence fast.
- Get the highlights right. The light reflection in the eye brings it to life. Place it consistently in both eyes.
- Don’t outline the whole eye. Real eyes don’t have a hard outline all the way round — let some edges fade.
- Lashes aren’t straight lines. They curve, they clump, they vary in length. Draw them in small groups.
- Trace first, then freehand. Using templates to trace builds understanding of the shapes before you try from scratch.
Recommended Art Supplies for Eye Drawing
You don’t need much to practise drawing eyes, but these supplies make the process more enjoyable:
- Staedtler Mars Lumograph Pencils — my favourite sketching pencils. The 2B and 4B are perfect for eye detail work.
- Strathmore 400 Series Sketch Pad — lovely smooth paper that takes pencil and light watercolour beautifully.
- Winsor & Newton Cotman Watercolour Set — if you want to paint over your eye templates, this starter set is brilliant value.
Frequently Asked Questions
What is the best way to learn eye drawing?
Start with references and templates. Trace existing eye outlines to understand the shapes, then gradually move to drawing freehand from reference photos. Daily practice — even just 10 minutes — builds skill faster than occasional long sessions.
Why are eyes so hard to draw?
Eyes have complex layered anatomy — the spherical eyeball, overlapping lids, lashes, iris detail, and light reflections all need to work together. Small mistakes are very noticeable because we look at eyes constantly. The good news? With reference sheets and practice templates, eyes become much more approachable.
How do you draw realistic eye proportions?
The eye width is roughly one-fifth of the face width. There’s one eye-width of space between the two eyes. The iris is about half the width of the visible eye opening. Start with these proportions and adjust as you observe real faces.
Can I use these eye templates for watercolour painting?
Absolutely. The templates are designed as clean outlines specifically for tracing and painting over. Print them on watercolour paper (or trace with a lightbox) and add your own colour. They work beautifully with watercolour, coloured pencils, and markers.
Are these templates free to use?
The free reference guide includes 10 reference images and 1 template. The full 25-template pack is available as a paid product. All are for personal use — trace them, paint them, use them in your sketchbook.
More Drawing References
If you found these eye references helpful, you might also enjoy:
- Hand Drawing Reference: Poses, Angles & Free Templates for Artists
- Easy Drawing Ideas for Beginners (+ FREE Printable Sketchbook Prompts)
- 9 Easy Sketchbook Ideas That Are Actually Fun to Make
- How to Draw Flowers Step by Step: Beautiful Botanical Sketches
- How to Draw Animals for Beginners: Easy Step-by-Step Guide
- Easy Things to Draw When You’re Bored
- What to Draw: 100+ Ideas for Your Sketchbook
Written by Dee Maene — artist, creative educator, and founder of Artsydee. I’ve been teaching drawing and watercolour techniques for over a decade, helping thousands of beginners find their creative confidence. When I’m not painting, I’m probably drinking tea and plotting my next sketchbook page.