Last Updated on June 23, 2026 by Dee
Updated: April 2026
Feet are one of those things that artists tend to avoid drawing. Honestly, I get it — they’re a tricky shape with all those toes and angles, and it’s tempting to just hide them behind furniture or crop them out of the frame.
But here’s the thing: once you start practising feet, they’re actually really satisfying to draw. They have gorgeous curves, interesting bone structure, and so much variety depending on the angle. And being able to draw convincing feet makes your full-body figures look so much better.
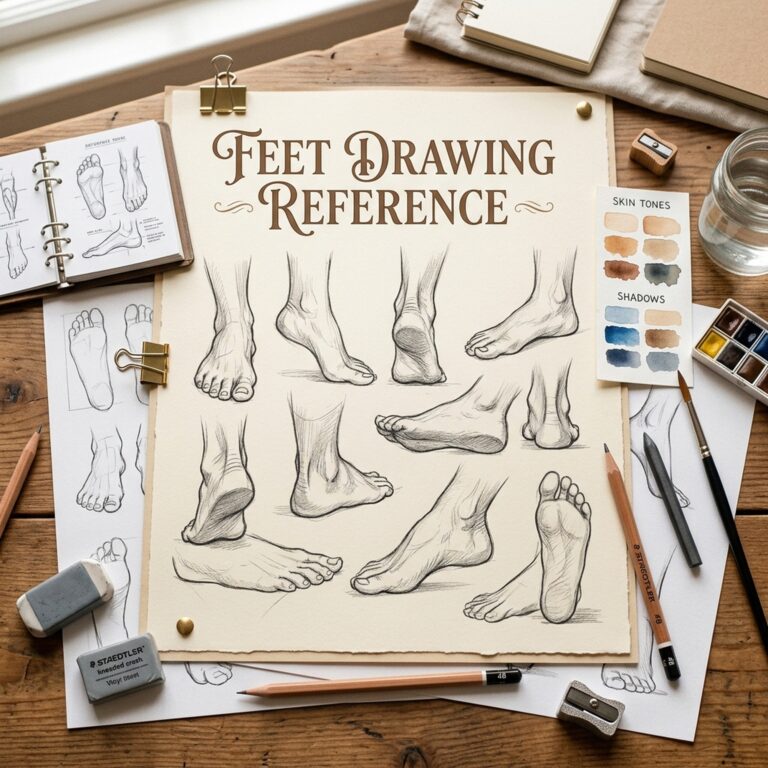
I’ve pulled together this collection of feet drawing references, anatomy breakdowns, and free templates so you’ve got everything you need in one spot. Whether you’re sketching your first foot or you want to nail tricky angles, these references will help.
Get your FREE Feet Drawing Reference Guide Here 👇🏻
Why Feet Drawing References Matter
Even experienced figure artists keep foot references handy — alongside eye references and hand references, they’re one of the three most useful study aids for portrait and figure work. The foot is a surprisingly complex structure — the angle of the arch, the way toes overlap from certain views, the shift in shape when weight is applied. Working from reference helps you get these details right instead of guessing and ending up with something that looks flat or awkward.
A good foot reference helps you:
- Understand the bone and muscle structure (arch, ankle, ball of foot)
- Draw feet from any angle without guessing
- Show weight and balance convincingly
- Capture the differences between relaxed, flexed, and pointed feet
Foot Anatomy Basics for Artists
You don’t need to memorise every bone, but knowing the key landmarks makes a massive difference. Here’s what to look for:
- The arch — the inner side of the foot curves up off the ground, while the outer edge stays flatter. This is what gives feet their distinctive shape from the side.
- The ankle bones — the inner ankle bone sits higher than the outer one. Getting this right instantly makes your foot drawings more believable.
- The ball of the foot — the wide, padded area behind the toes. This is where weight presses down when walking or standing on tiptoe.
- The heel — rounded and sturdy. It’s wider than you might think and anchors the foot from behind.
- The toes — the big toe is the thickest and longest (usually), and each toe gets progressively smaller. They don’t line up in a straight row — they curve.
- The Achilles tendon — the strong line running from the calf down to the heel. It’s visible from the back and side views and adds lovely structure to your drawings.

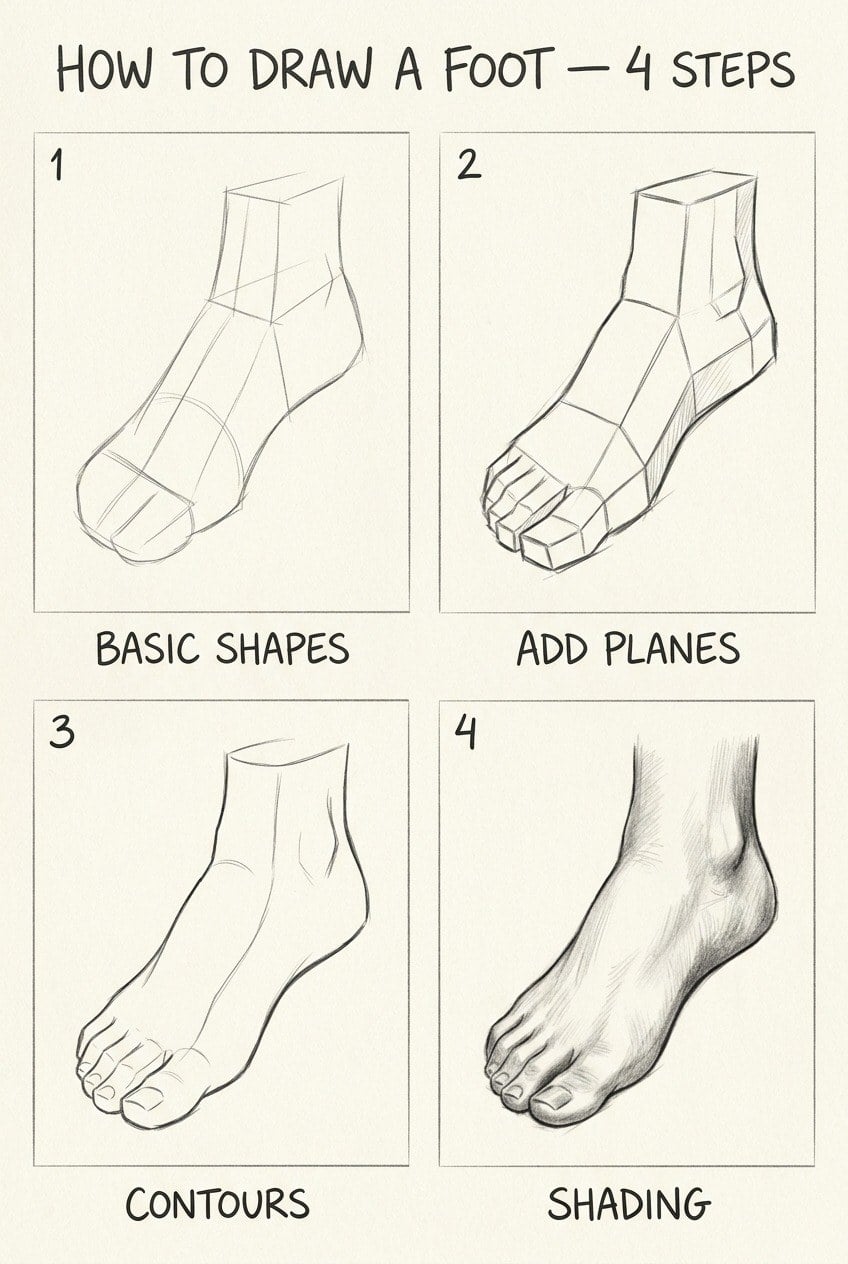
Once you can spot these landmarks, breaking down any foot pose becomes much easier. Start with the basic wedge shape, mark the ankle, then build the toes and arch from there. The same step-by-step approach works beautifully for hands — see my hand drawing reference guide for more.
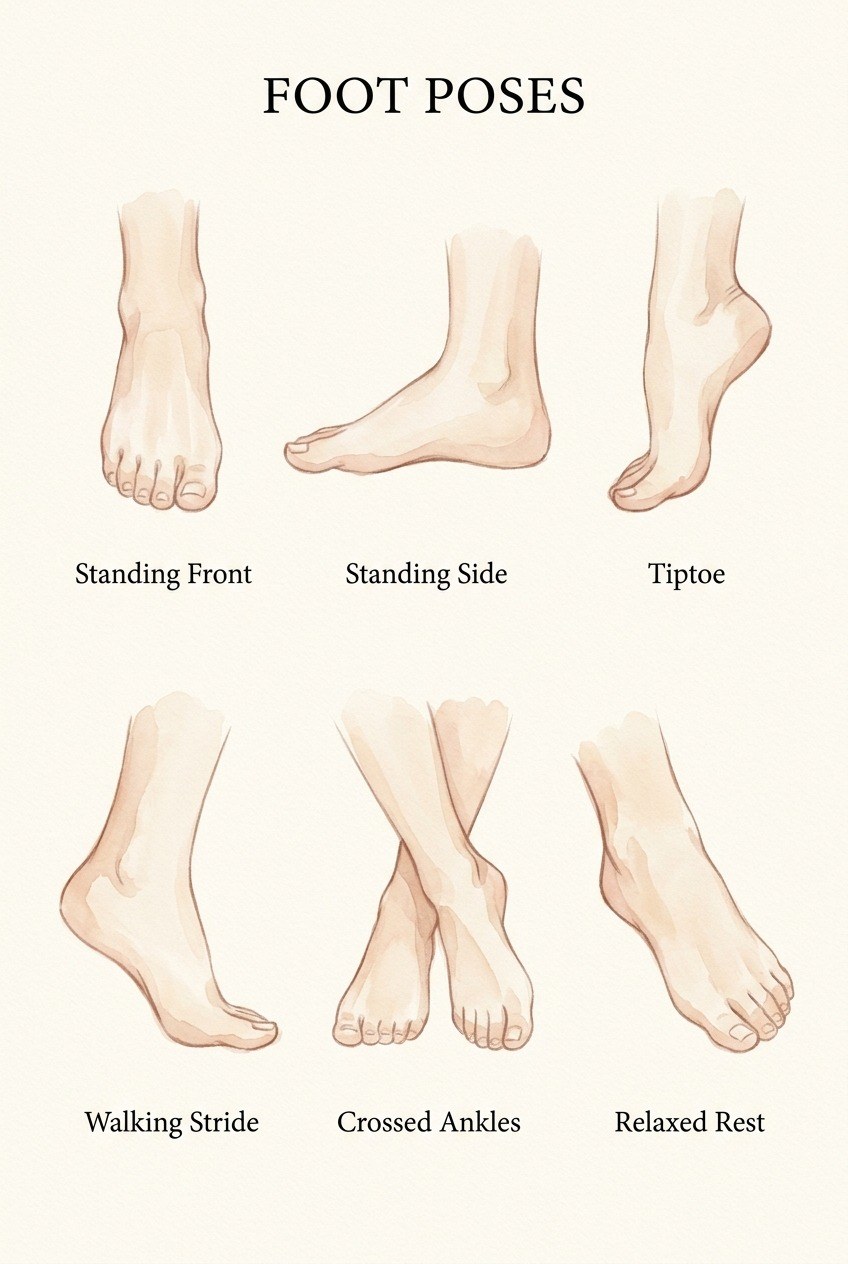
Easy Foot Angles to Start With
If feet feel intimidating, start with these simpler views before tackling the really tricky angles (and if you’re new to figure drawing in general, my easy drawing ideas for beginners is a friendlier on-ramp):
- Side profile — the easiest angle. You can clearly see the arch, heel, and toe line. Start here.
- Front view — looking straight at the toes. Simplify the toes as rounded shapes and focus on getting the overall width right.
- Standing flat — a foot with weight on it looks different from a relaxed foot. The toes spread, the arch flattens slightly. Good for figure drawing practice.
- Bottom/sole view — surprisingly fun to draw. You can see the ball, heel pad, and toe pads clearly.
- Foot pair standing — drawing both feet together teaches you spacing and how weight distributes across a stance.
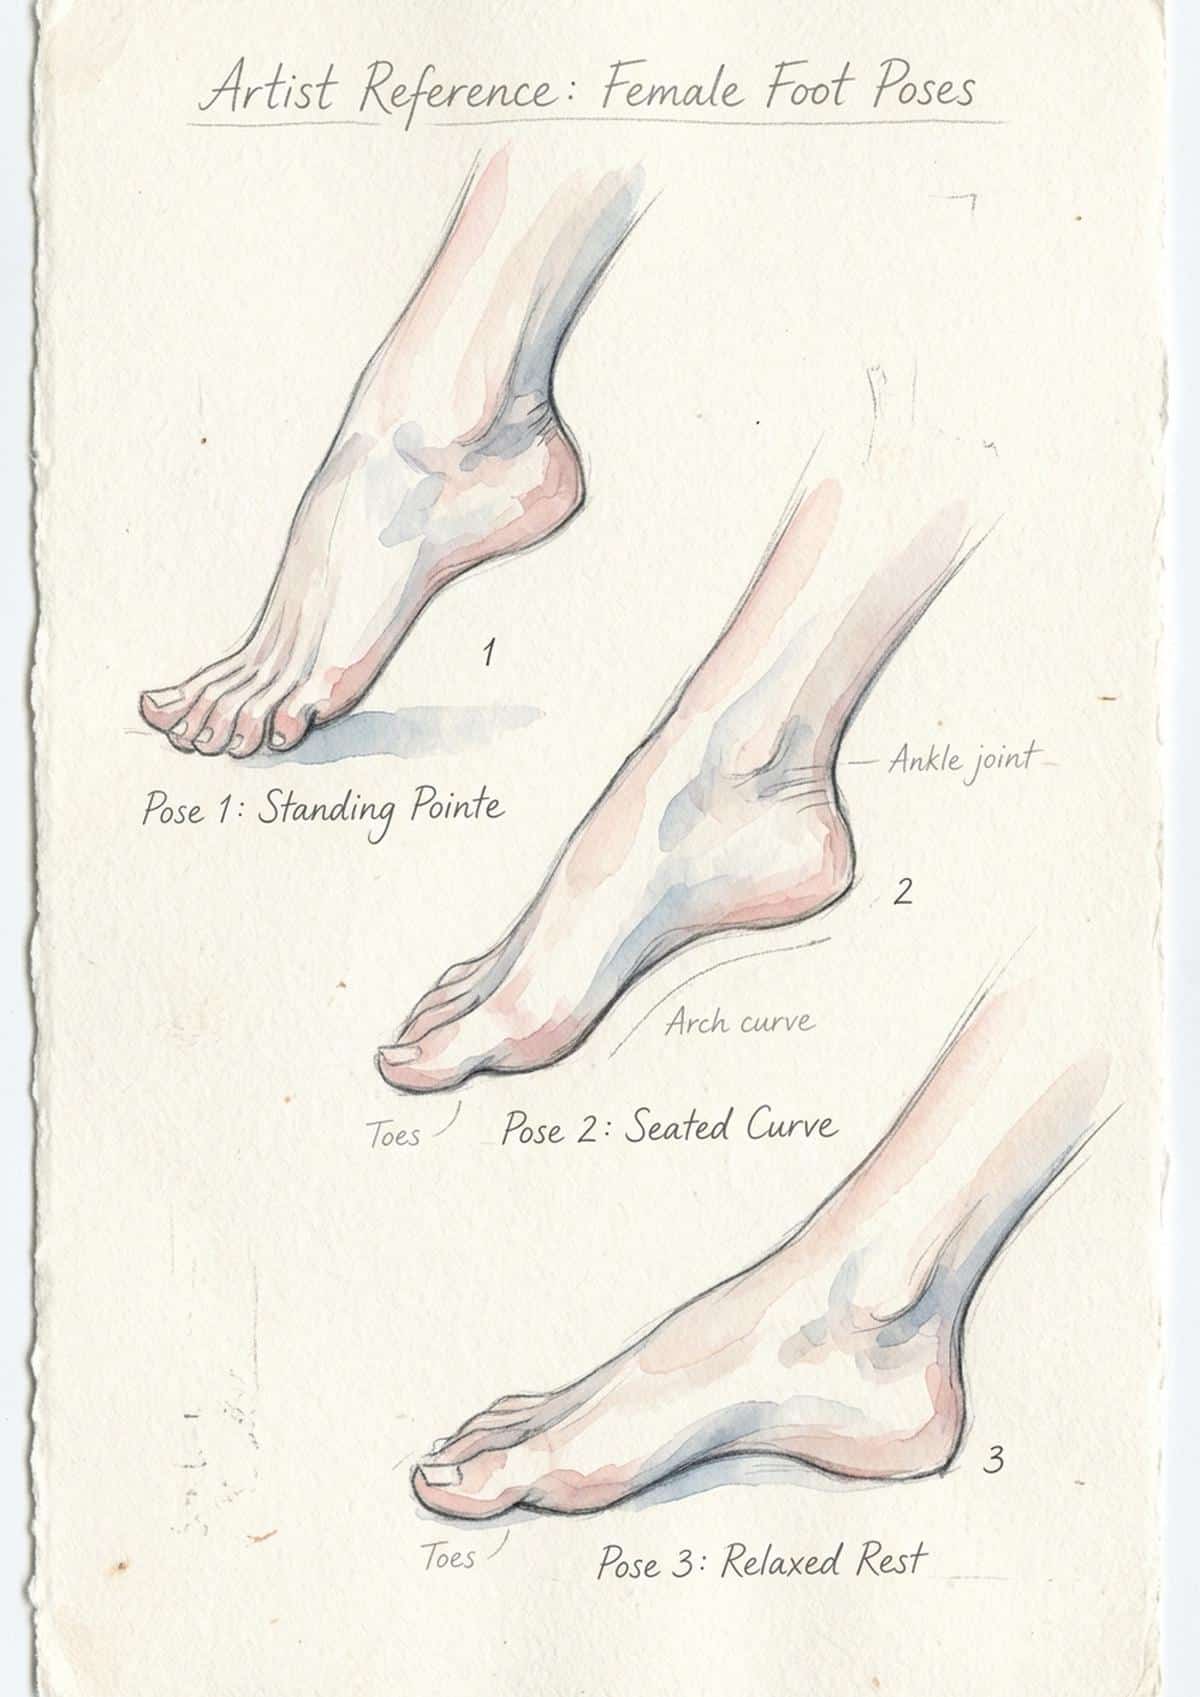
Female Feet References
Female feet in art are often drawn with more slender proportions and graceful lines. The key differences to watch for:
- Narrower overall shape, especially through the heel and ankle
- More defined arch curve
- Slimmer, more tapered toes
- More delicate ankle bones
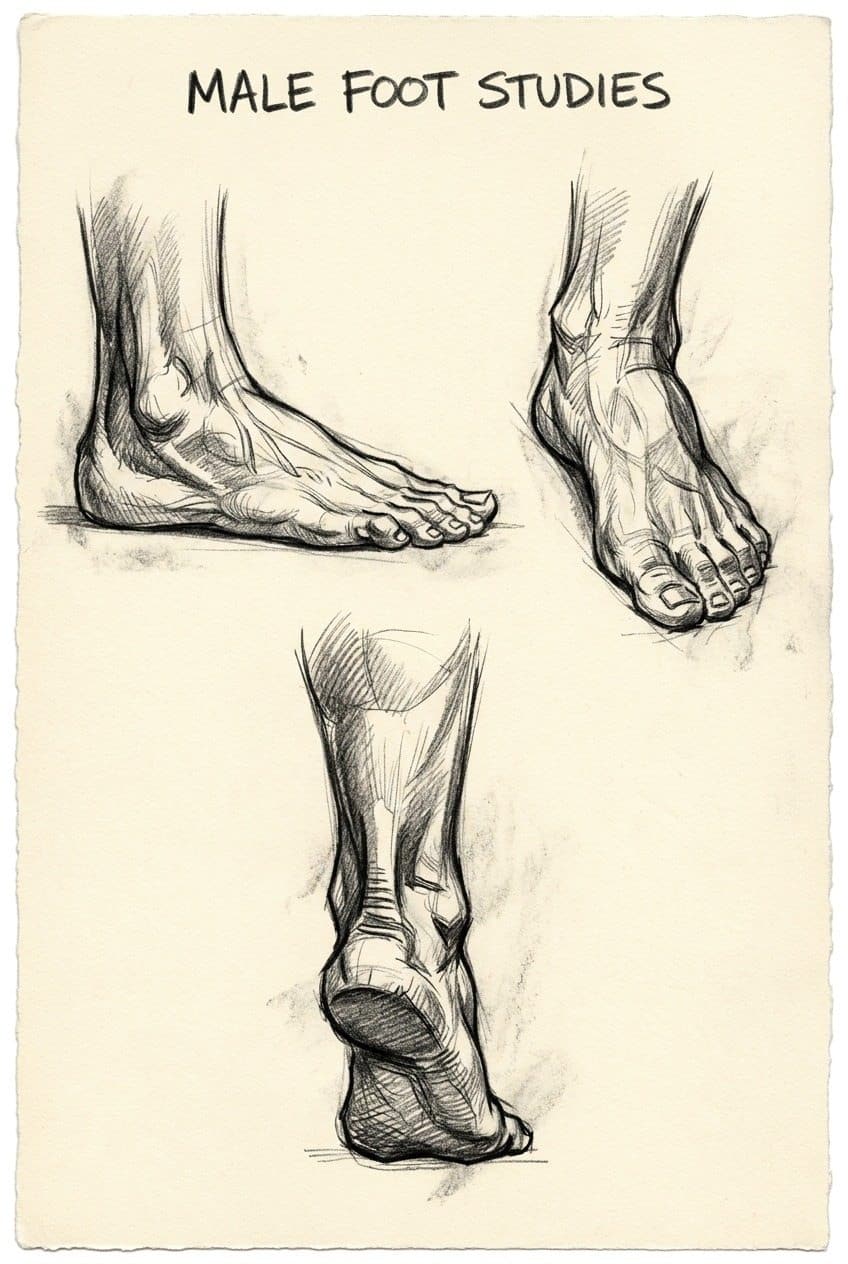
Male Feet References
Male feet tend to be broader and sturdier. When drawing masculine feet:
- Wider overall proportions, especially across the ball of the foot
- Thicker, more prominent ankle bones and Achilles tendon
- Broader, squarer toes
- Heavier heel with more visible bone structure
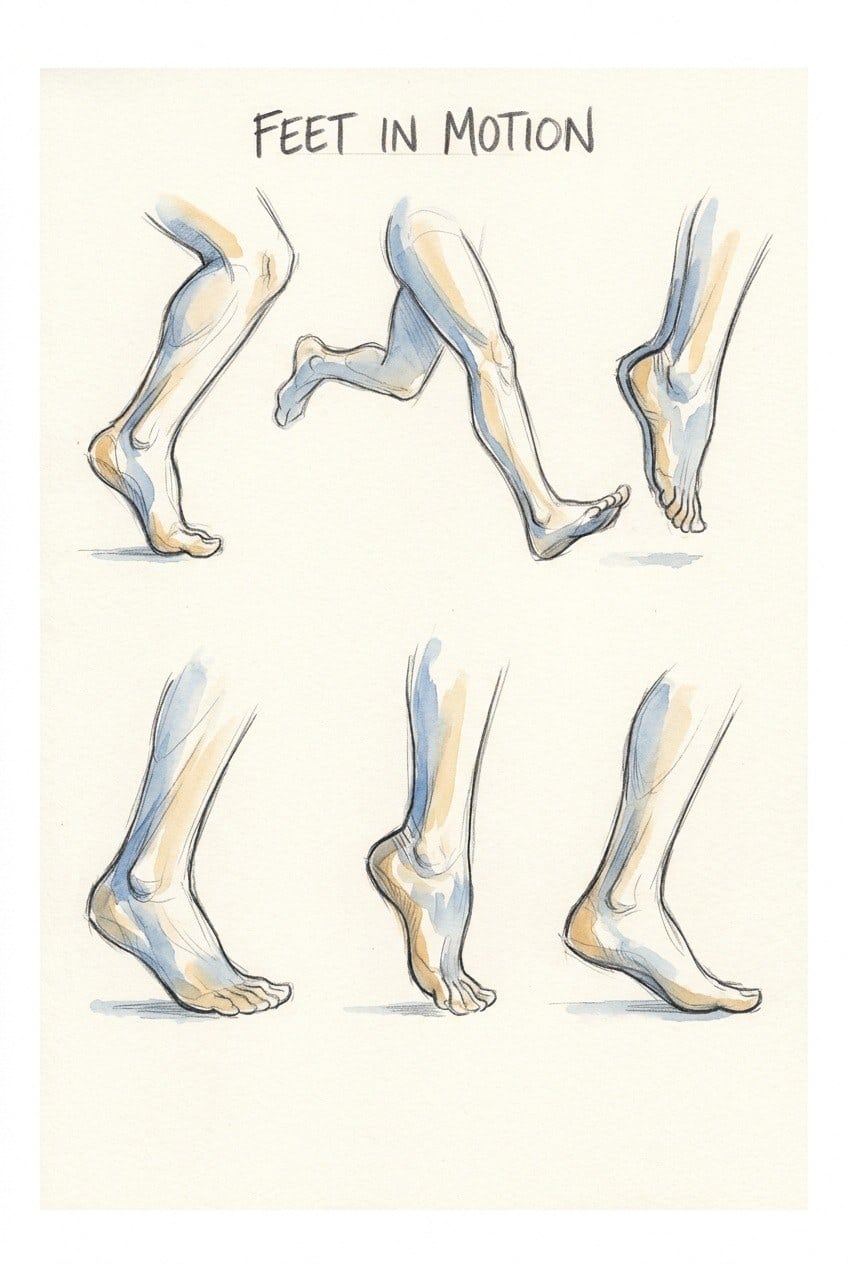
Feet in Motion
Drawing feet in motion is where things get really interesting. Pair daily foot studies with my easy sketchbook ideas for consistent practice. A walking foot bends at the ball, a running foot pushes off from the toes, a jumping foot points downward in the air. The shape of the foot changes dramatically depending on what it’s doing — and capturing that movement is what makes figure drawings feel alive and dynamic.
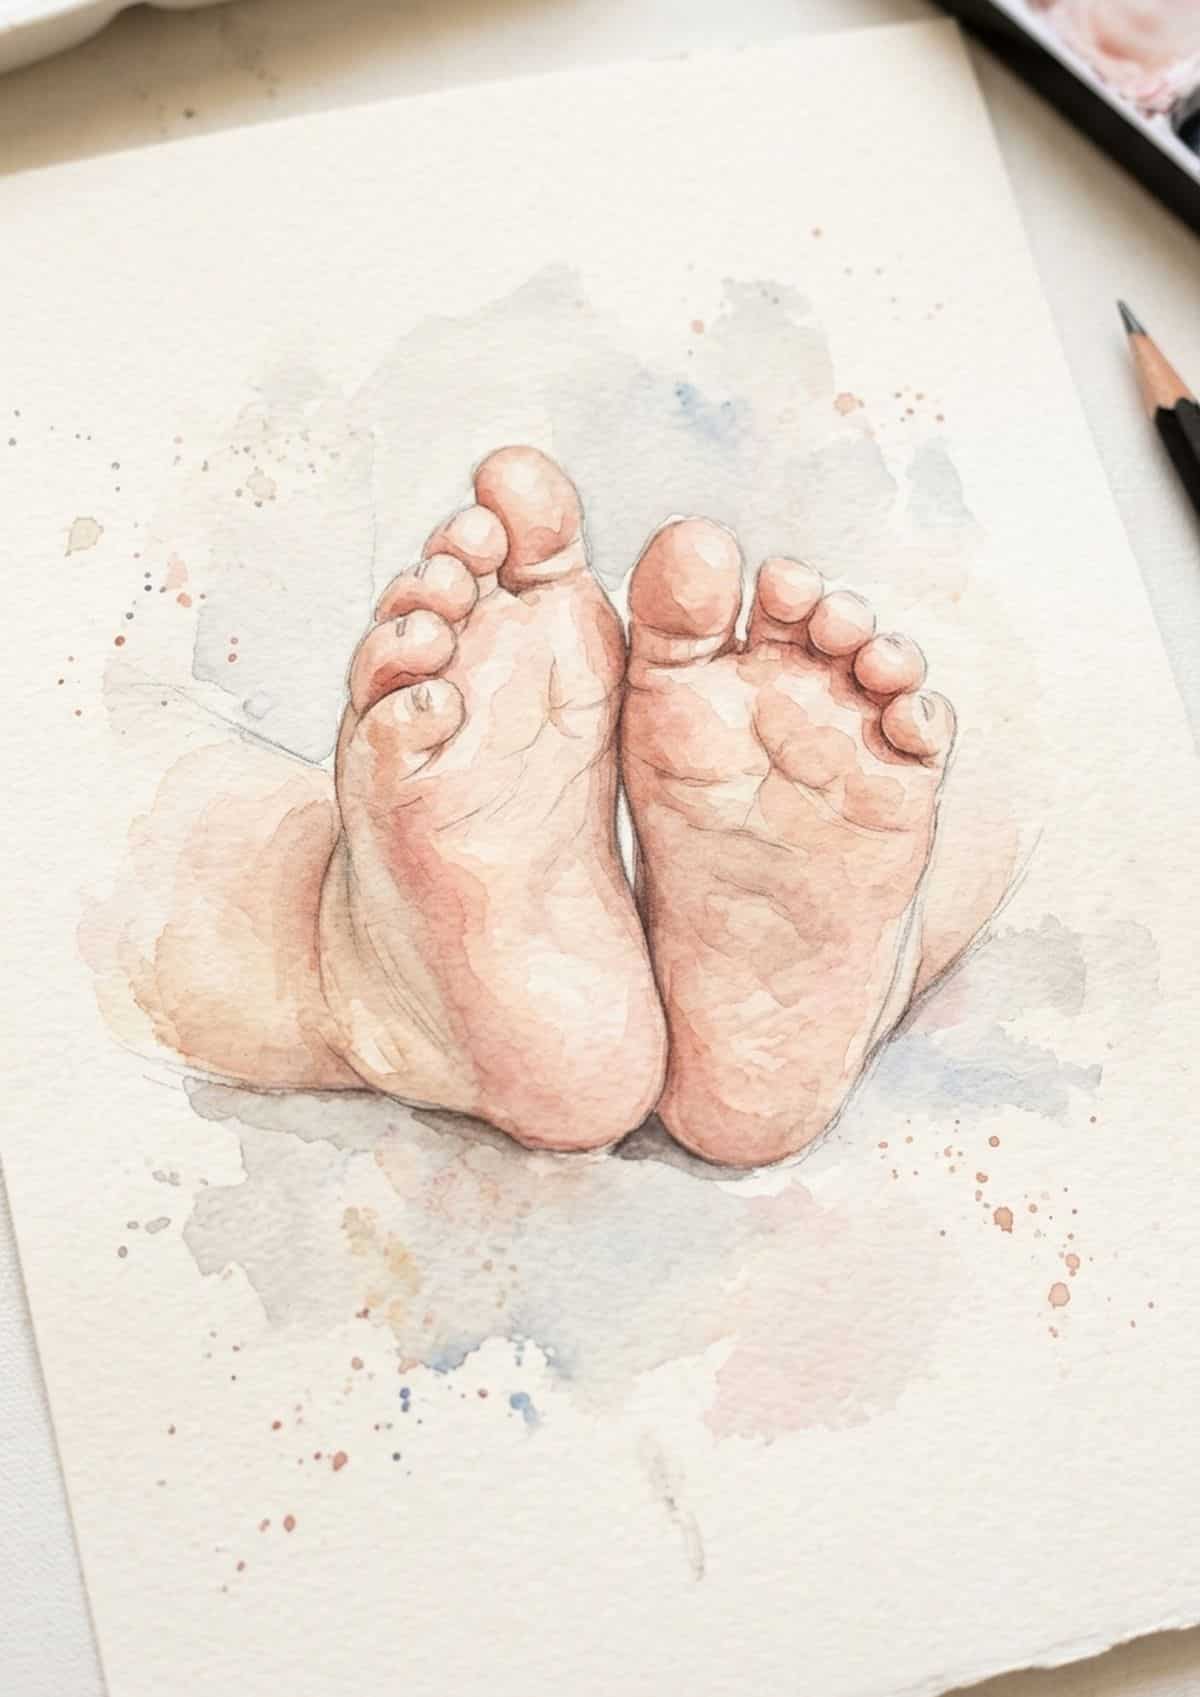
Drawing Baby Feet
Baby feet are irresistibly cute to draw. They’re chubby, soft, and the proportions are completely different from adult feet. The toes are tiny and round, the arch barely exists yet, and the whole foot has those gorgeous fat rolls and dimples. If you want to practise drawing feet without pressure, baby feet are a lovely place to start — they’re forgiving and fun.
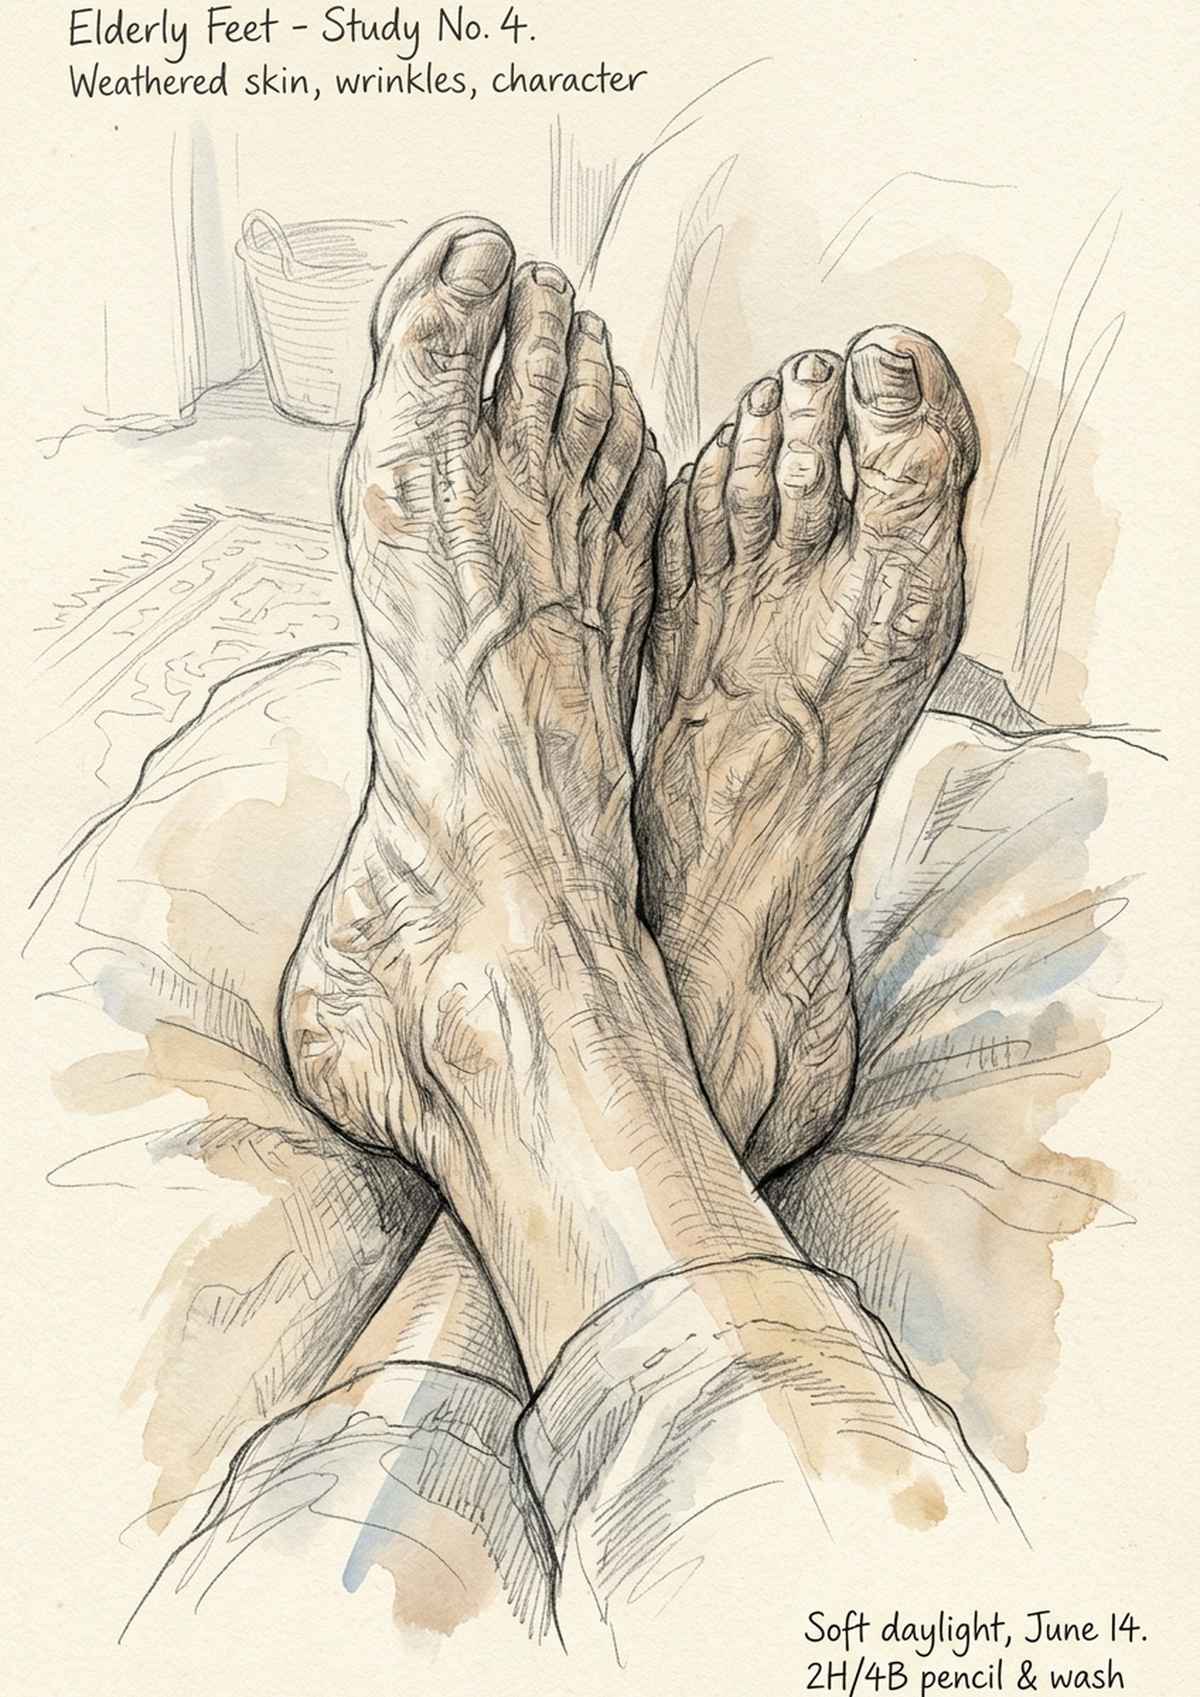
Elderly Feet — Drawing Character
Older feet tell incredible stories. Bunions, prominent veins, thickened nails, textured skin — these details add so much character and honesty to your drawings. Don’t smooth them away. The weathered quality of aged feet is what makes portrait and figure drawings feel real and respectful. There’s beauty in every wrinkle and knobby joint.
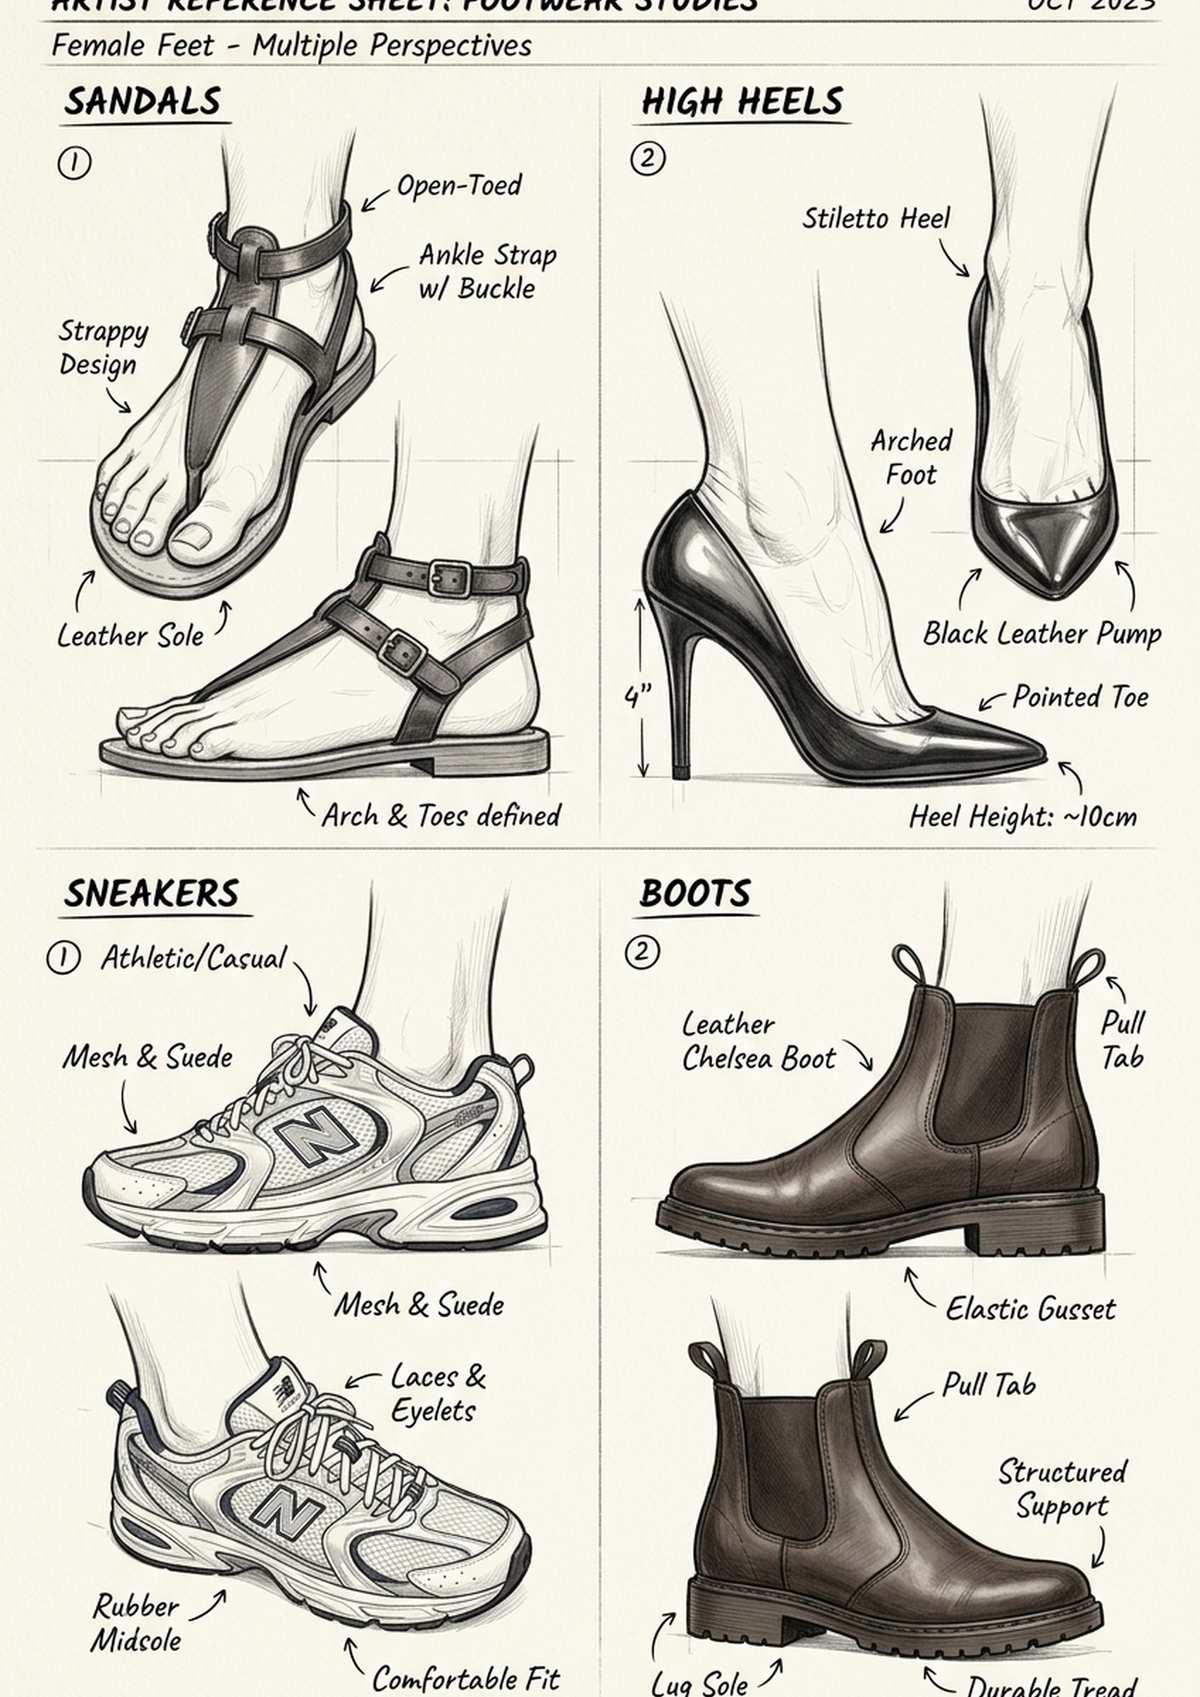
Feet in Shoes
Understanding the foot inside the shoe makes your shoe drawings so much better. A high heel forces the foot into a steep angle. A sandal reveals the toe line and arch. A sneaker wraps the foot in a structured shell. When you know where the ankle, ball, and toes sit inside the shoe, you can draw footwear that looks like it actually has a foot in it — not just an empty shape sitting on the ground.
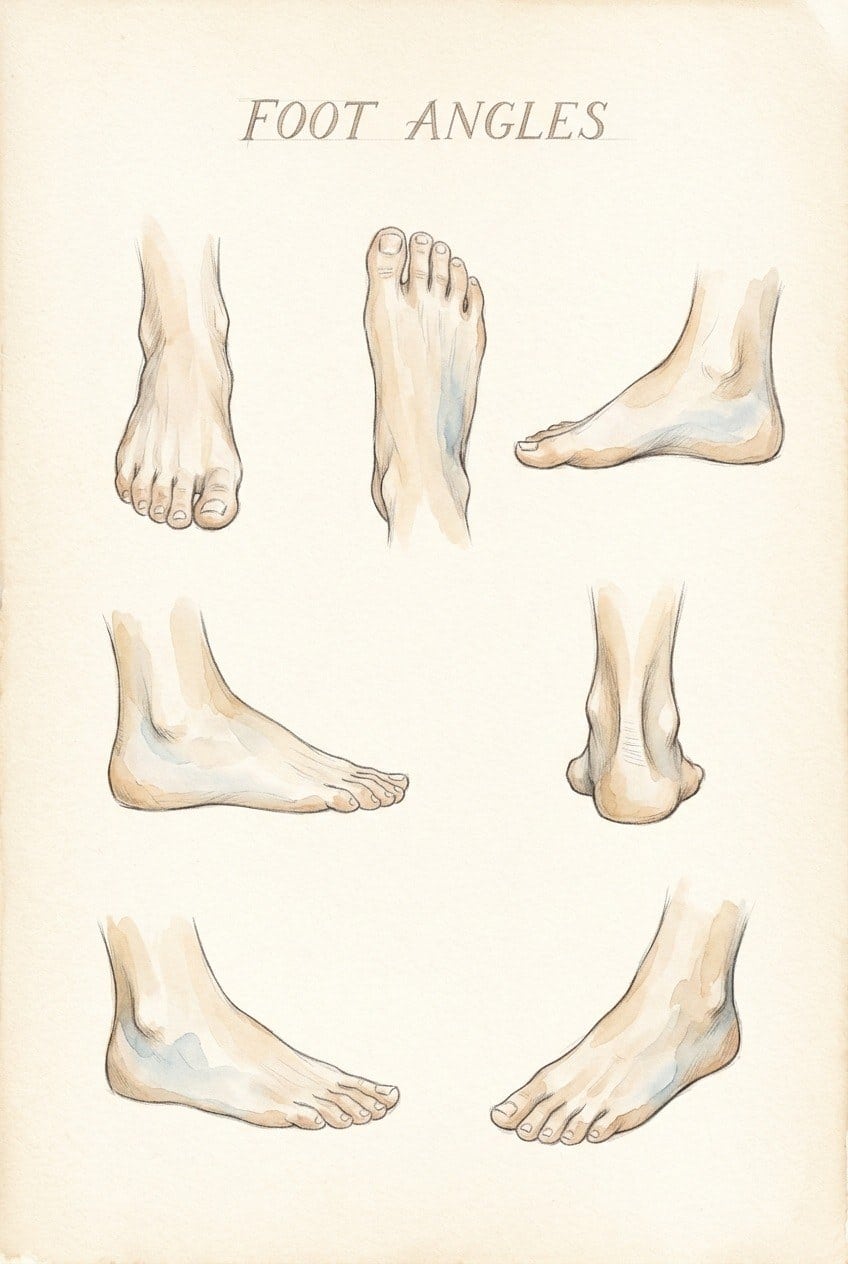
Feet from Different Angles
The foot looks completely different depending on where you’re viewing it from. Front on, the toes dominate. From the side, it’s all about the arch and ankle. From behind, you see the heel and Achilles tendon. From above, the top of the foot is a long, smooth wedge. Practising all these angles is the fastest way to feel confident drawing feet in any position — and these reference sheets give you every view you need.
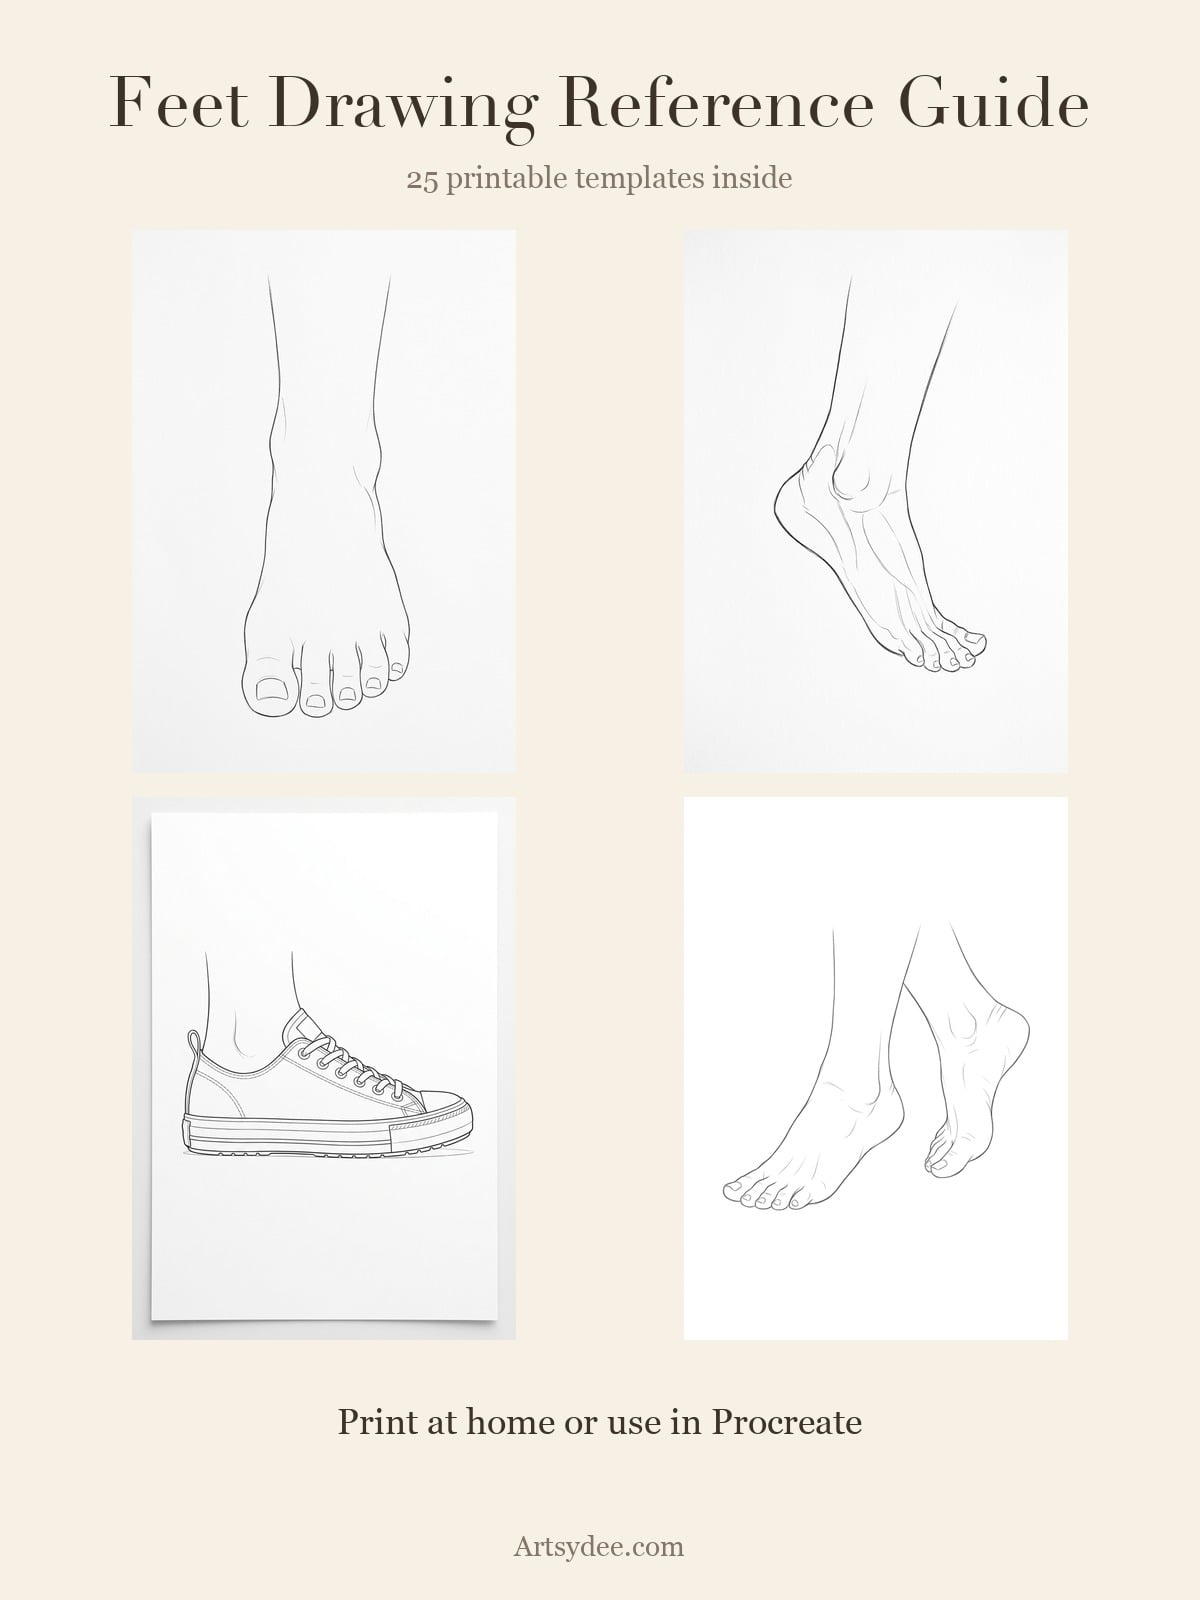
Free Feet Drawing Templates
I’ve created a set of 25 feet drawing templates that you can trace, paint over, and use as practice guides. Each template is a clean line drawing of a different foot pose — from simple front views to feet in shoes to dynamic action poses.
Want a free taster? Grab my free Feet Drawing Reference Guide — it includes 10 foot reference images plus a free template to get you started.
For the full 25-template pack, check out the Feet Drawing Templates Pack — perfect for watercolour practice, sketchbook work, or just building your foot-drawing confidence.
Tips for Drawing Better Feet
- Start with a wedge shape. Think of the foot as a simple wedge or triangle from the side — narrow at the ankle, wide at the toes. This basic form guides everything else.
- Remember the ankle bones are uneven. Inner ankle higher, outer ankle lower. This tiny detail makes feet look instantly more realistic.
- Study your own feet. Kick off your shoes, grab a mirror, and sketch from different angles. Your feet are your best free reference.
- Draw feet daily. Even 5-minute gesture sketches of feet in different positions builds confidence quickly.
- Pay attention to the arch. The inner edge of the foot lifts off the ground — only the heel, ball, and outer edge actually touch the floor when standing.
- Toes aren’t all the same. They decrease in size, curve slightly, and overlap from certain angles. Don’t draw them as identical circles in a row.
- Trace first, then freehand. Using templates builds your understanding of foot shapes before you try drawing from scratch.
Recommended Art Supplies for Feet Drawing
You don’t need much to practise drawing feet, but these supplies make the process more enjoyable:
- Staedtler Mars Lumograph Pencils — my favourite sketching pencils. The 2B and 4B are perfect for capturing the subtle curves and structure of feet.
- Strathmore 400 Series Sketch Pad — lovely smooth paper that takes pencil and light watercolour beautifully.
- Winsor & Newton Cotman Watercolour Set — if you want to paint over your foot templates, this starter set is brilliant value.
Frequently Asked Questions
Why are feet so hard to draw?
Feet have a complex 3D shape that changes dramatically depending on the angle. The overlapping toes, the curved arch, and the way the foot bends and flexes all make it tricky. The good news is that once you learn the basic landmarks — arch, ankle bones, ball, heel — it gets much easier. Reference sheets and tracing templates speed up the learning process enormously.
What is the easiest angle to draw a foot from?
The side profile is the most beginner-friendly angle. You can clearly see the arch, the heel, the ankle, and the toe line without worrying about foreshortening or overlapping toes. Once you’re comfortable with side views, try the front view and then three-quarter angles.
How do I draw feet in proportion to the body?
A common rule of thumb: the foot length is roughly the same as the forearm length (wrist to elbow). For most adults, the foot is about one head-length long. Children’s feet are proportionally smaller. These guidelines give you a solid starting point to check your figure drawings.
Can I use these foot templates for watercolour painting?
Absolutely. The templates are designed as clean outlines specifically for tracing and painting over. Print them on watercolour paper (or trace with a lightbox) and add your own colour. They work beautifully with watercolour, coloured pencils, and markers.
Are these templates free to use?
The free reference guide includes 10 reference images and 1 template. The full 25-template pack is available as a paid product. All are for personal use — trace them, paint them, use them in your sketchbook.
More Drawing References
If you found these feet references helpful, you might also enjoy:
- Hand Drawing Reference: Poses, Angles & Free Templates for Artists
- Easy Drawing Ideas for Beginners (+ FREE Printable Sketchbook Prompts)
- 9 Easy Sketchbook Ideas That Are Actually Fun to Make
- How to Draw Animals for Beginners: Easy Step-by-Step Guide
- Easy Things to Draw When You’re Bored
- What to Draw: 100+ Ideas for Your Sketchbook
Written by Dee Maene — artist, creative educator, and founder of Artsydee. I’ve been teaching drawing and watercolour techniques for over a decade, helping thousands of beginners find their creative confidence. When I’m not painting, I’m probably drinking tea and plotting my next sketchbook page.