Last Updated on February 26, 2026 by Dee
When most people hear “loose watercolor,” their brain immediately goes to flowers. Roses with soft, bleeding petals. Poppies in a field. Maybe a wreath or two. And look, I get it — loose watercolor flowers are gorgeous. But there’s a whole world of loose watercolor techniques waiting beyond the petal.
What if you could bring that same fluid, expressive energy to landscapes? To abstract compositions? To textures that feel alive on paper? That’s what we’re exploring here — how to loosen up your watercolor practice and take it places you haven’t tried yet.
Whether you’re already comfortable with loose florals or you’ve been painting tight and controlled for years, these techniques will shake something free. Less fussing, more feeling. Less perfection, more presence.
Grab your free Loose Technique Practice Sheets and Abstract Watercolor Prompt Cards (both free PDFs!) below to practice alongside this post.
Table of Contents
Free Loose Technique Practice Sheets
I’ve put together a set of practice sheets that walk you through the core loose watercolor techniques covered in this post — from wet-on-wet washes to expressive mark-making exercises. Print them out, tape them into your sketchbook, or just keep them beside you while you paint.
Want Weekly Watercolor Resources?
If you love these free printables, you’ll absolutely love my Patreon. Every week I share new watercolor resources — reference sheets, colour mixing guides, painting tutorials, and practice templates. You get instant access to a growing library of creative resources the moment you join.
It’s the best way to keep your watercolor practice fresh with new inspiration every single week. Join me on Patreon here →
What Does “Loose” Actually Mean in Watercolor?
Painting “loose” means giving up tight control over where your paint goes — and learning to love what happens when water and pigment make their own decisions.
It’s not about being sloppy. That’s the biggest misconception. Loose watercolor painting actually requires more understanding of how water behaves, not less. You’re working with the medium instead of fighting it. You load your brush, touch it to wet paper, and then — here’s the hard part — you step back and let the paint do its thing.
Think of it this way: tight watercolor is about telling the paint where to go. Loose watercolor is about suggesting a direction and then trusting the process. You’re still in charge — you choose the colors, the paper wetness, the brush pressure — but you’re collaborating with water rather than commanding it.
The result? Paintings that breathe. Edges that blur and bloom. Colors that mingle in ways you couldn’t have planned. If you’re used to controlling every stroke, this will feel terrifying at first. And then it’ll feel like flying. If you’re just starting your watercolor journey, my watercolor painting ideas for beginners guide is a great companion to this post.
Capturing Light and Shadow with Loose Washes
The secret to luminous loose watercolors? Preserve your whites. The paper itself is your brightest light source, and once you cover it, that glow is gone.
Before you touch brush to paper, squint at your subject and ask yourself: where’s the light coming from? Those bright spots are where you leave the paper completely untouched. I know it feels counterintuitive — you want to paint, not not paint — but those white spaces create the sparkle that makes loose watercolor so alive.
For shadows, try dropping a cooler, darker pigment into a still-wet wash. Don’t push it around — just touch the loaded brush tip to the wet area and watch it spread. The soft, feathered edge it creates is something you could never achieve by painting shadow onto dry paper. That softness reads as atmosphere, as depth, as real light falling on real surfaces.
A good round brush makes all the difference here. I love Escoda Versatil brushes for this — they hold a generous amount of water and release it smoothly, which is exactly what you need for controlled washes that still feel spontaneous.
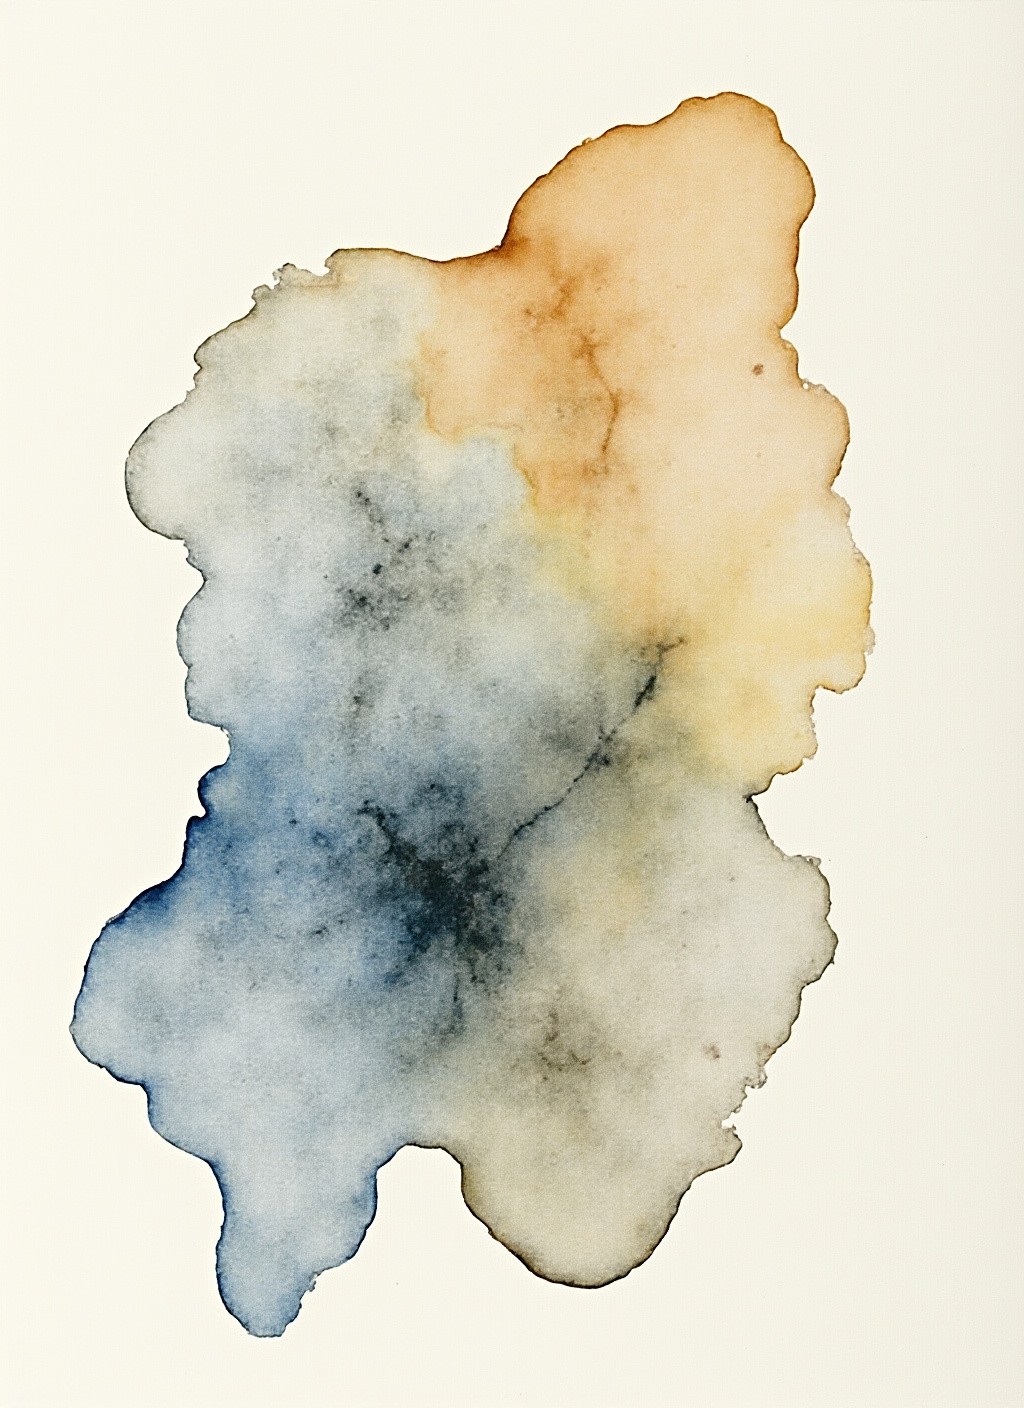
Textural Effects: Salt, Alcohol, and Granulating Pigments
Watercolor texture techniques add a whole layer of visual interest to your loose paintings — and the best part is, you’re letting chemistry do most of the work.
Here are three of my favorites:
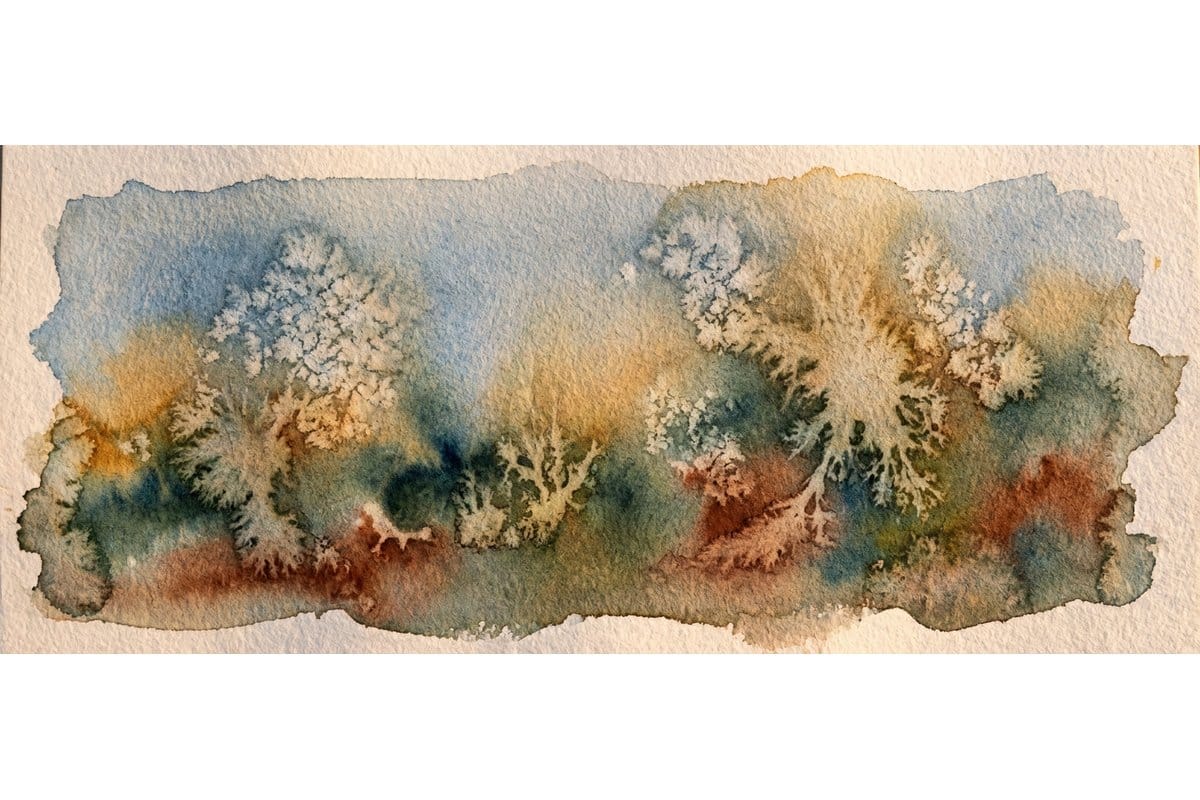
Coarse salt on a wet wash. Sprinkle it while the paint is still shiny-wet (not puddle-wet, not damp — that sweet spot where it glistens). The salt crystals absorb pigment and create these beautiful starburst textures. Perfect for suggesting snow, stone, or the surface of old paper. Brush the salt off once everything is bone dry.
Rubbing alcohol drops. Dip a cotton swab in isopropyl alcohol and dab it onto a wet wash. The alcohol repels the pigment and creates these organic, cell-like patterns. It’s unpredictable every time, which is the whole point. Wonderful for abstract backgrounds or suggesting organic textures like lichen or coral.
Granulating pigments. Some watercolor pigments are naturally “grainy” — they settle into the texture of the paper in a way that creates a mottled, sandy effect. Look for pigments like Ultramarine Blue, Burnt Sienna, and Lunar Earth. Winsor & Newton Cotman sets include several granulating colors that are wonderful for experimenting with these effects.
The key with all of these watercolor texture techniques? Timing. Too wet and the effect disappears. Too dry and nothing happens. Experiment on scrap paper first until you develop a feel for that sweet spot.
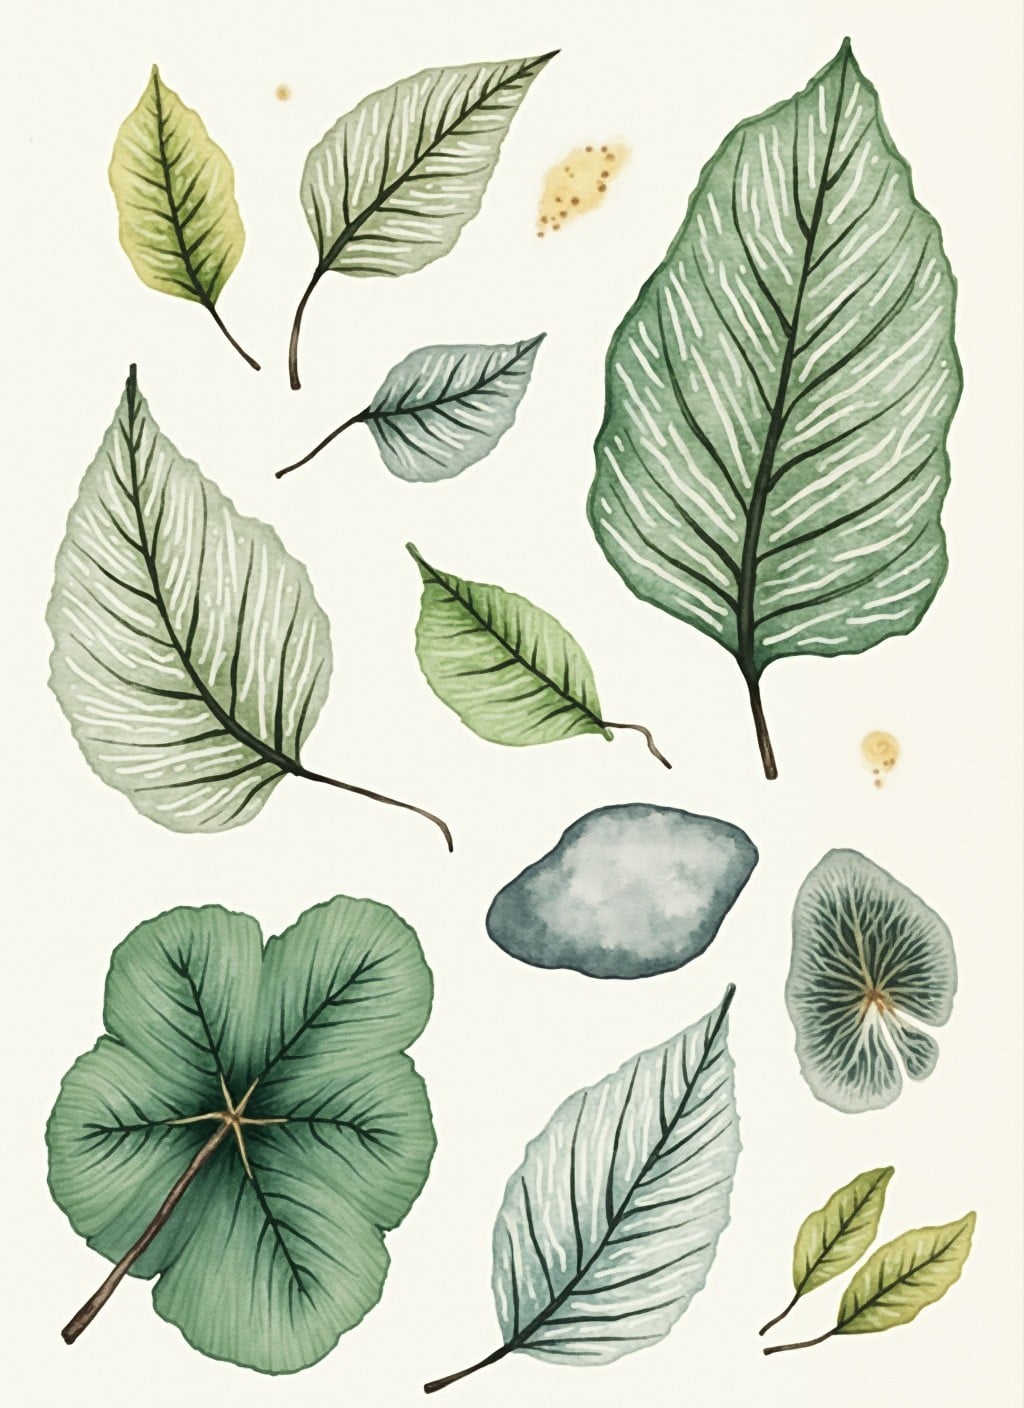
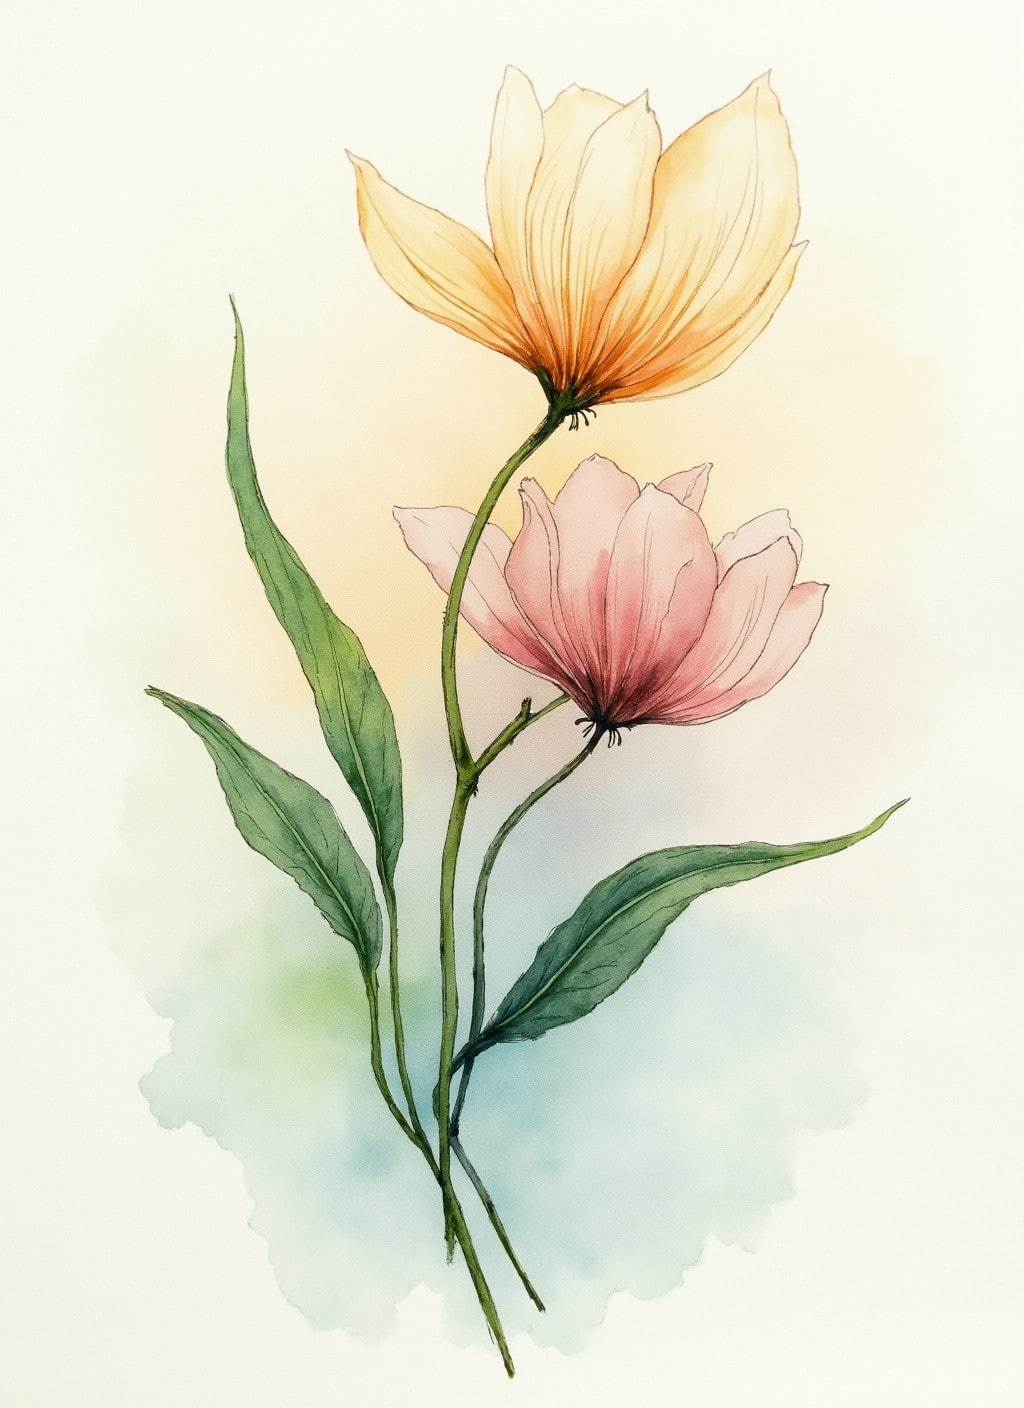
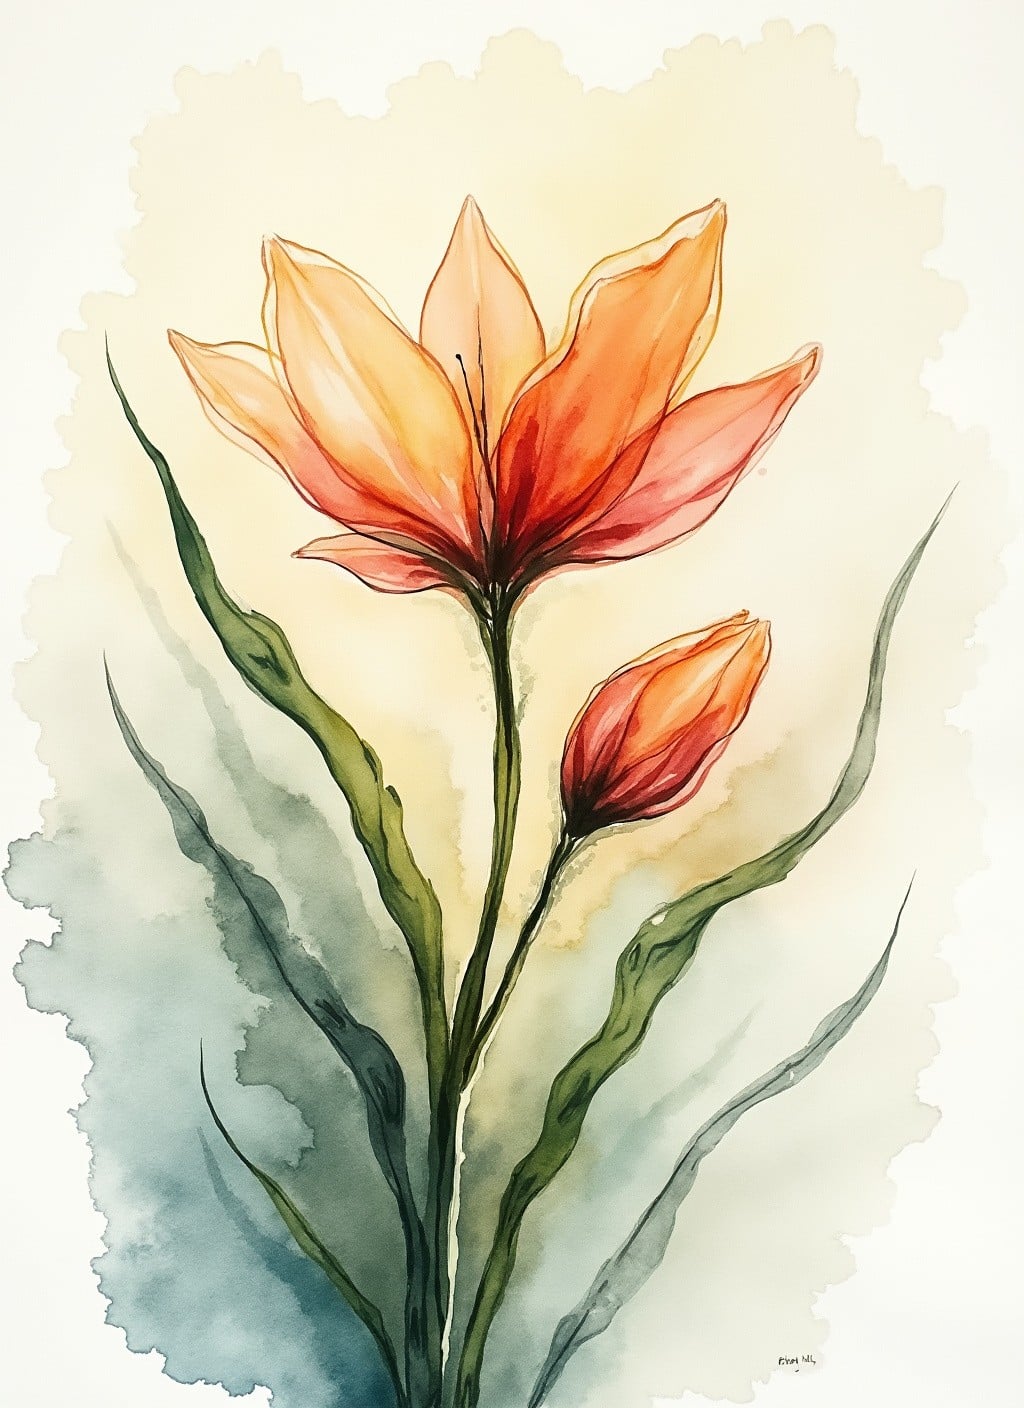
Painting Organic Shapes (Beyond Florals)
Once you understand how to paint loose petals, you can apply the exact same principles to rocks, clouds, fruit, feathers — basically anything with a soft, irregular edge.
The technique is the same: load your brush, lay down a shape with confident strokes, and let the edges stay imperfect. Where beginners get stuck is thinking that “loose” only applies to flowers. But a loose watercolor pear is just as satisfying as a loose rose. Maybe more, because nobody expects it.
Try painting a collection of river stones. Load your brush with a grey mixed from Ultramarine Blue and Burnt Sienna, and drop each stone in a single stroke. While they’re still wet, add a shadow underneath with a darker version of the same mix. Leave a little white highlight on each one. Done. Five seconds per stone and they look more convincing than if you’d spent five minutes fussing.
Feathers are another beautiful subject for loose techniques. Paint the central shaft as a single line, then flick outward strokes from it while the shaft line is still damp. The colors will bleed together at the base and stay sharp at the tips. For more organic subject ideas that work brilliantly with loose watercolor, browse my simple watercolor ideas for beginners — many of those subjects look even better painted loose than tight.
The Art of the Wash: Wet-on-Wet Mastery
Wet-on-wet is the foundation technique behind most expressive watercolor work, and getting comfortable with it will transform every painting you make from here on out.
The concept is dead simple: wet your paper first, then add pigment to the wet surface. What happens next is pure watercolor magic — the color spreads and diffuses in soft, unpredictable ways. No hard edges. Just smooth gradients and gentle blooms of color.
But here’s what nobody tells you about wet-on-wet: the water level matters enormously. If the paper is flooded, your pigment will drift everywhere and you’ll end up with a muddy puddle. If the paper is barely damp, you’ll get hard edges anyway. What you want is an even sheen — like the paper just took a deep breath and is holding it.
Good paper makes this so much easier. I reach for my Canson XL Watercolor Pad for practice sessions — it handles wet-on-wet beautifully without buckling too much, and it’s affordable enough that you won’t feel precious about “wasting” sheets while you learn. Want more ideas for filling your watercolor sketchbook? My easy watercolor sketchbook ideas post is packed with them.
Practice this: wet a section of paper, drop in three analogous colors (say, yellow, orange, warm red), and just watch them mingle. Don’t touch it. Just observe. You’ll learn more about how water moves pigment in ten minutes of watching than in hours of trying to control it.
Expressive Brushwork: Let Go of Control
Your brush can make dozens of different marks depending on pressure, speed, angle, and how much paint it’s carrying. Learning to vary these marks is what gives loose watercolor painting its energy and life.
Most of us grip our brushes like we’re writing with a pen — tight, close to the tip, making small controlled movements. For expressive watercolor, try this: hold your brush at the very end of the handle. Now paint. Feel how different that is? You can’t make tight, fussy marks from there. Your strokes naturally become bigger, bolder, more gestural.
Here are some brush exercises to build your expressive vocabulary:
- Press and lift: Push the brush flat for a thick mark, then lift to a thin point. This single move creates leaves, petals, and feather shapes.
- Dry brush drag: Load your brush, then wipe most of the paint off on a paper towel. Drag it quickly across textured paper for a scratchy, broken line — perfect for suggesting grass, bark, or distant trees.
- Splatter: Load a stiff brush with watery paint and tap it against your finger over the paper. The random droplets add life to skies, ground textures, or abstract compositions.
- Edge variation: In a single brushstroke, let one side stay sharp (where brush meets dry paper) and one side bleed (where brush meets wet paper). This creates instant dimension.
Subscribe to my YouTube channel to watch these techniques in real time — it’s so much easier to understand brushwork when you can actually see the speed, pressure, and water levels in action. Hit that subscribe button so you don’t miss new tutorials!
Loose Watercolor Landscapes and Skyscapes
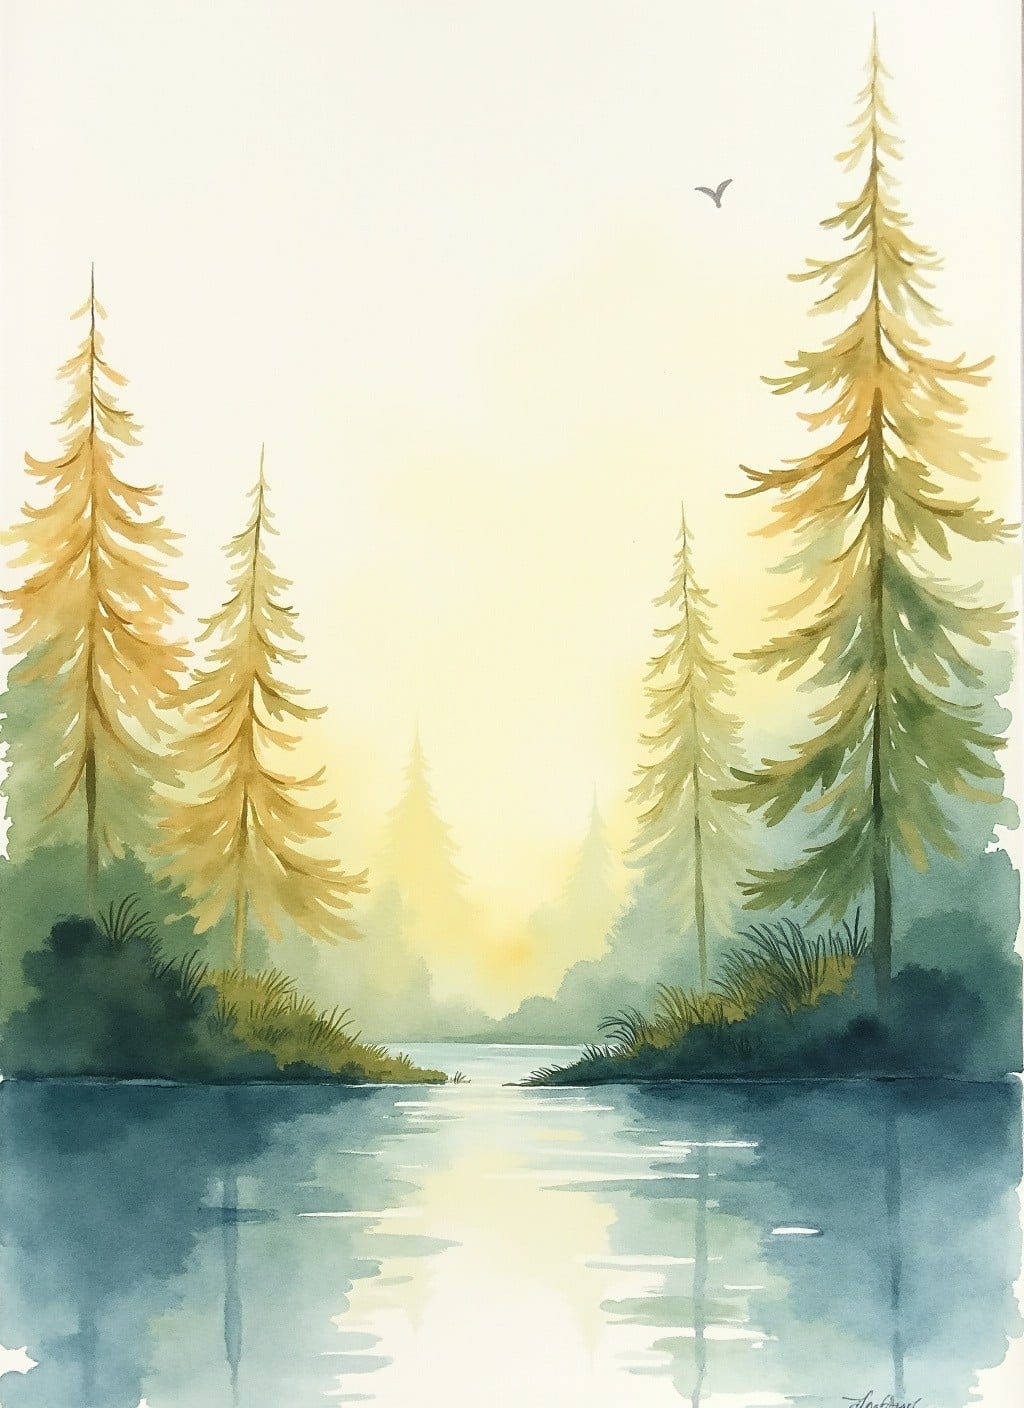
Landscapes are where loose watercolor techniques really sing. All those soft edges and flowing washes? They’re literally how nature looks — distant mountains are blurry, skies blend, water reflects.
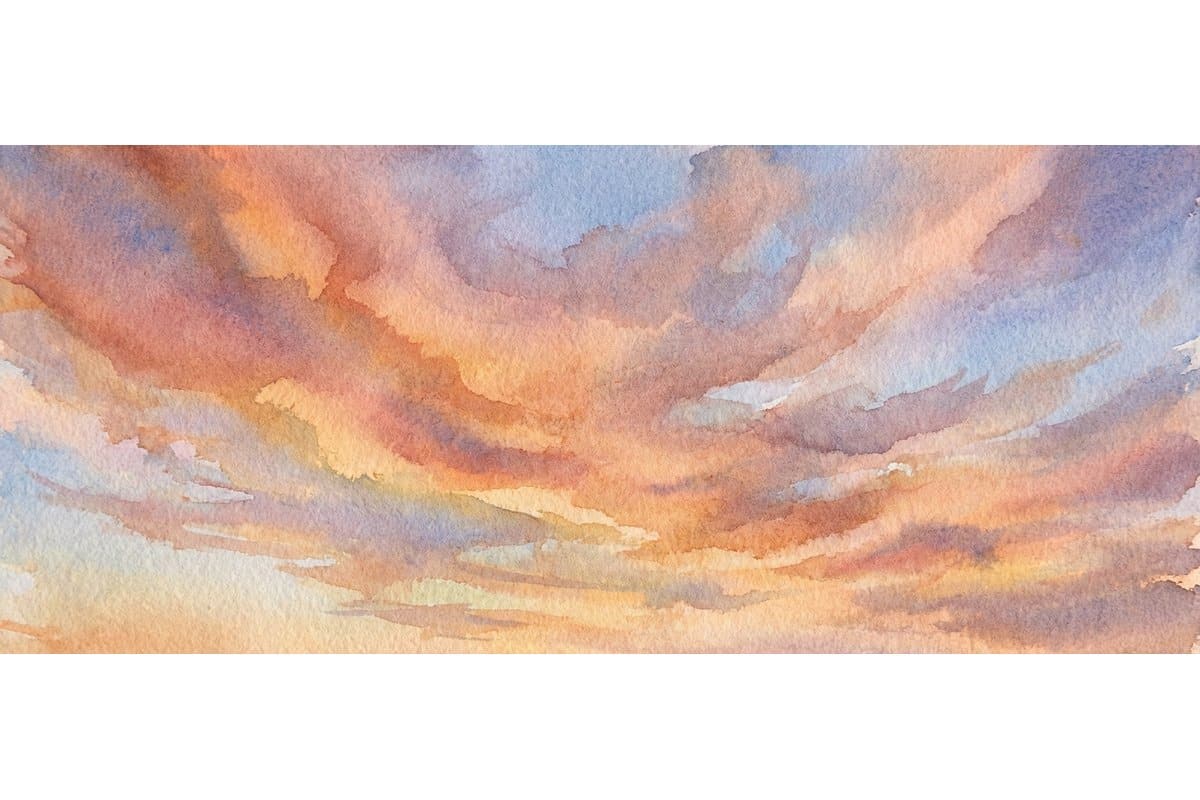
Start with the sky. This is where wet-on-wet was born to be used. Wet your paper across the top two-thirds, then drop in your sky colors. For a simple sunset: lay a pale yellow wash, add coral while it’s still wet, then touch in a deeper rose or lavender at the top. The colors will drift into each other and create the kind of soft gradient that takes oils an hour to achieve.
For distant hills and mountains, wait until the sky wash has lost its sheen but isn’t fully dry. This is the “damp” stage. Lay in your mountain shapes with a slightly thicker pigment. The edges will soften just enough to push those mountains back in space, creating atmospheric perspective without any effort at all.
Water reflections? Flip your landscape upside down. Seriously. Paint the reflection as a softer, slightly distorted version of whatever sits above the waterline. Pull your brushstrokes downward (or upward, since you’ve flipped the paper). When you turn it back over, it’ll look like a convincing reflection.
If landscape subjects excite you, you’ll love pairing these loose watercolor techniques with the prompts in my easy watercolor sketchbook ideas post — lots of nature-based subjects that were made for this approach.
Common Mistakes When Painting Loose (and How to Fix Them)
Painting loose is simple in concept, tricky in practice. Here are the most common stumbling blocks I’ve seen (and made myself) — and what to do about them.
Overworking the paint. This is the number one killer of loose watercolor. You lay down a beautiful wash, and then you go back in and “fix” it. And fix it again. And suddenly it’s muddy and dead. The rule: once you put paint down, leave it alone until it’s dry. Walk away if you have to. Make a cup of tea. Just don’t touch it.
Using too little water. Loose watercolor needs water. Lots of it. If your paint feels sticky or thick on the paper, add more water to your brush. You’re not painting a wall — you’re guiding a river. The paint should flow off your brush, not get dragged.
Being afraid of the mess. Loose painting is messy by nature. Paint will drip. Colors will bleed where you didn’t intend. Your edges will be imperfect. That’s not a bug — it’s the entire feature. The drips and bleeds are what give loose watercolor its charm and energy.
Painting too small. Tiny brushes and tiny paper encourage tight, controlled marks. When you’re learning loose watercolor techniques, go bigger. Use a size 10 or 12 round brush. Paint on at least A4-size paper. Give your arm room to make those big, sweeping strokes. For more beginner-friendly tips like these, my watercolor painting ideas for beginners post covers the fundamentals.
Comparing your “loose” to someone else’s. Everyone’s version of loose looks different. Some painters are barely controlled chaos. Others are just slightly softer than realistic. Your loose is your loose. Don’t try to match someone else’s level of freedom — find your own comfort edge and push it just a little further each time.
My Go-To Supplies for Loose Watercolor
Good supplies won’t make you a better painter overnight, but they’ll stop your materials from fighting against you. Here are the watercolor essentials I reach for every time I sit down to paint loose:

| 
| 
| 
|
This post contains affiliate links, which means I may earn a small commission at no extra cost to you if you make a purchase. I only recommend products I genuinely love and use myself!
Free Abstract Watercolor Prompt Cards
Ready to push your loose watercolor practice into abstract territory? I’ve created a set of prompt cards that give you starting points for abstract compositions — color palettes, mood words, mark-making challenges, and compositional starting structures. They’re designed to get you out of your head and into the paint.
- Color mood prompt cards (pair unexpected palettes with emotions)
- Mark-making challenge cards (practice specific brush techniques)
- Composition starters (where to place your first wash)
- Texture experiment prompts (salt, alcohol, lifting, and more)
FAQ
How long does it take to learn loose watercolor techniques?
Most people start to feel a shift within a few dedicated practice sessions — maybe 3-5 sit-downs where you focus specifically on loosening up. But “learning” loose watercolor is really an ongoing thing. You’ll get more comfortable over weeks, and then one day you’ll realize you’re not thinking about it anymore. The paint just flows. Give yourself grace and enjoy the messy middle.
Can I combine loose and tight techniques in one painting?
Absolutely — and honestly, some of the most striking watercolors do exactly this. Paint your background loose and wild, then add a few carefully rendered details on top once it’s dry. The contrast between controlled focal points and free-flowing surroundings creates real visual drama. It’s not all-or-nothing.
What paper is best for loose watercolor painting?
You want cold-pressed watercolor paper, 140lb (300gsm) or heavier. Cold-pressed has enough texture to grab the paint while still letting it flow. Avoid smooth hot-pressed paper when you’re practicing loose techniques — it’s much harder to control washes on a slick surface. For everyday practice, a student-grade pad works fine. Save the fancy cotton paper for finished pieces.
Do I need expensive paints for loose watercolor?
Not at all. Student-grade paints like Winsor & Newton Cotman are perfectly good for learning and practicing. The main difference with artist-grade paints is higher pigment concentration and better lightfastness — nice to have, but not essential when you’re building skills. Spend your budget on decent paper first. That makes a much bigger difference than fancy paint.
How do I stop overworking my watercolors?
Set a physical timer. Seriously. Give yourself 60 seconds per wash, then put the brush down and walk away. The urge to “fix” a wet wash is almost irresistible, but it’s also what destroys freshness. Another trick: paint standing up. It naturally speeds up your strokes and makes you less likely to fiddle. And remember — what looks “wrong” while wet often dries beautifully.
Final Thoughts
Here’s what I want you to take away from all of this: loose watercolor isn’t a skill you master once and check off a list. It’s a practice. A way of showing up to the page with an open hand instead of a clenched fist. Some days your washes will sing. Other days they’ll turn to mud. Both are part of the journey.
The best thing you can do right now is pick one technique from this post — just one — and try it today. Not tomorrow. Not when you have the “right” supplies or the perfect free afternoon. Grab whatever paint and paper you have, set a timer for fifteen minutes, and make some marks. Let the water move. Let the colors bleed. Let it be imperfect.
That’s where all the good stuff happens.
Want to watch these loose watercolor techniques in action? Head over to my YouTube channel where I paint along and share tips in real time. Hit subscribe so you catch new tutorials as they drop!
And if you try any of these techniques, tag me @artsydee on Pinterest — I’d genuinely love to see what you create. Messy, beautiful, imperfect, and all.
You Might Also Like
- Loose Watercolor Flowers: A Step-by-Step Guide
- Watercolor Painting Ideas for Beginners
- Simple Watercolor Ideas for Beginners
- Easy Watercolor Sketchbook Ideas
Pin this for later!