Last Updated on September 16, 2026 by Dee
Faces are the thing almost everyone wants to draw and the thing almost everyone finds hardest. One eye ends up higher than the other, the nose lands in a strange spot, and somehow the whole thing looks a little off even when you can’t say why. If that’s you, you’re in good company — the face is the one thing almost every artist I know has quietly wrestled with at some point. The good news is that most of it comes down to a handful of proportions you can actually learn.
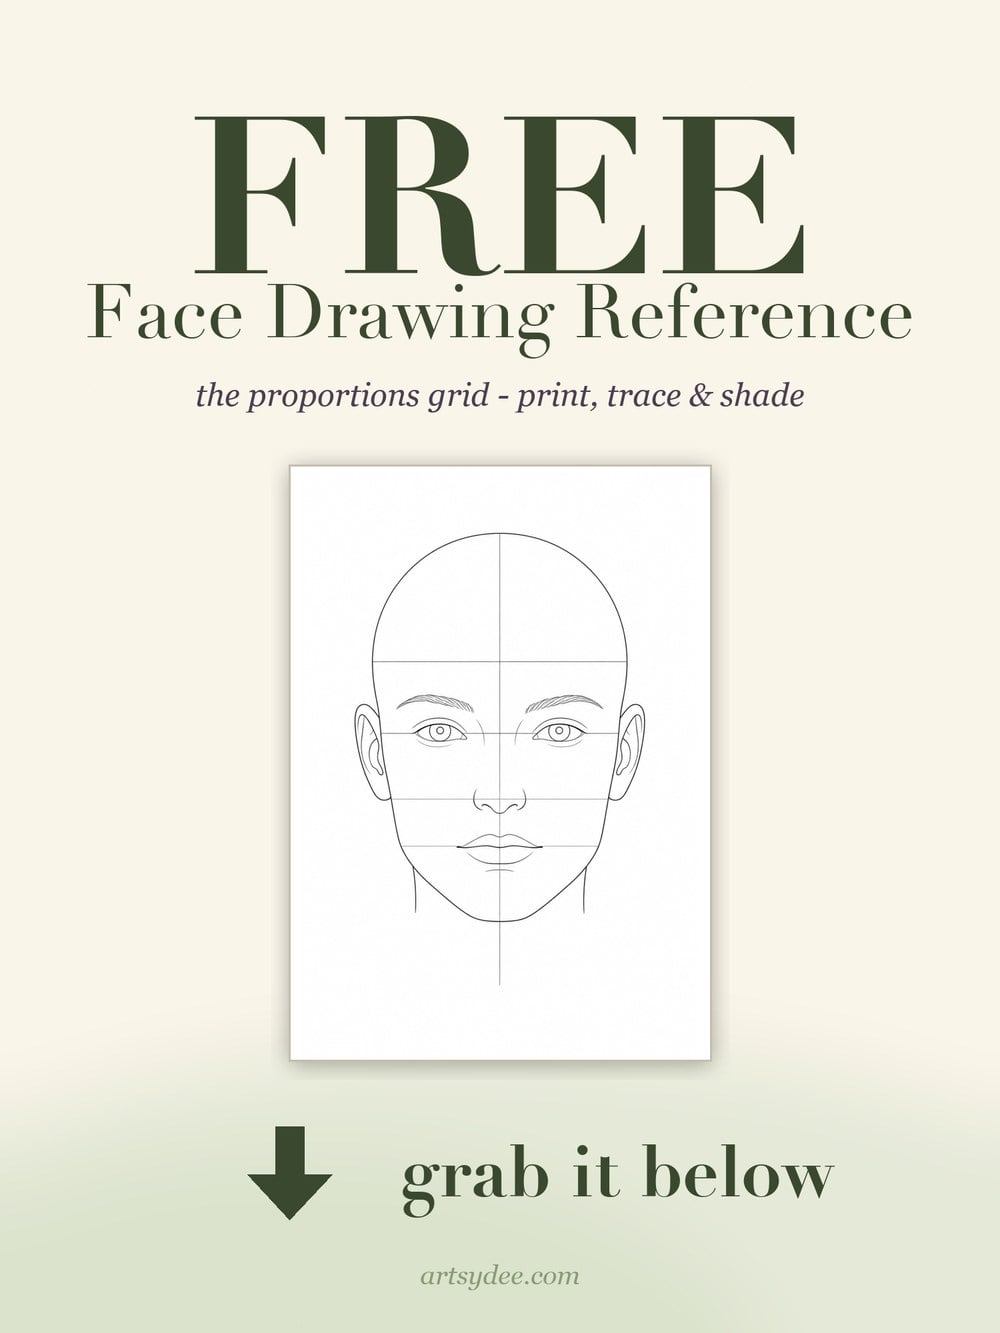
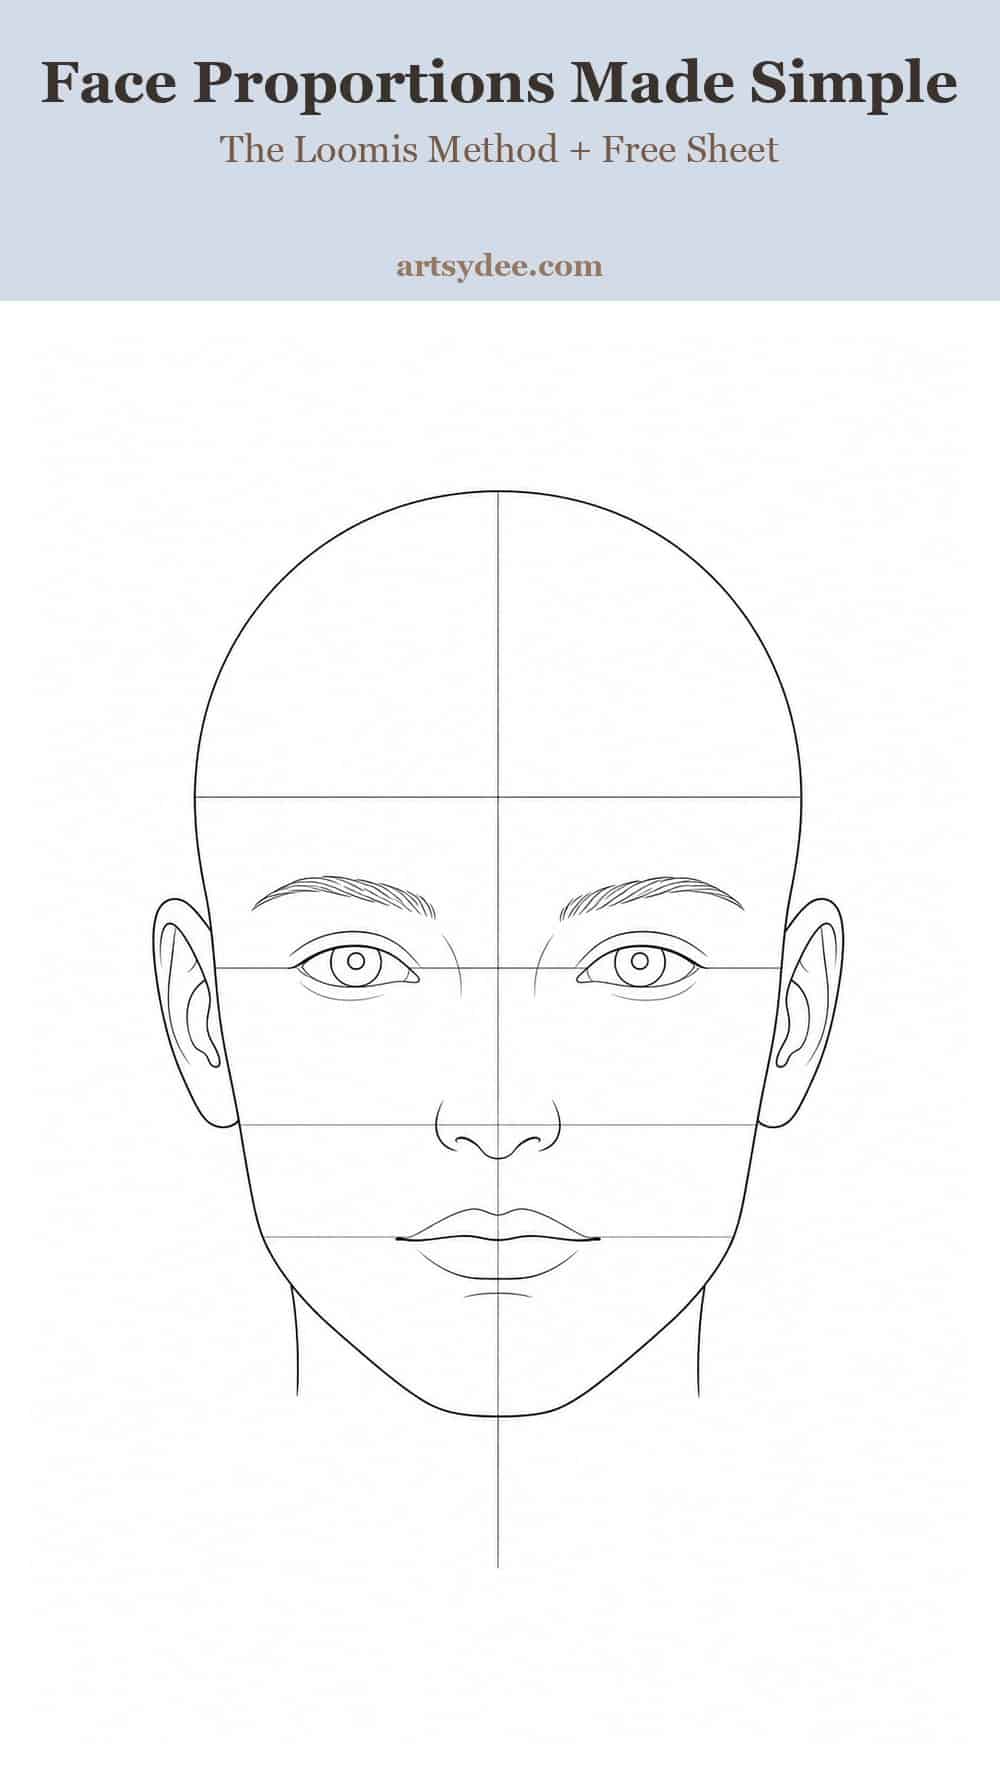
To make it easier, I’ve put together a free Face Drawing Reference Sheet — a printable you can keep next to your sketchbook while you practise. It’s a single clean front-view head with the classic proportion guidelines marked on it, so you can print it and practise placing the eyes, nose and mouth in the right spots. Grab it right below and let’s walk through how faces actually work.
Grab Your Free Face Reference Sheet
The free sheet is one page from my full face reference set — a clean front-view head with the proportion guidelines marked, so you can print it and start drawing straight over the top today. Pop your email in the form above and it’ll land in your inbox, ready to print.
Table of Contents
Why Use a Face Drawing Reference
A face drawing reference gives you a map of where the features sit before you commit a single line. Instead of guessing where the eyes go, you have a guide that shows the proportions and angles that make a face read as a face.
Here’s the thing nobody tells beginners: drawing from reference isn’t cheating. Every artist I know keeps some kind of guide within reach, whether it’s a photo, a printed proportion sheet, or a scribbled note in the margin. Your brain is brilliant at recognising faces and surprisingly bad at reproducing them, because it remembers the idea of a face rather than the measurements. A reference closes that gap. It takes the panic out of the blank page and lets you focus on the fun part — the character, the expression, the little details that make a face feel like a person.
If you’ve already worked through my eye drawing reference or hand drawing reference, this is the natural next step. The face pulls all those individual features together into one believable whole.
Face Proportions, Made Simple
The quickest rule for face proportions: the eyes sit halfway down the head, the bottom of the nose sits halfway between the eyes and the chin, and the mouth sits about a third of the way from the nose to the chin. Get those three landmarks right and the rest tends to fall into place.
Most beginners draw the eyes far too high because we mentally lump the forehead and hairline together and forget how much skull sits above the brow. So start with an egg shape for the head, draw a light horizontal line across the middle, and place the eyes there. It’ll feel too low. Trust it anyway — it’s almost always right.
A couple more handy guides: the space between the two eyes is roughly one eye wide, and the outer corners of the eyes line up with the edges of the nose at the bottom. The Loomis method — the one in your free sheet — builds on this by wrapping the head in simple guidelines so you can turn and tilt it while keeping everything in the right place. It looks technical at first, but after a few tries it becomes second nature.
The Three Angles Every Artist Needs
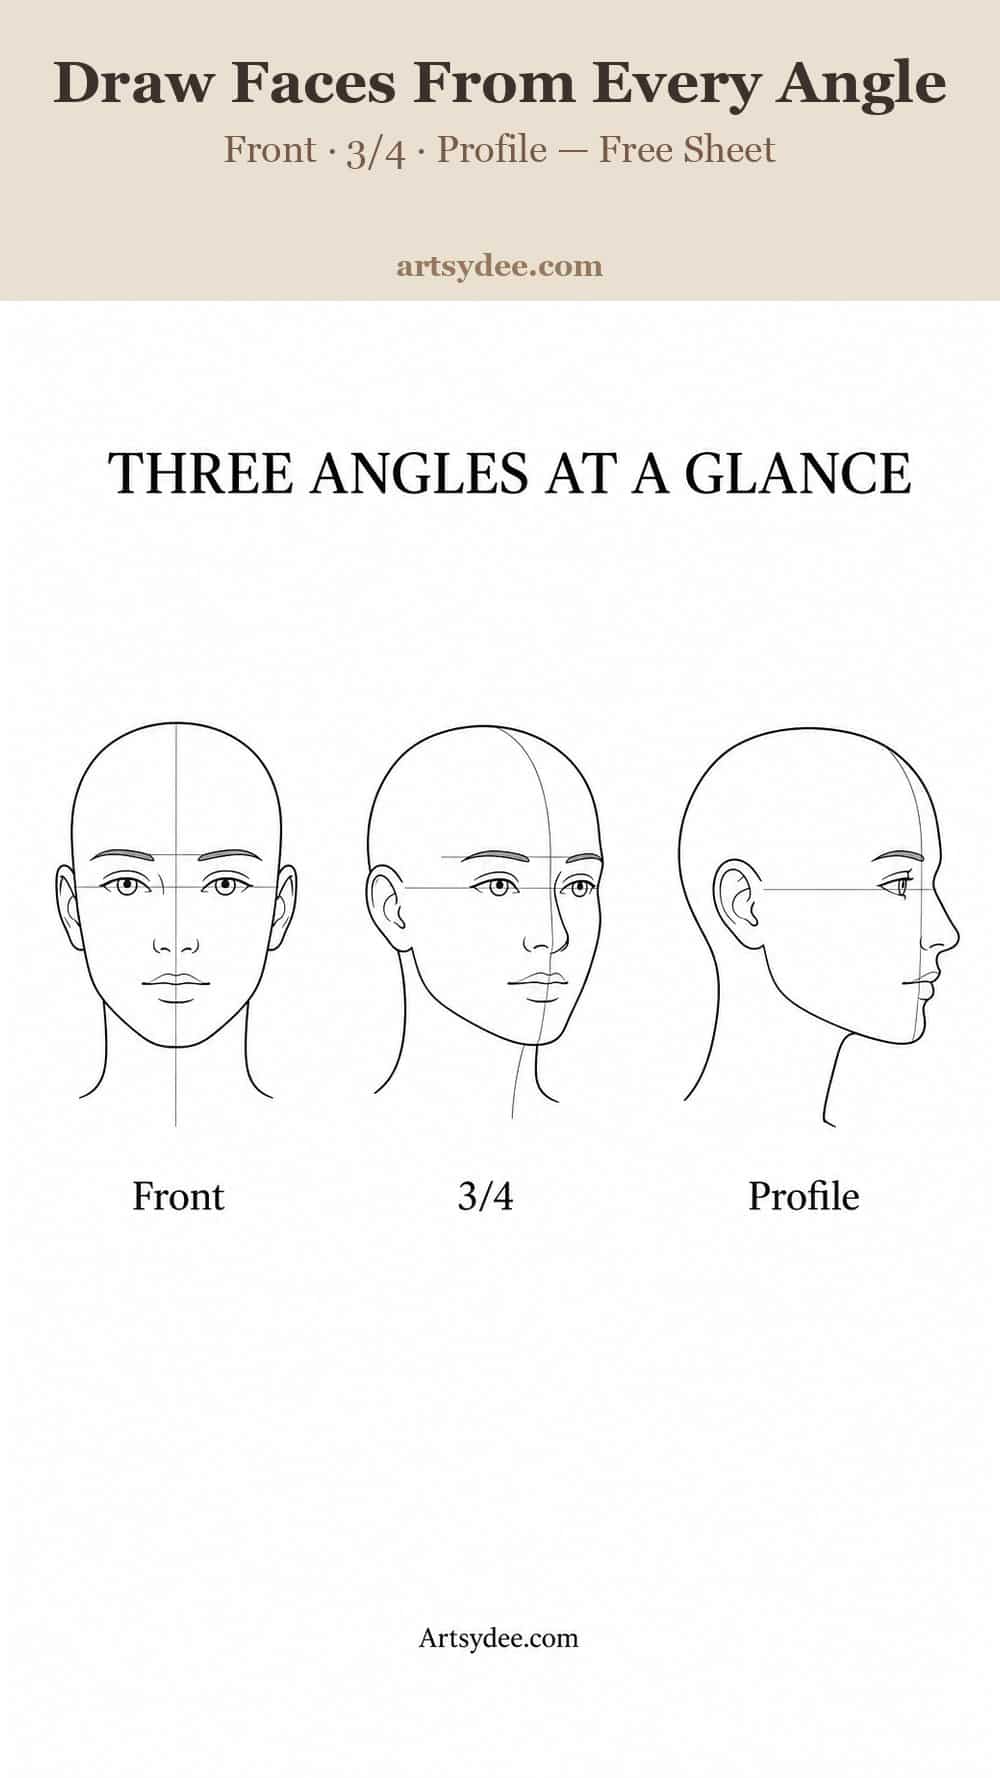
The three angles worth mastering first are the front view, the three-quarter view, and the profile. Nail these and you can draw a face in almost any pose you’ll actually need.
The front view is the friendliest place to start because it’s symmetrical — whatever you do on one side, you mirror on the other. Draw a vertical centre line and keep the features balanced across it.
The three-quarter view is the one you’ll use most, and it’s where a lot of people get stuck. The trick is that the centre line curves as the head turns, so the far side of the face compresses and the nose starts to overlap the far cheek. The eye on the far side gets a little narrower too. It feels fiddly until it clicks, and then it’s the angle that makes your portraits look natural instead of stiff.
The profile is a pure side view, and the whole game here is the line from forehead to nose to lips to chin. Get that silhouette right and the profile reads instantly. Your free sheet shows all three side by side so you can see exactly how the features shift as the head rotates.
Drawing Expressions Without Overthinking It
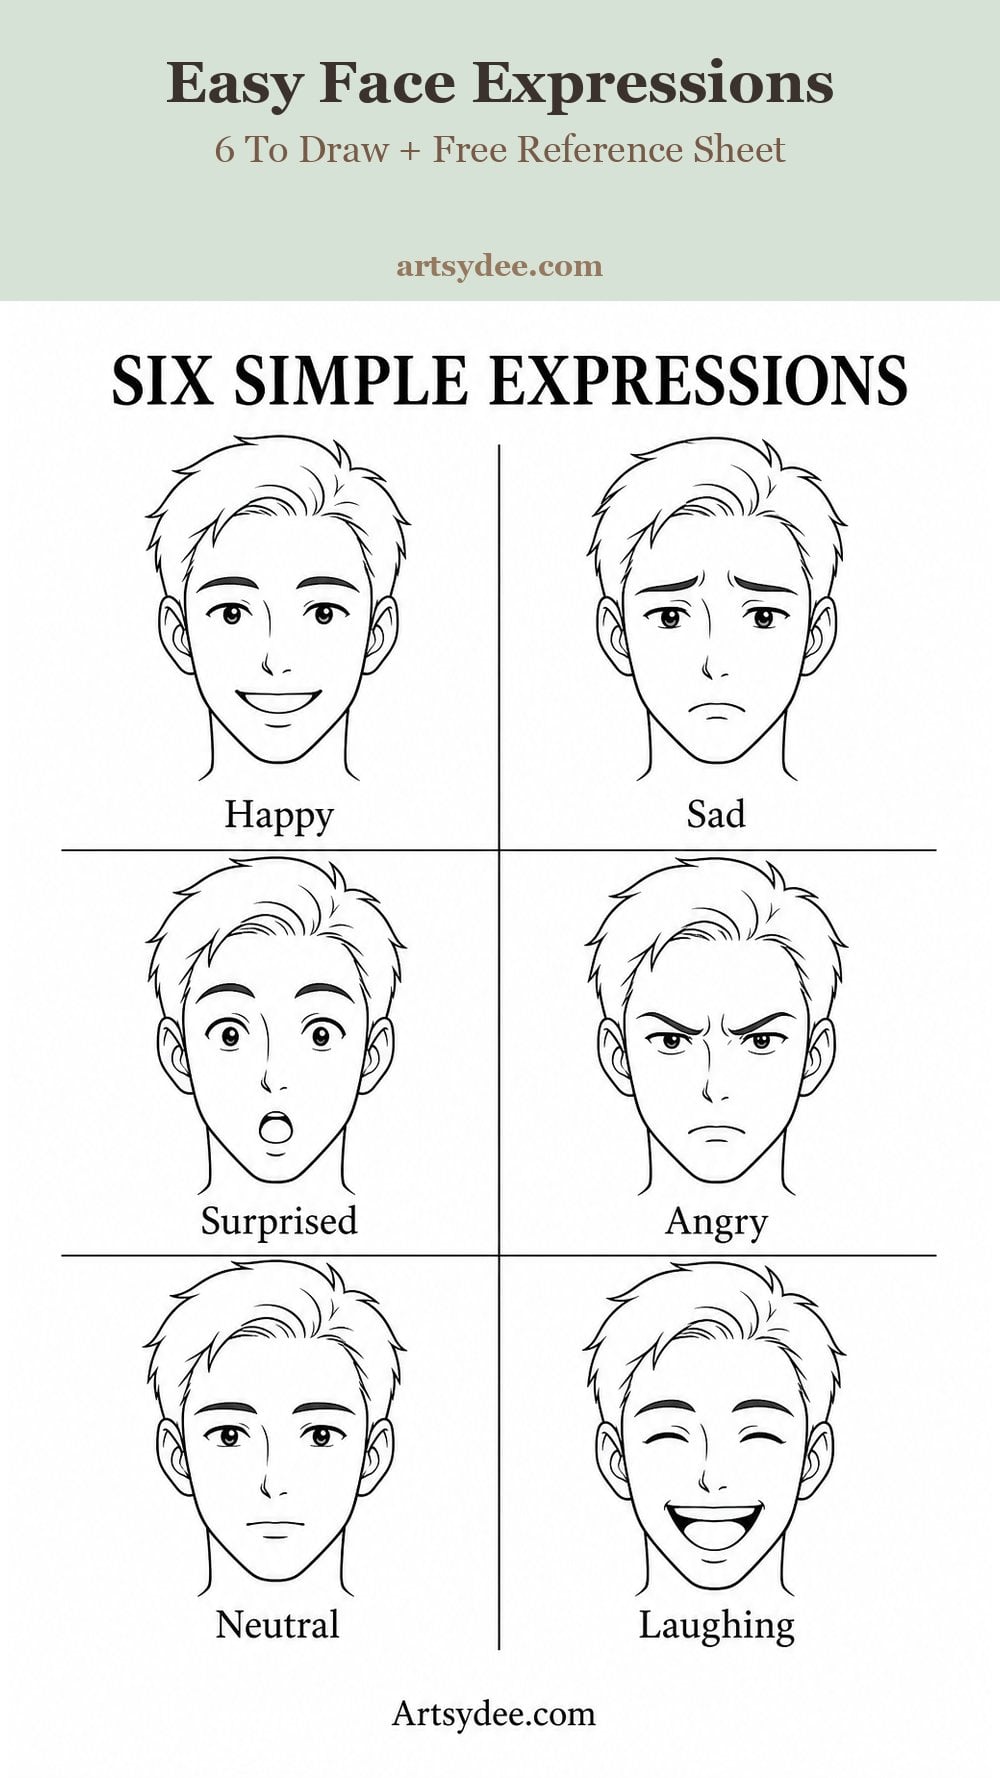
Expressions come down to three movers: the eyebrows, the eyes, and the mouth. Change those three and you can go from happy to worried to surprised without touching anything else.
A genuine smile, for instance, isn’t just a curved mouth — the cheeks lift and the eyes narrow slightly. Miss that and the smile looks pasted on. Surprise is all about opening things up: raised brows, wide eyes, a dropped jaw. Sadness pulls the inner corners of the brows up and the mouth corners down. Once you start noticing these patterns, you’ll spot them everywhere.
The expressions page in the free sheet gives you six basics to copy — happy, sad, surprised, angry, neutral and laughing. I’d start by drawing the same neutral face a few times, then only change the brows and mouth to shift the mood. It’s a brilliant way to see how little it takes to make a face feel alive.
Common Face Drawing Mistakes
The most common face drawing mistakes are placing the eyes too high, forgetting the skull above the brow, and drawing every feature with the same heavy line. Here are the ones I saw over and over in the classroom, and the quick fixes for each.
- Eyes too high. The classic. Drop them to the halfway line of the head and resist the urge to raise them.
- Flat, forgotten skull. Beginners shrink the cranium. Remember there’s a big rounded mass of head above and behind the face.
- Features floating apart. Use light guidelines to connect the eyes, nose and mouth so they belong to the same face.
- Same line weight everywhere. Press harder on shadowed edges — the lash line, under the nose, the corners of the lips — and go light everywhere else. It instantly adds depth.
- Symmetry panic in the three-quarter view. Faces aren’t flat, so stop trying to make both sides match. Let the far side compress.
How to Practise With a Reference Sheet
The best way to practise with a face reference sheet is to keep it beside you and do short, focused warm-ups rather than one long marathon. Ten minutes a day beats two hours once a week, every time.
Print the sheet and try this simple routine. Start by copying the proportion guide a few times until the landmarks feel automatic. Then pick one angle and draw it three or four times, checking your version against the reference each round. Once the angles feel comfortable, move on to swapping expressions on a neutral face. Keep a cheap sketchbook just for face warm-ups so you can flip back and watch yourself improve — it’s honestly the most motivating thing.
A soft pencil helps too. I reach for a graphite set like the Faber-Castell Pitt Graphite tin for the light construction lines, because a softer grade erases cleanly and lets you build up the darker features gradually. Sketch the guidelines lightly, get everything sitting in the right place, and only then commit to the final lines. When a face goes wrong, don’t scrap the page — a precise eraser like the Tombow Mono Zero lets you lift out just the one line that drifted, and you’ll fix it faster next time.
This post contains affiliate links, which means I may earn a small commission at no extra cost to you if you make a purchase. I only recommend supplies I genuinely use and love.
Want More Face Drawing Practice?
The free sheet gets you started, and when you are ready to go further the same step-by-step approach runs right through my printable drawing reference sets — the 25 Hand Drawing Reference Templates is the closest sibling to this one.
Prefer a steady stream of new drawing resources? I share fresh reference sets, tutorials and printables every month over on my Patreon — it’s where a lovely community of hobby artists hang out and practise together. Come and join us. You can also browse more printable drawing guides in my Payhip shop.
Frequently Asked Questions
What is the easiest way to start drawing faces?
Start with the front view and a proportion guide. Draw an egg shape, place the eyes on the halfway line, then add the nose and mouth using the landmarks in a reference sheet. The front view is symmetrical, so it’s the most forgiving place to build confidence before you move on to angled views.
Why are faces so hard to draw?
Faces are hard because our brains are wired to notice the tiniest error in a face, so even a small proportion slip looks obviously wrong. The fix is to stop drawing from memory and use a reference for the key measurements — where the eyes, nose and mouth actually sit — until those proportions become second nature.
What are the correct proportions for a face?
As a general guide, the eyes sit halfway down the head, the bottom of the nose sits halfway between the eyes and chin, the mouth sits about a third of the way from nose to chin, and the eyes are roughly one eye-width apart. These are averages, not strict rules — real faces vary, and that variation is what gives a portrait character.
Are these face reference templates free to use?
Yes — the free Face Drawing Reference Sheet is yours to download and print for your own practice. Use it as a study aid beside your sketchbook as much as you like. If you’d like the expanded set with step-by-step breakdowns and more angles, that’s available as an affordable printable in my shop.
Final Thoughts
Learning to draw faces isn’t about talent — it’s about knowing where the pieces go and practising until it feels natural. Keep your free reference sheet close, work in short bursts, and be kind to yourself on the wonky days. Everyone draws a few lopsided faces on the way to the good ones.
Want to see this kind of thing in action? Head over to my YouTube channel for step-by-step drawing and watercolour tutorials — hit subscribe so you don’t miss the next one.
You can also find me sharing daily inspiration over on Pinterest and YouTube — come say hello!
You Might Also Like
Faces are just the beginning. If you’re building up your figure-drawing toolkit, work through the rest of the series too — each one uses the same clear, beginner-friendly approach:
- Eye Drawing Reference: Anatomy, Expressions & Styles
- Hand Drawing Reference for Artists
- Sketch Ideas for Beginners
- 100 Sketchbook Prompts
- Cute Food Drawings to Try
Grab your free face sheet above, print it out, and give yourself ten minutes today. Draw one face. Then draw it again. That’s genuinely how it starts — and future-you will be so glad you did.
📌 Pin this for later!