Last Updated on September 16, 2026 by Dee
Hair is one of those things that can make or break a portrait. You can nail the face, get the eyes just right, and then the hair turns into a flat helmet or a scribbly mess that sits on top of the head like a wig. Sound familiar? You are absolutely not alone.
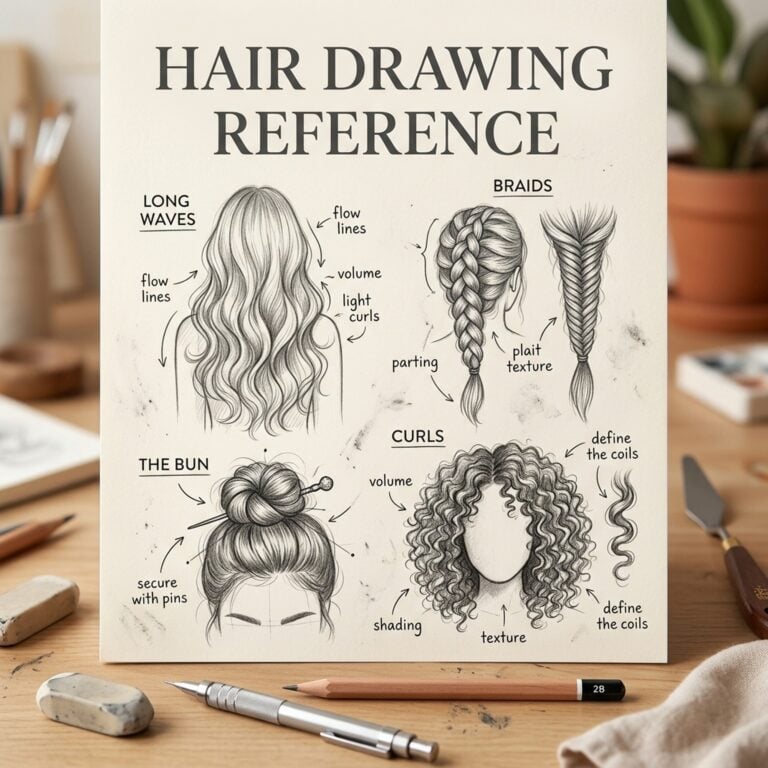
The good news is that drawing hair gets so much easier once you stop trying to draw every single strand and start seeing it as flowing shapes with direction and weight. That is exactly what a good reference gives you: a map of how hair actually behaves so you can trace the movement instead of guessing at it.
Whether you are sketching portraits, illustrating characters, or just filling a page in your sketchbook on a rainy afternoon, hair is where a drawing either comes alive or falls flat. It frames the face, sets the mood, and says an enormous amount about a person before you have drawn a single other detail. Get the flow and the volume right and even a simple face reads as someone real.
To help you practise, I have put together a free hair drawing template you can print and keep next to your sketchbook. Grab it right below, then let’s walk through how to draw hair that looks soft, full and alive — whatever the style.
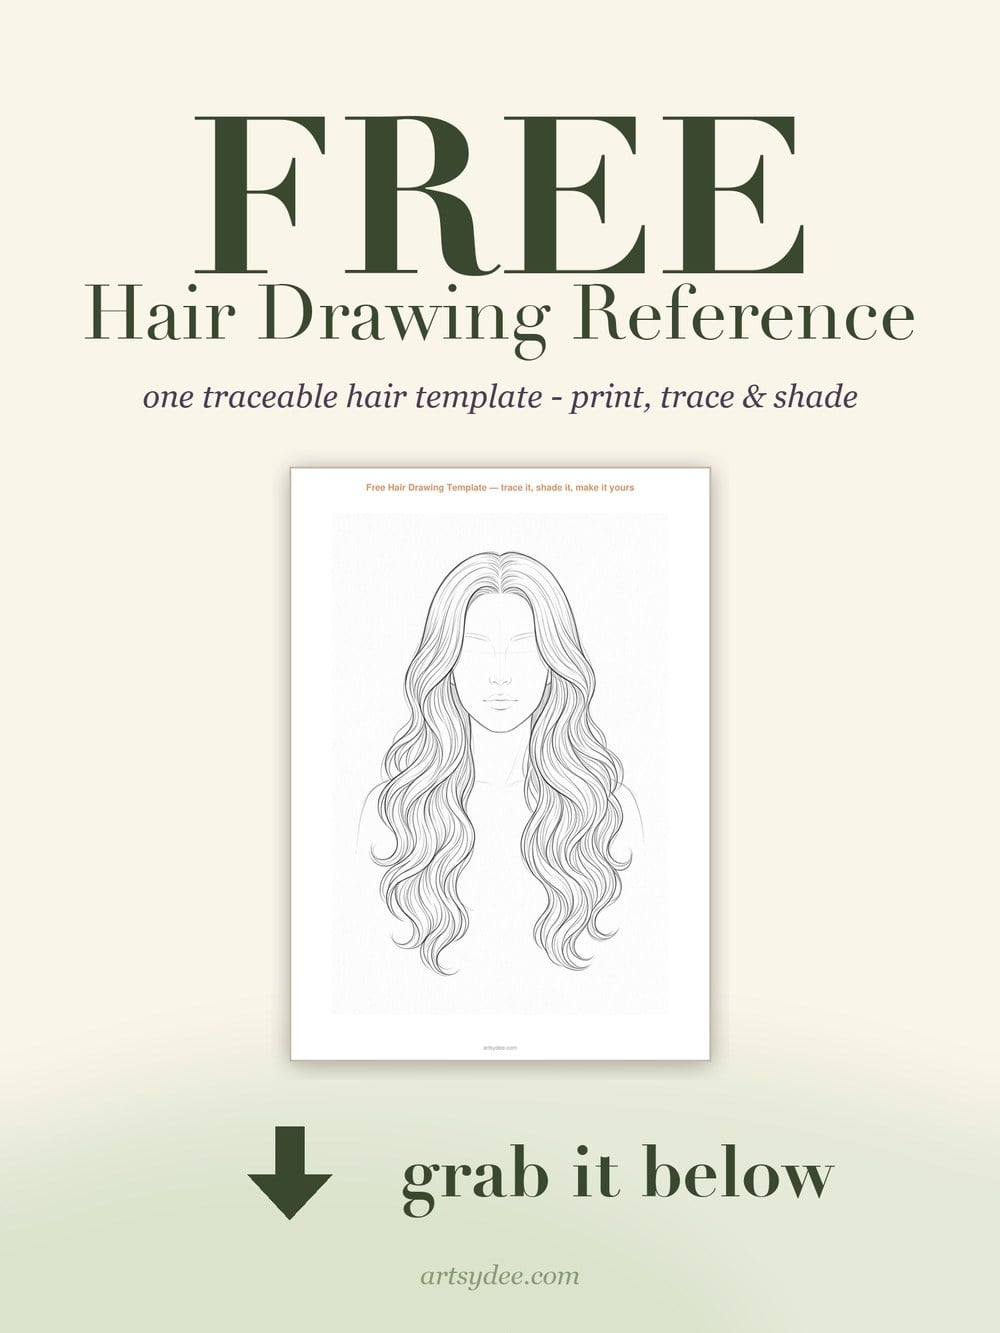
Table of Contents
Why Use a Hair Drawing Reference
A hair drawing reference shows you where the volume sits, which way the strands travel, and how light falls across the surface before you commit a single line. Instead of guessing, you have a guide for the flow — and flow is everything with hair.
Working from reference is not cheating. Every artist I know keeps something nearby, whether it’s a photo, a printed study sheet, or a quick note in the margin. Your brain remembers the idea of hair, not the way it actually clumps, parts and catches the light. A reference closes that gap so you can relax and enjoy the drawing.
If you have already worked through my face drawing reference or eye drawing reference, hair is the natural next step — it frames the face and pulls the whole portrait together.
Prefer to dive straight in? You can grab the full Hair Drawing Reference set — 25 traceable templates for £8 whenever you like. Otherwise, grab the free template above and keep reading.
Draw Hair as Shapes, Not Strands
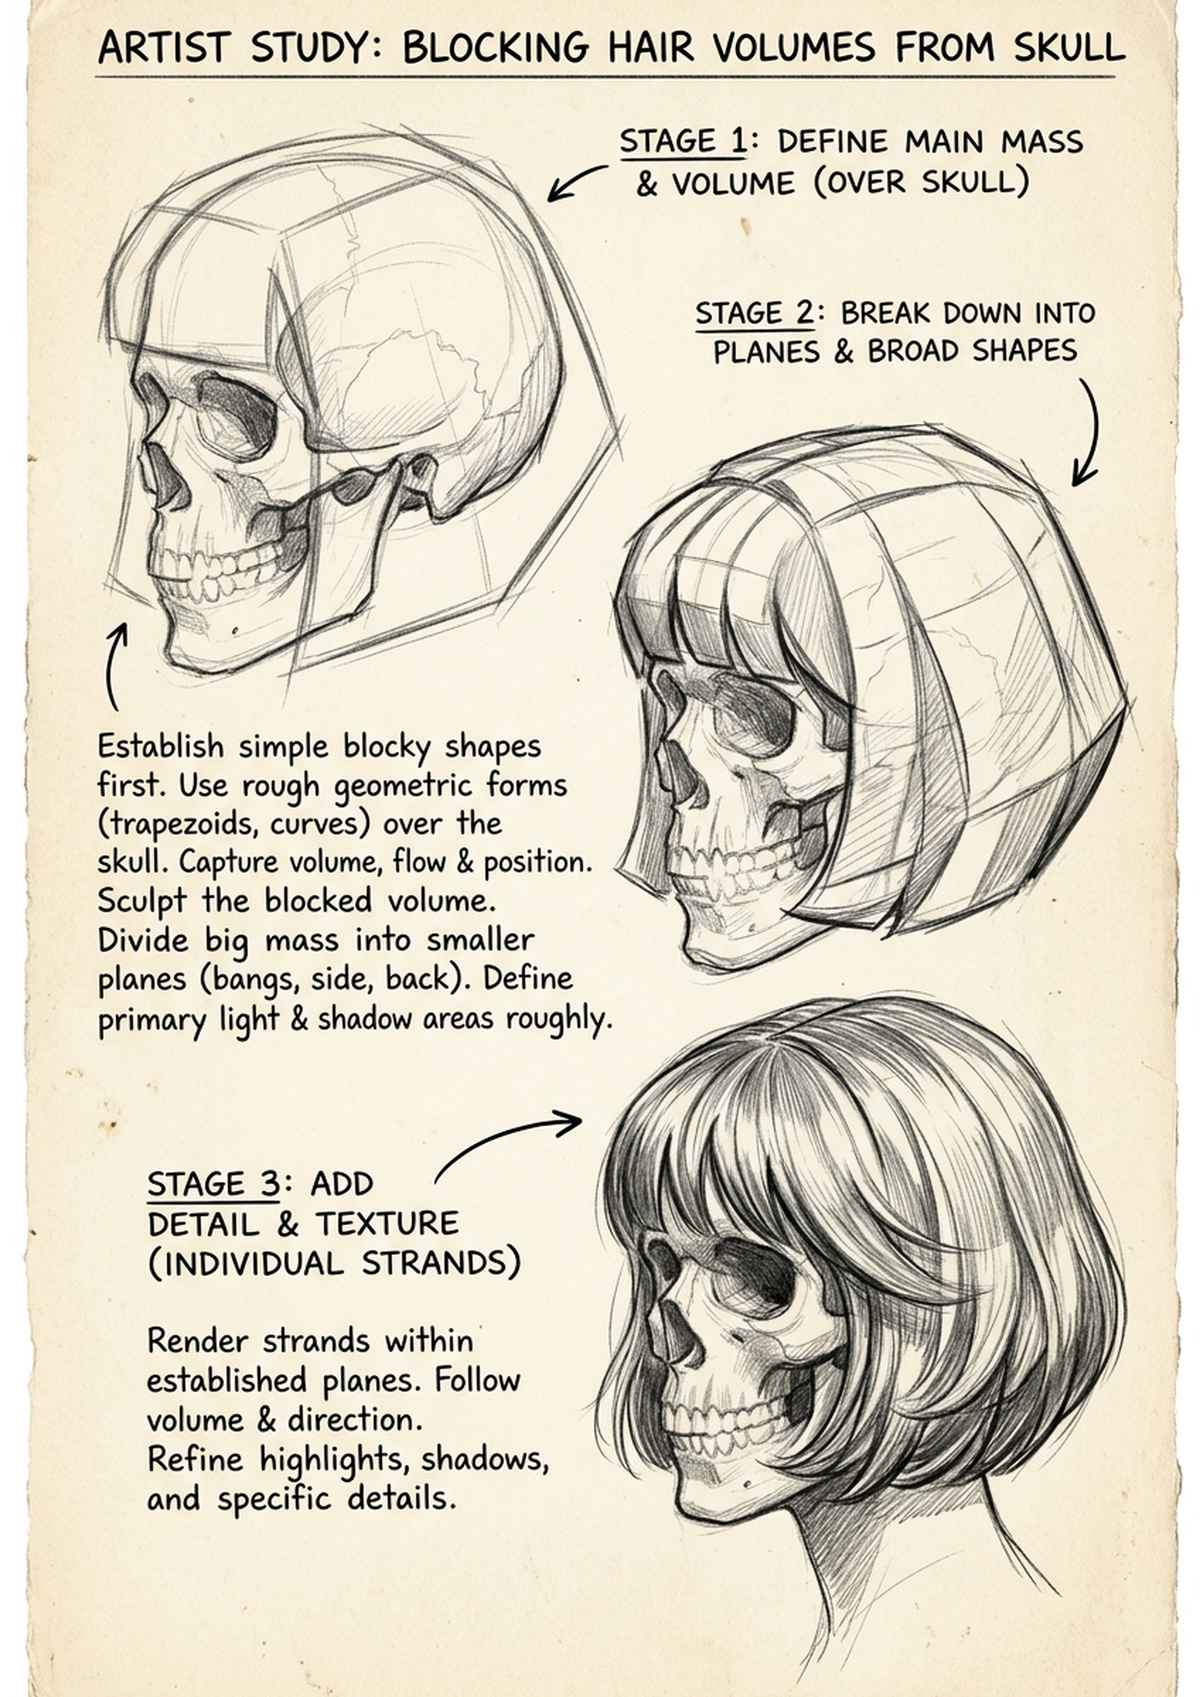
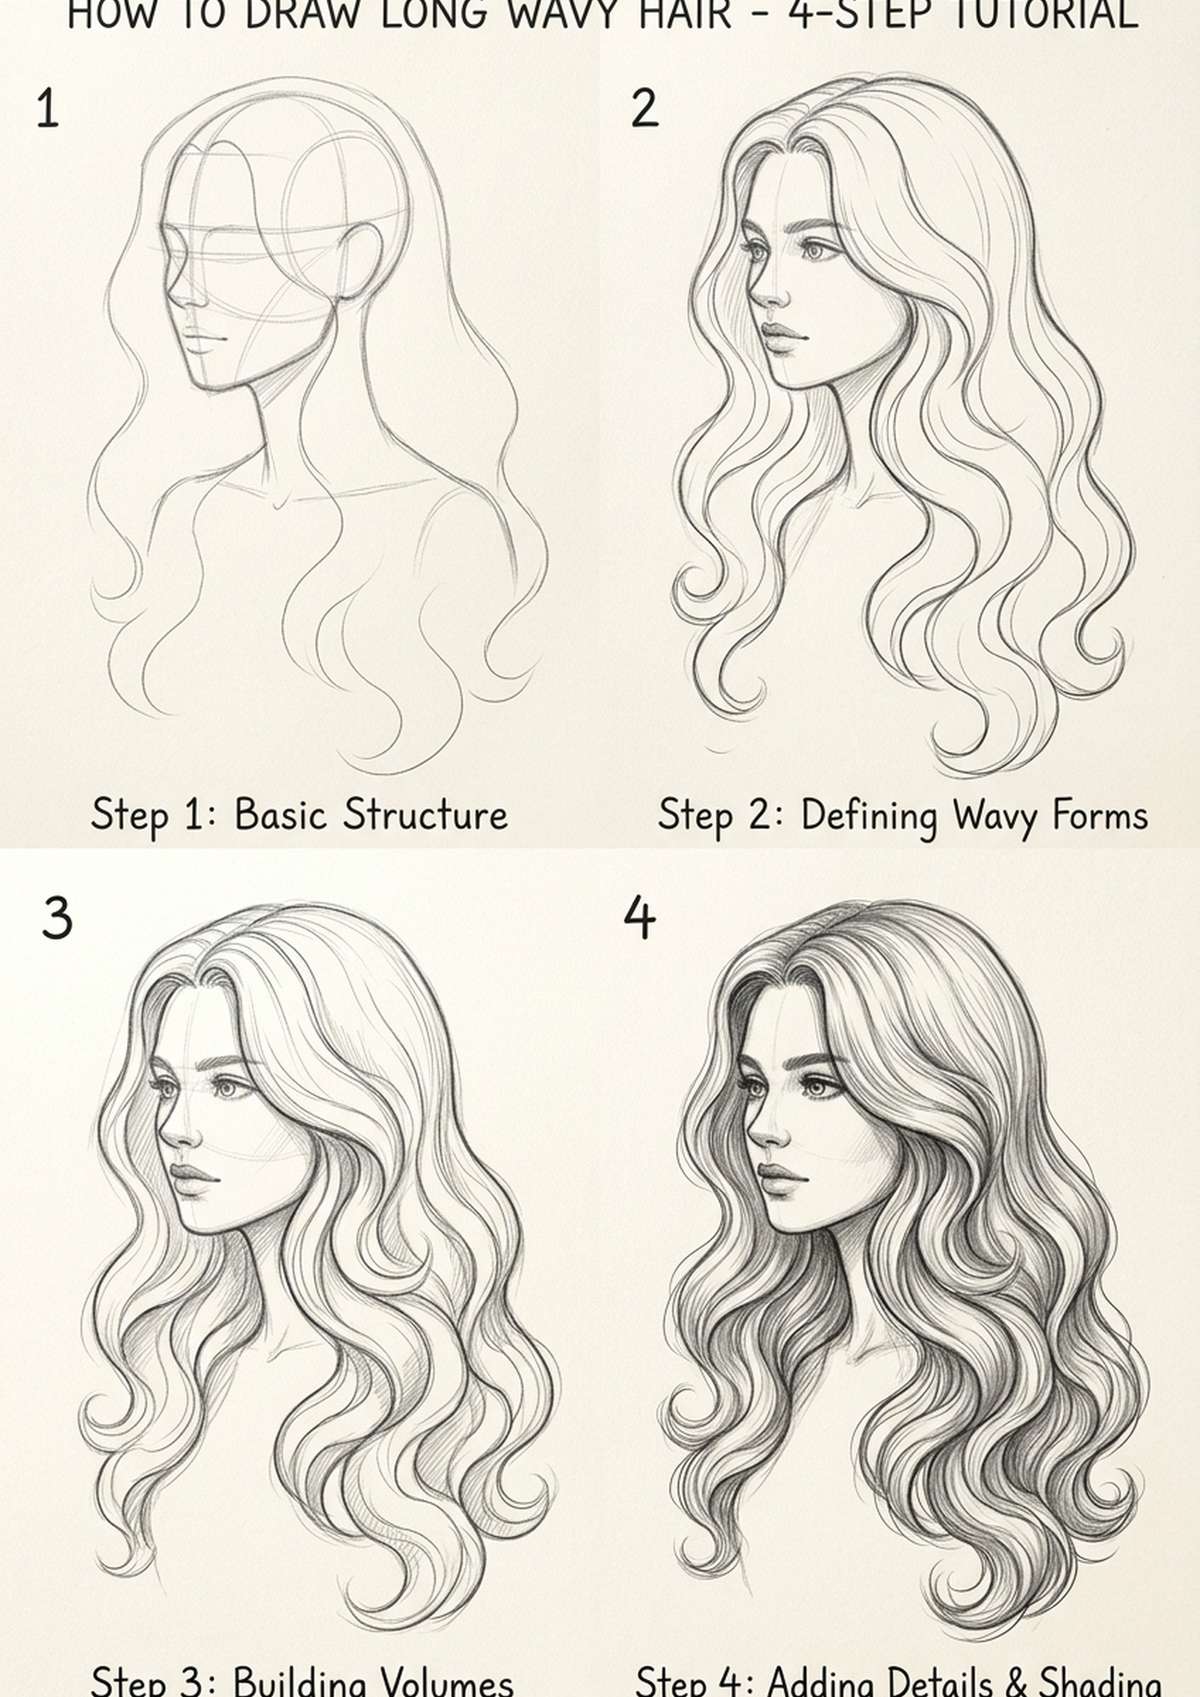
This is the single biggest shift that makes hair click. Beginners tend to draw hair one strand at a time, which leaves it looking thin and wiry. Instead, block in the big shapes first — think of hair as a soft mass that wraps around the skull, like a scarf draped over a ball.
Start with the overall silhouette. Where does the hair sit away from the head? Where does it hug the skull? Then break that mass into a few large sections that move in the same direction. Only at the very end do you suggest individual strands, and even then you draw groups, not singles.
- Block the big shape first — the whole mass, not the outline of every hair
- Find the parting or crown; hair flows out from there
- Divide the mass into three to five large flowing sections
- Let some sections overlap so the hair reads as layered and full
- Save the fine strands for last, and draw them in clumps
How to Draw Different Hair Types
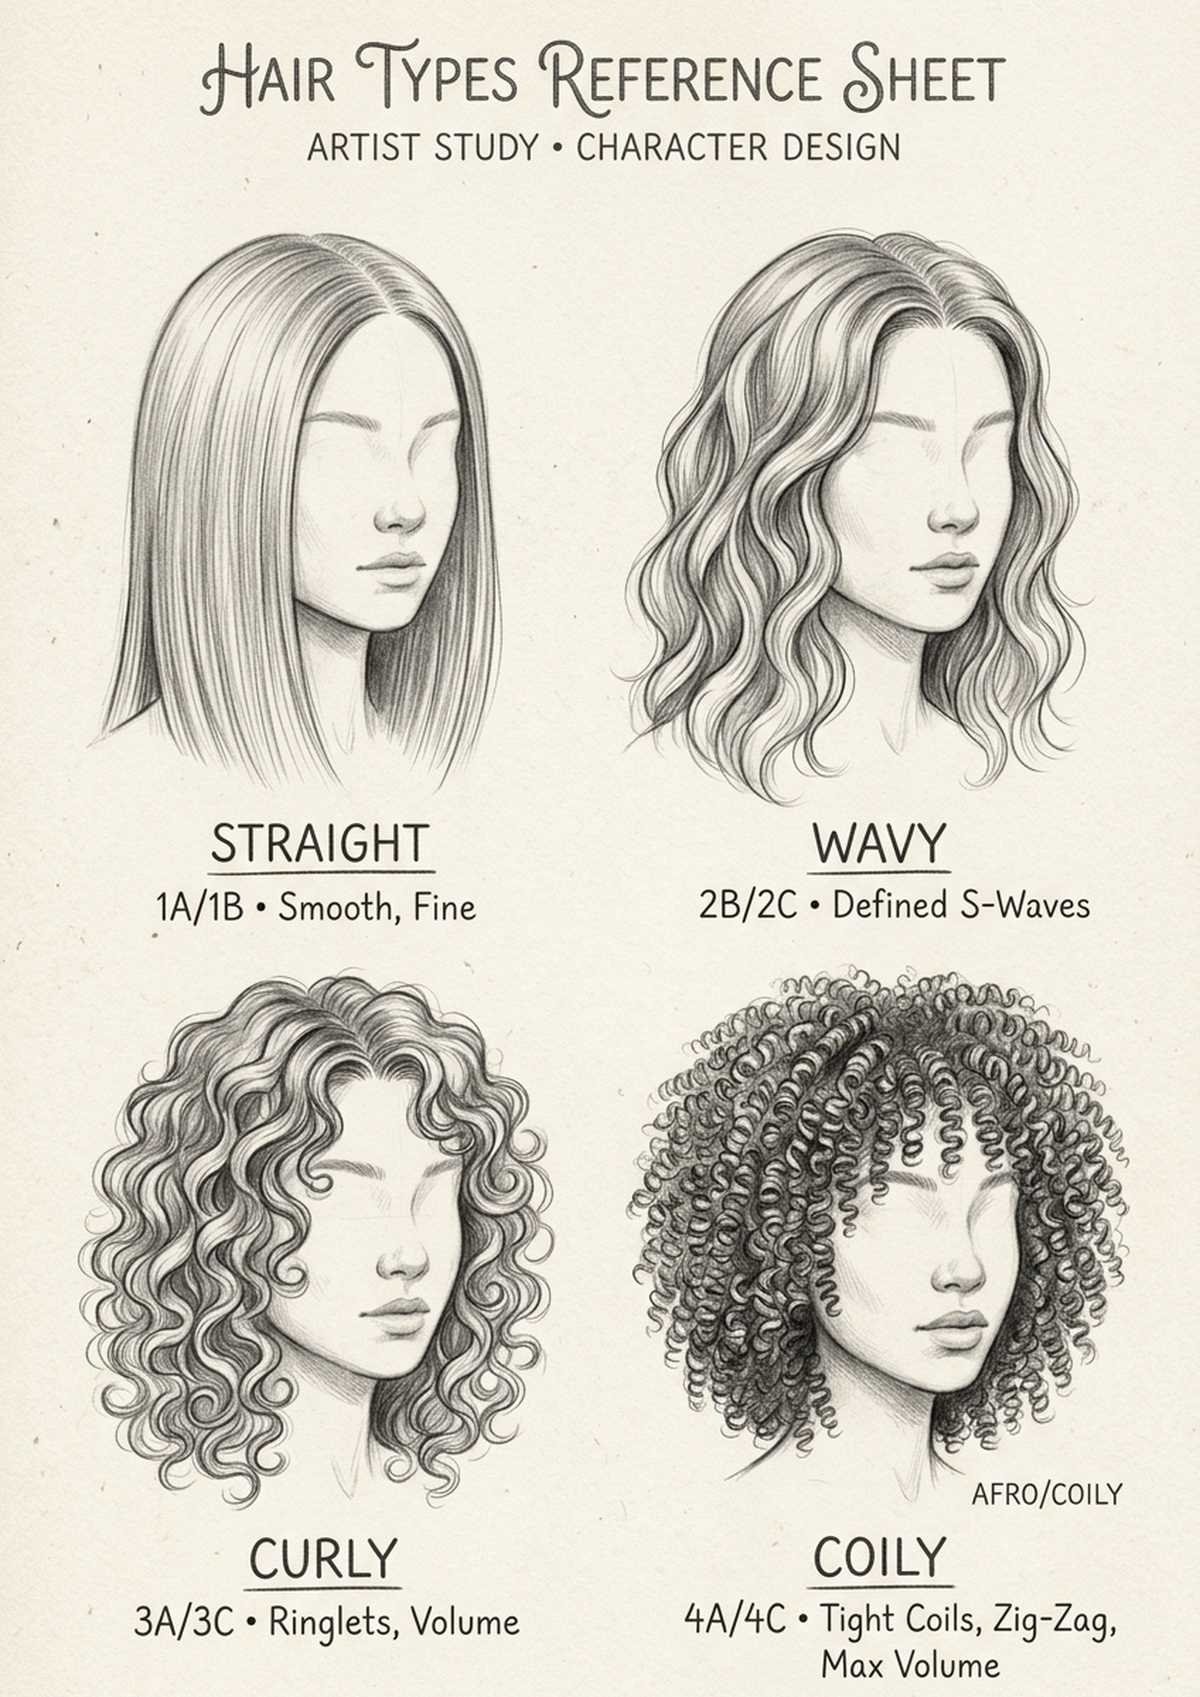
Straight, wavy, curly and coily hair all follow different rules for how they move and catch the light. Once you understand the underlying pattern of each, you can draw any style with confidence.
- Straight hair falls in long, smooth planes. Keep your lines confident and mostly parallel, with a clean highlight band where the light hits.
- Wavy hair moves in soft S-curves. Draw the ribbon of movement first, then let the strands follow that wave.
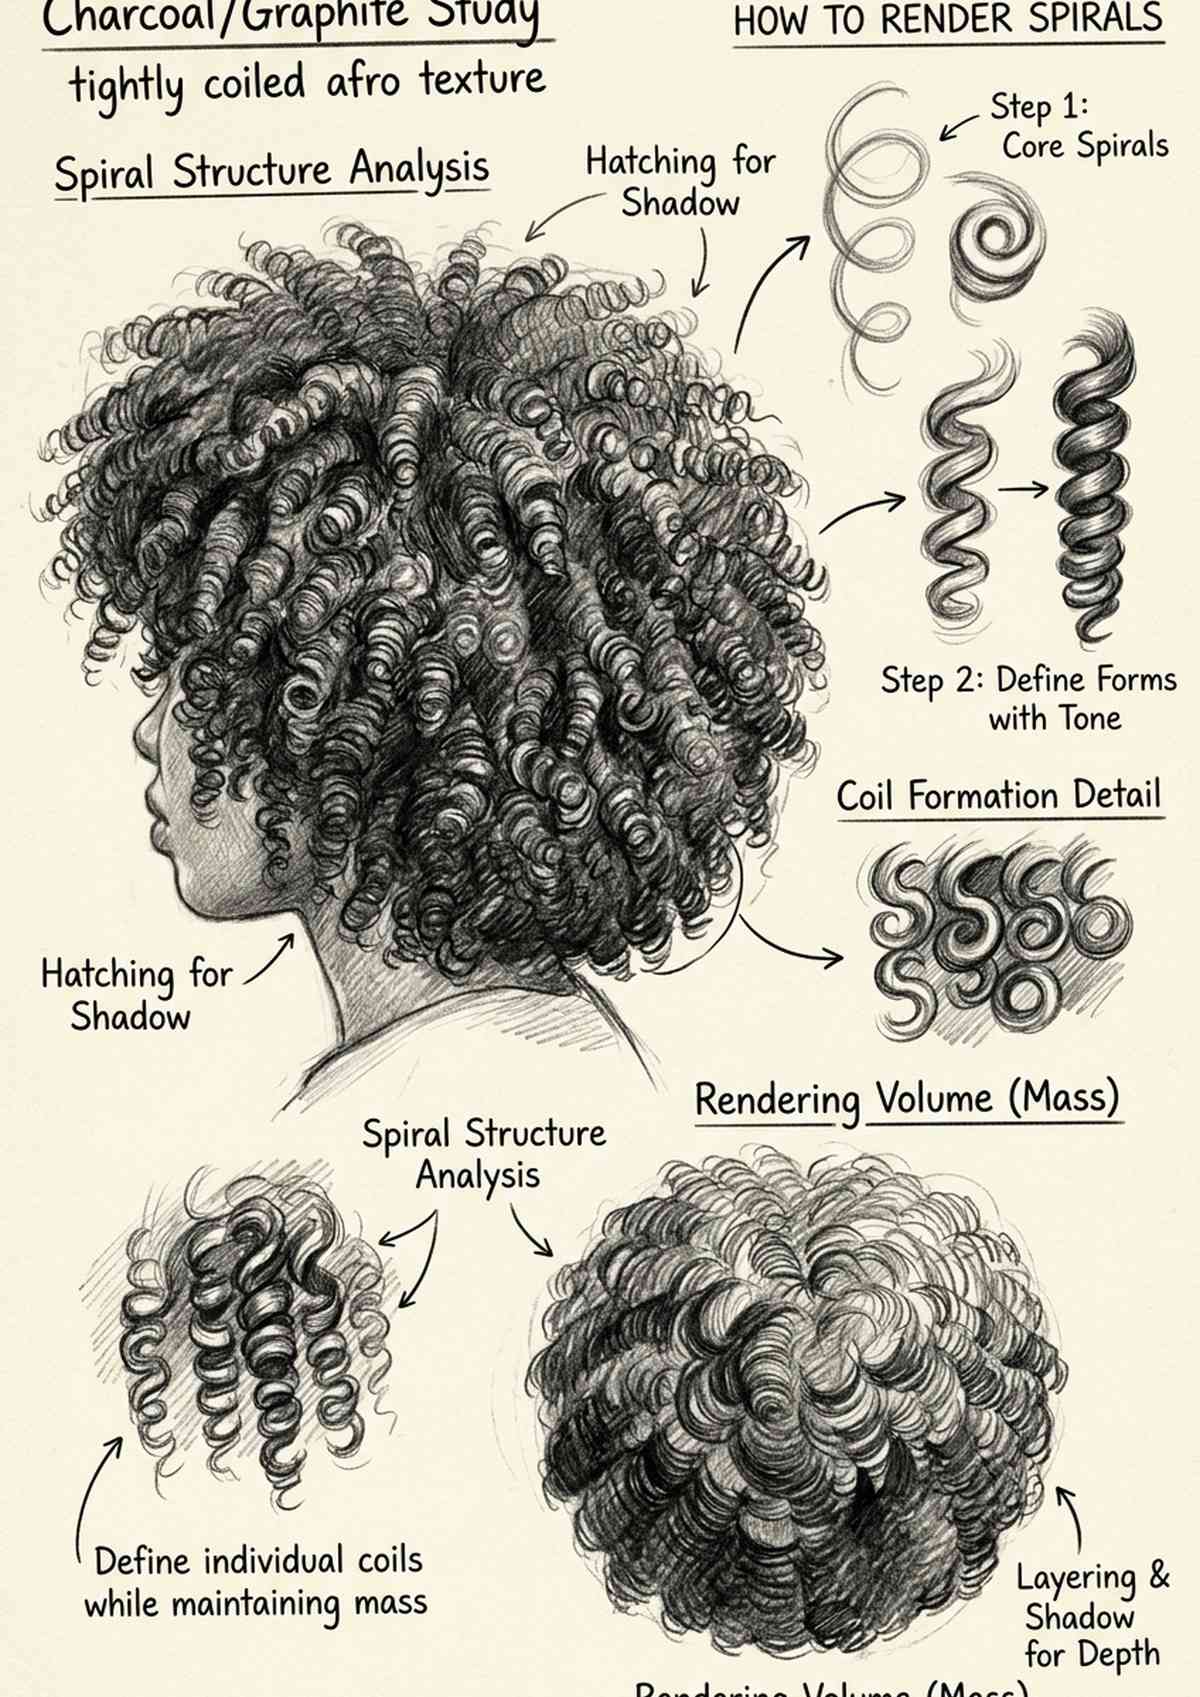
- Curly hair is built from spirals. Think of each curl as a cylinder turning in space — draw the ones in front fully and let the ones behind fade.
- Coily hair reads as texture and volume more than individual coils. Suggest the springiness with a broken, bumpy edge and let the shape be beautifully round and full.
The mistake I see most often is drawing curly and coily hair with tight little scribbles all over. Step back and treat it as a big soft shape with texture on the surface, exactly like the other types.
It also helps to think about how much each type moves. Straight hair is heavy and hangs close to the head, so it changes shape the least. Wavy and curly hair holds more air, so it sits further out from the skull and bounces when the head turns. Coily hair has the most volume of all and keeps its shape even in motion. Keeping those differences in mind stops every hairstyle you draw from looking like the same wig in a different colour.
Common Hair Drawing Mistakes
Most hair problems come down to a handful of habits, and once you know them they are easy to catch. Here are the ones I see again and again, and the quick fix for each:
- Drawing hair as a flat outline. Hair has depth. Give it a few overlapping layers and a clear light band so it sits around the head rather than painted on top of it.
- Starting the hairline too high. Hair grows from further down the forehead than beginners expect. Place the hairline about a third of the way down from the top of the skull.
- Forgetting the skull underneath. Hair adds volume, so it should always sit a little away from the head. If it hugs the skull like a swim cap, you have lost the volume.
- Even, evenly-spaced strands. Real hair clumps. Vary the thickness and spacing of your strand groups so it looks natural instead of combed by a machine.
- Outlining every strand in dark pencil. Let most strands be soft and tonal, and reserve your darkest, crispest lines for a few accents near the parting and the shadows.
If a drawing feels off and you cannot say why, run through this list. Nine times out of ten it is the hairline placement or a missing sense of the skull underneath.
Ponytails, Buns and Updos
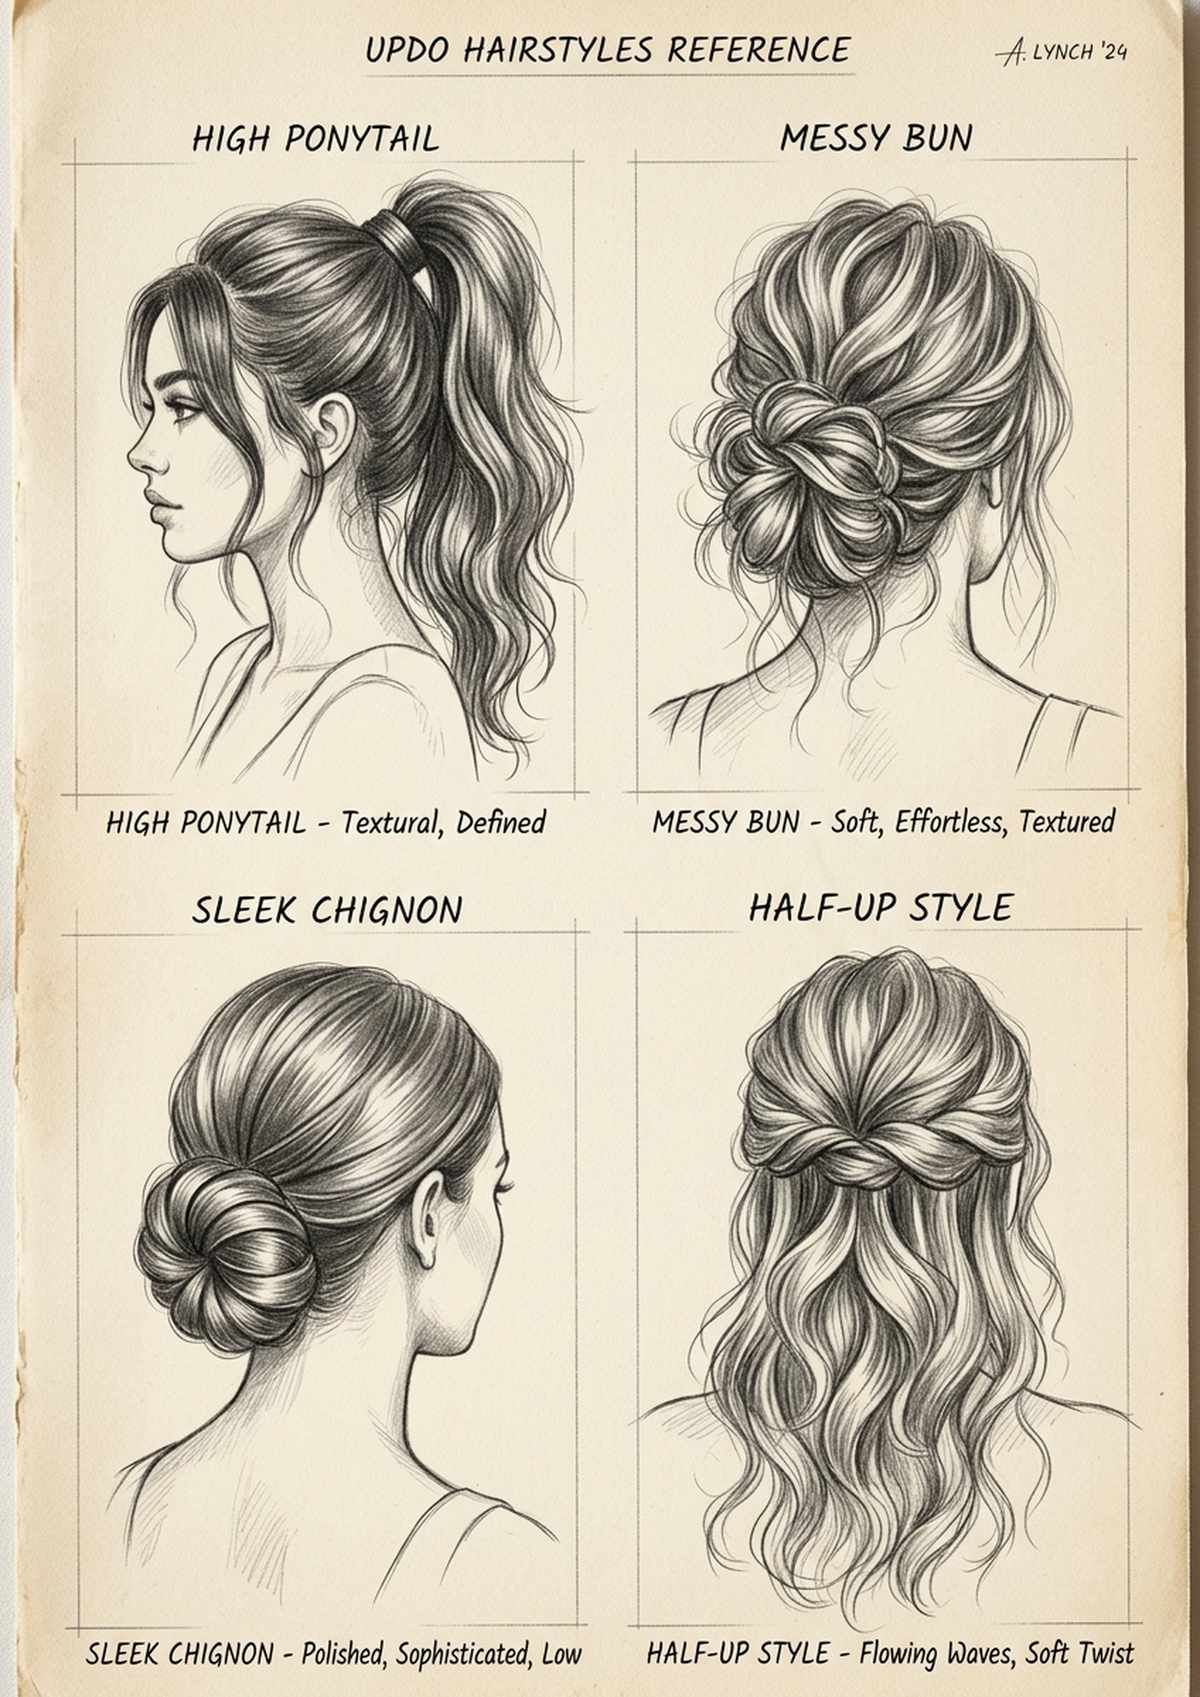
Updos are where hair direction really matters. Every strand is being pulled towards a single point — the base of a ponytail, the centre of a bun — so your job is to show that gathering tension.
For a ponytail, draw the sweep of hair travelling from the hairline to the tie, then let it burst out and fall from that point. For a bun, wrap the strands around a hidden centre so they read as a coil rather than a flat circle. Little stray pieces around the face and neck instantly make an updo feel real instead of stiff.
Watch the tension lines too. When hair is pulled back tightly you get long, smooth guide lines running from the face to the gather, with a slight sheen along the top of the head where it is stretched taut. A looser, messier updo has softer, more broken lines and more volume around the crown. That single choice, tight or loose, changes the whole personality of the style.
Braids: Dutch, Fishtail and Cornrows
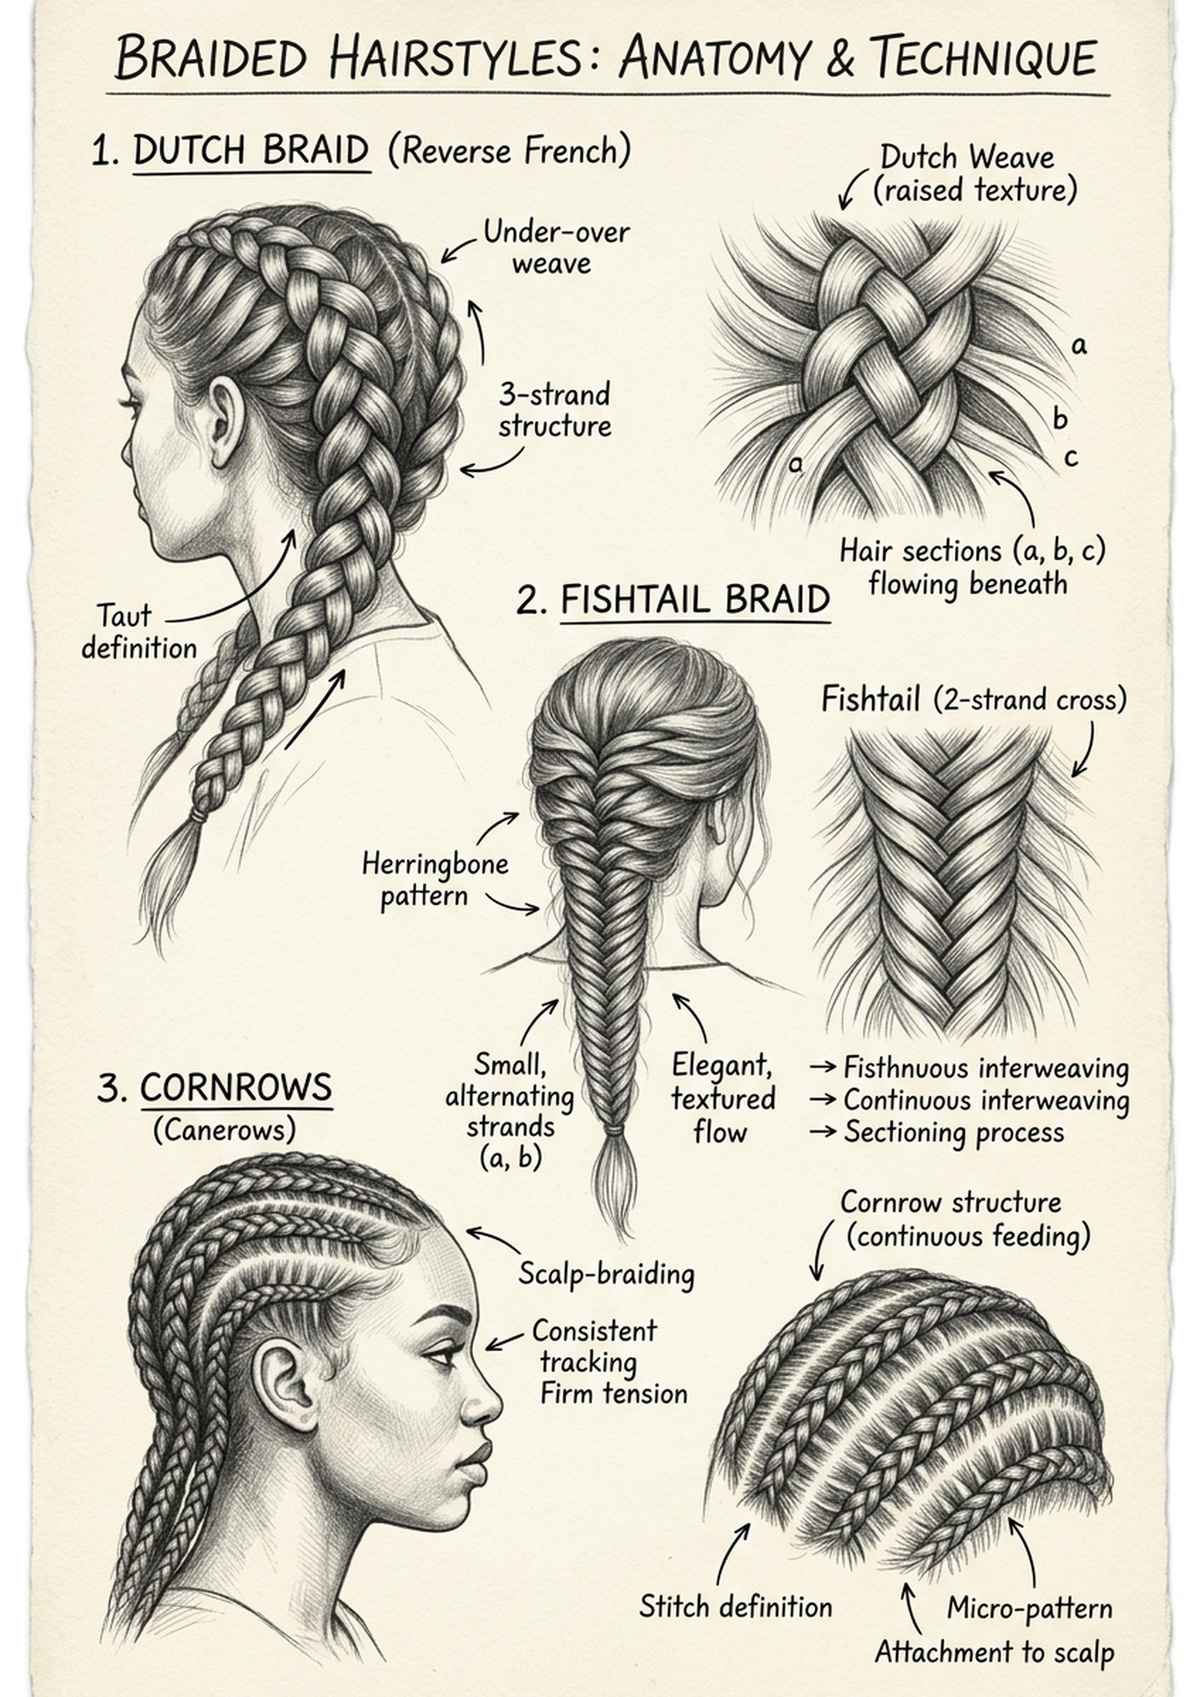
Braids look intimidating but they are just a repeating pattern. Once you can draw one section of the weave, you copy it down the length and let it taper. The trick is to draw the braid as a stack of overlapping wedges, each one tucking under the next.
- Dutch braid sits raised on top of the hair — draw bold chunky segments that pop forward
- Fishtail braid is finer, with narrow V-shaped segments crossing in the middle
- Cornrows follow the scalp in neat rows — draw the guide lines first, then the little rungs of the braid along each row
Keep the segments slightly smaller as the braid tapers towards the end, and add a few loose wisps so it doesn’t look like rope.
If a braid feels flat, it usually needs more contrast between its light and shadow. The top of each little wedge catches the light while the tuck underneath falls into shadow, and exaggerating that difference is what gives a braid its lovely three-dimensional, woven look. Draw the guide line of the whole braid first, lightly, so your segments follow one smooth path instead of wandering.
Short Hairstyles and Men’s Hair
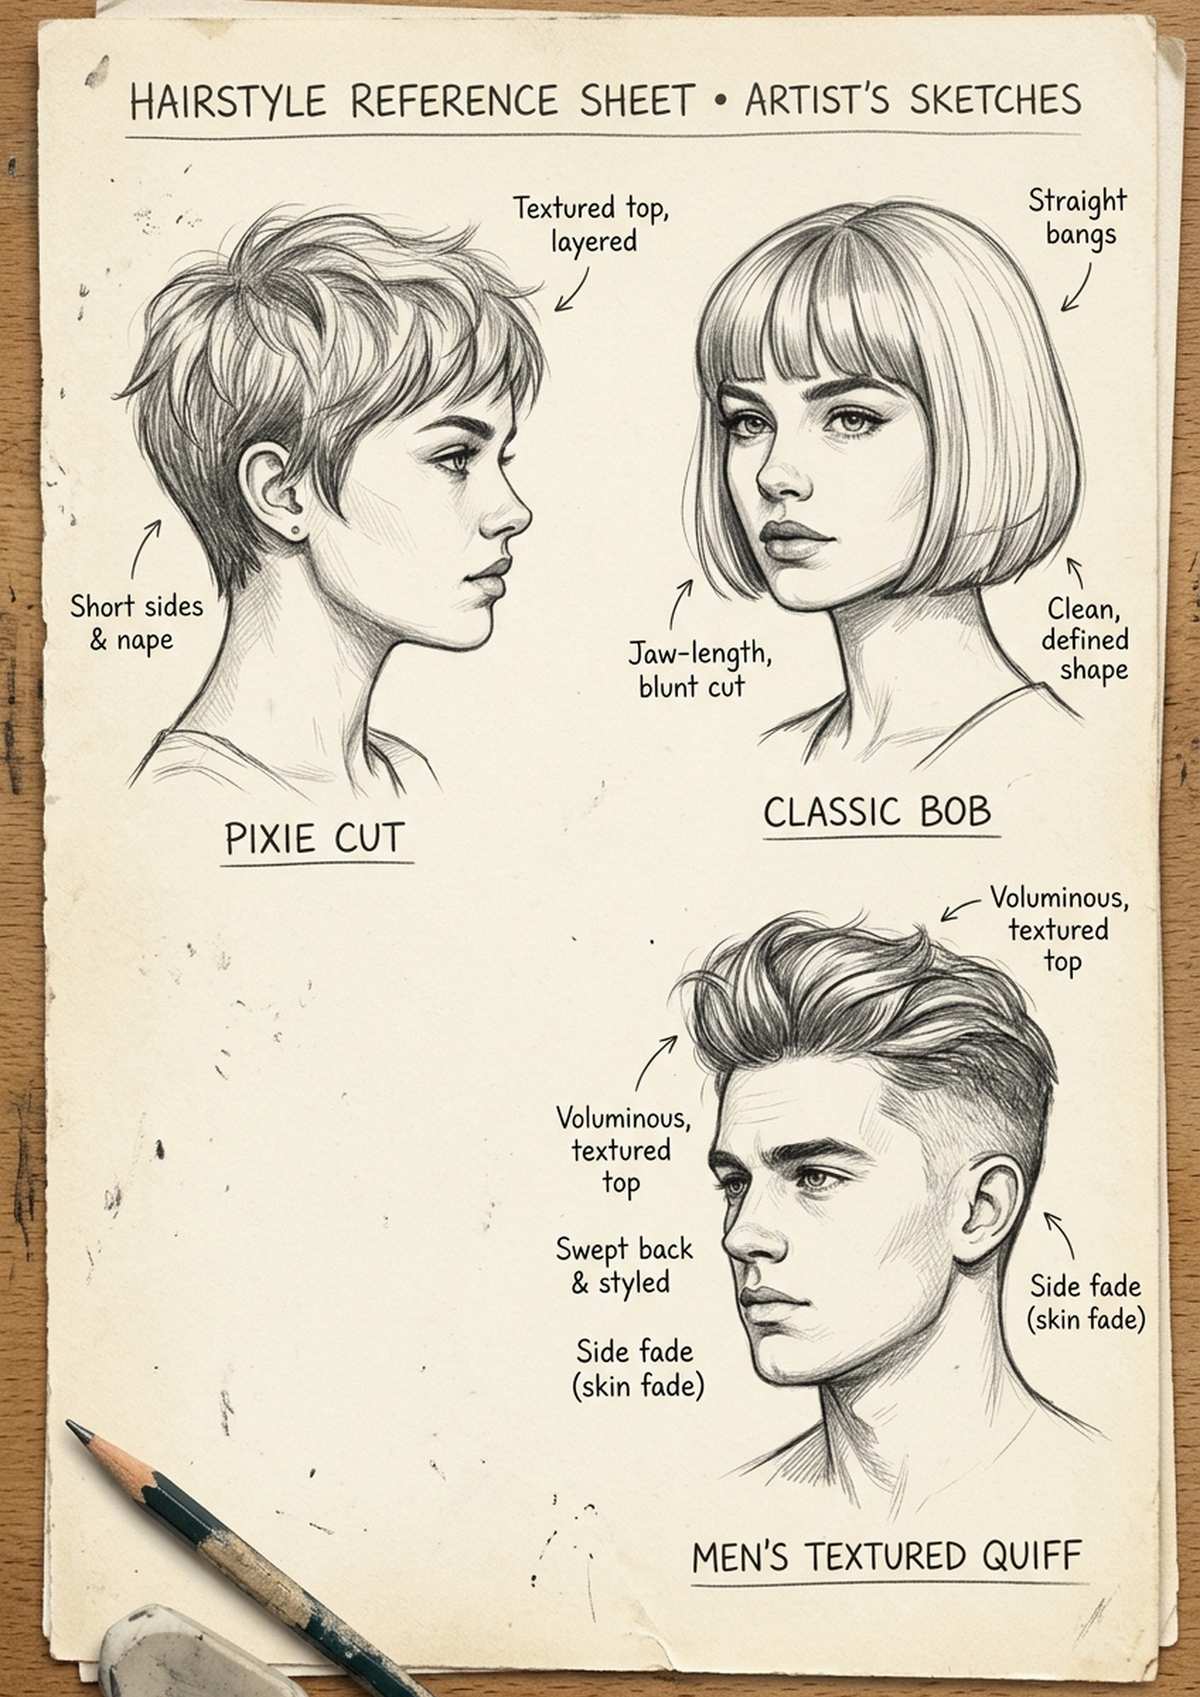
Short hair follows the shape of the skull much more closely, so your head construction has to be solid underneath. A pixie cut, a bob, a buzz cut or a textured quiff are all about where the hair breaks away from the head and where it lies flat.
For very short cuts, resist the urge to outline every hair. Shade the overall form, then flick in a few directional marks at the edges to suggest texture. Men’s hair especially benefits from a light touch — a strong silhouette plus a little edge texture reads as hair far better than a mass of individual lines.
Adding Texture and Shading
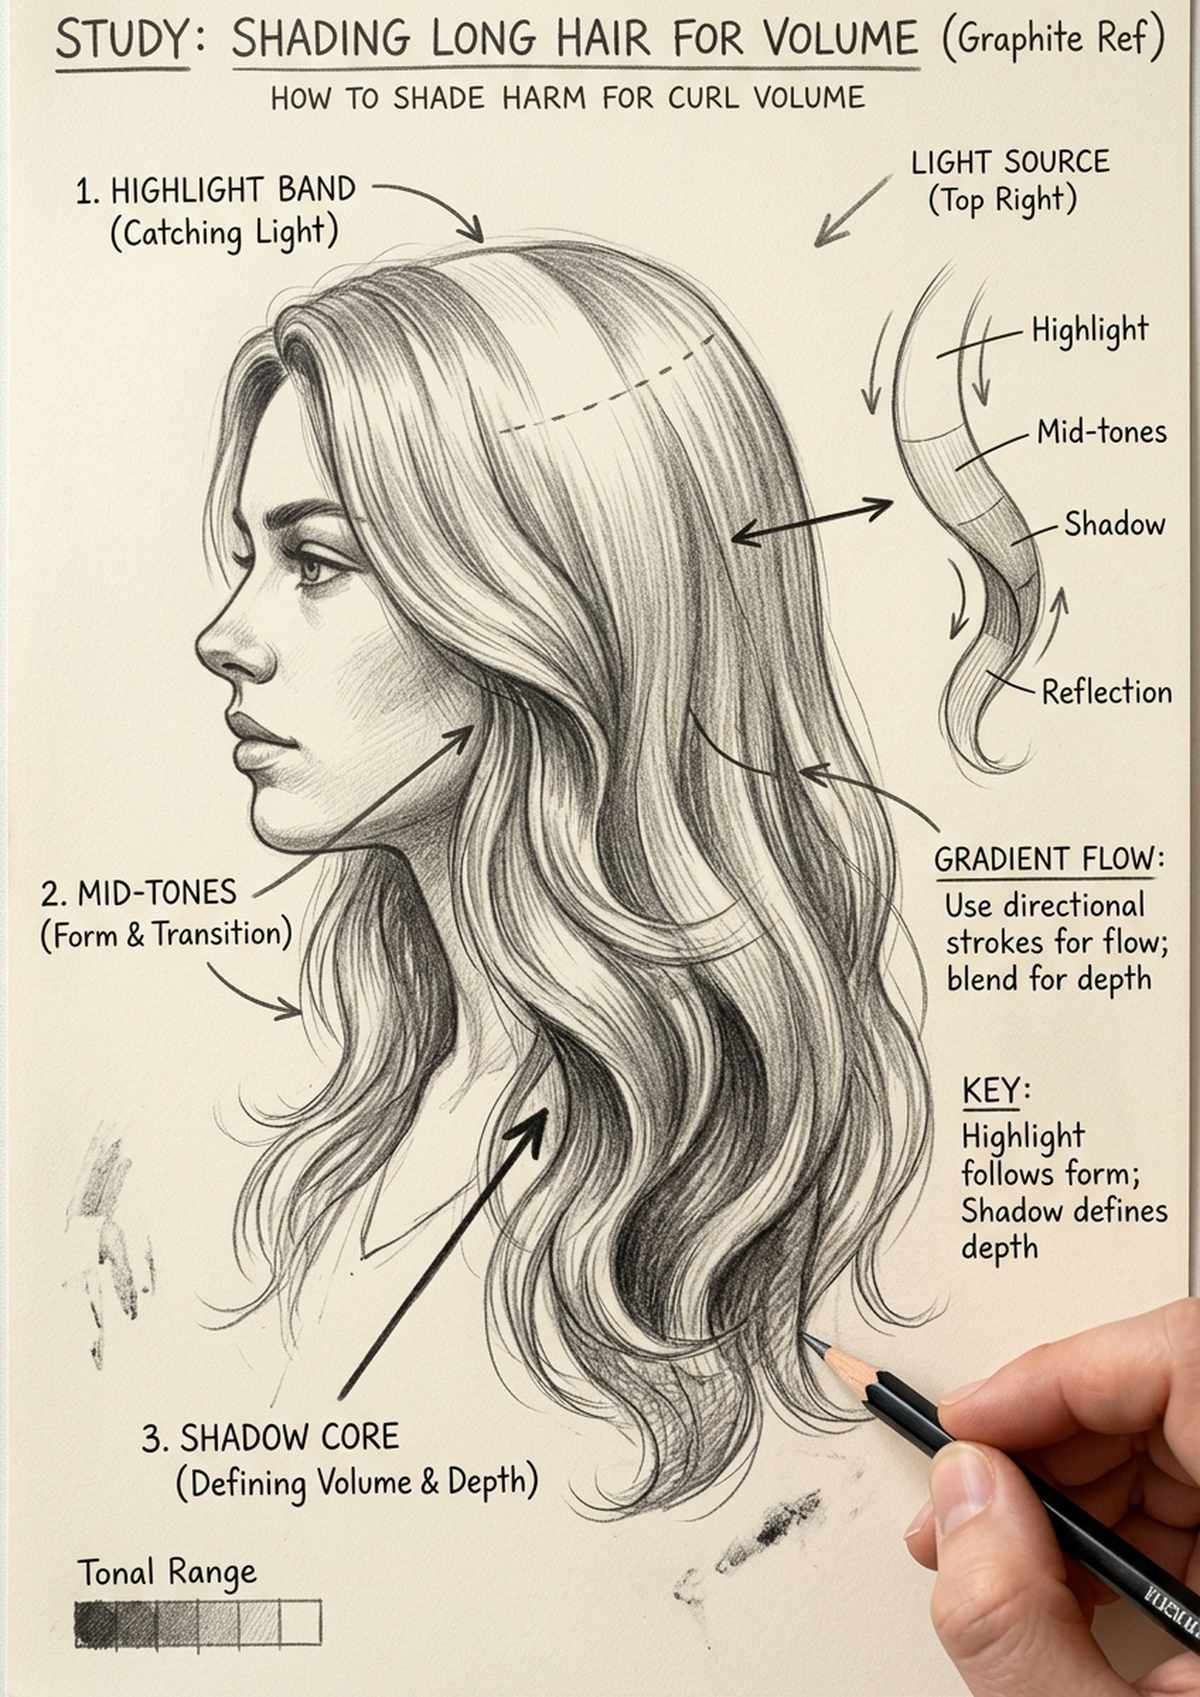
Shading is what turns a flat outline into hair with real volume. The secret is the highlight band — that soft ribbon of light that wraps around the curve of the head where it faces the light source. Leave it lighter, then build up darker tones above and below it.
- Find your light source and keep the highlight band consistent across the whole head
- Build shadow at the roots, under overlapping sections, and at the far side of the head
- Let your pencil strokes follow the direction of the hair, never across it
- Leave a few clean gaps of paper — hair is not one solid tone
- Darken the deepest cores last, so the hair has depth without going muddy
Drawing Hair in Motion
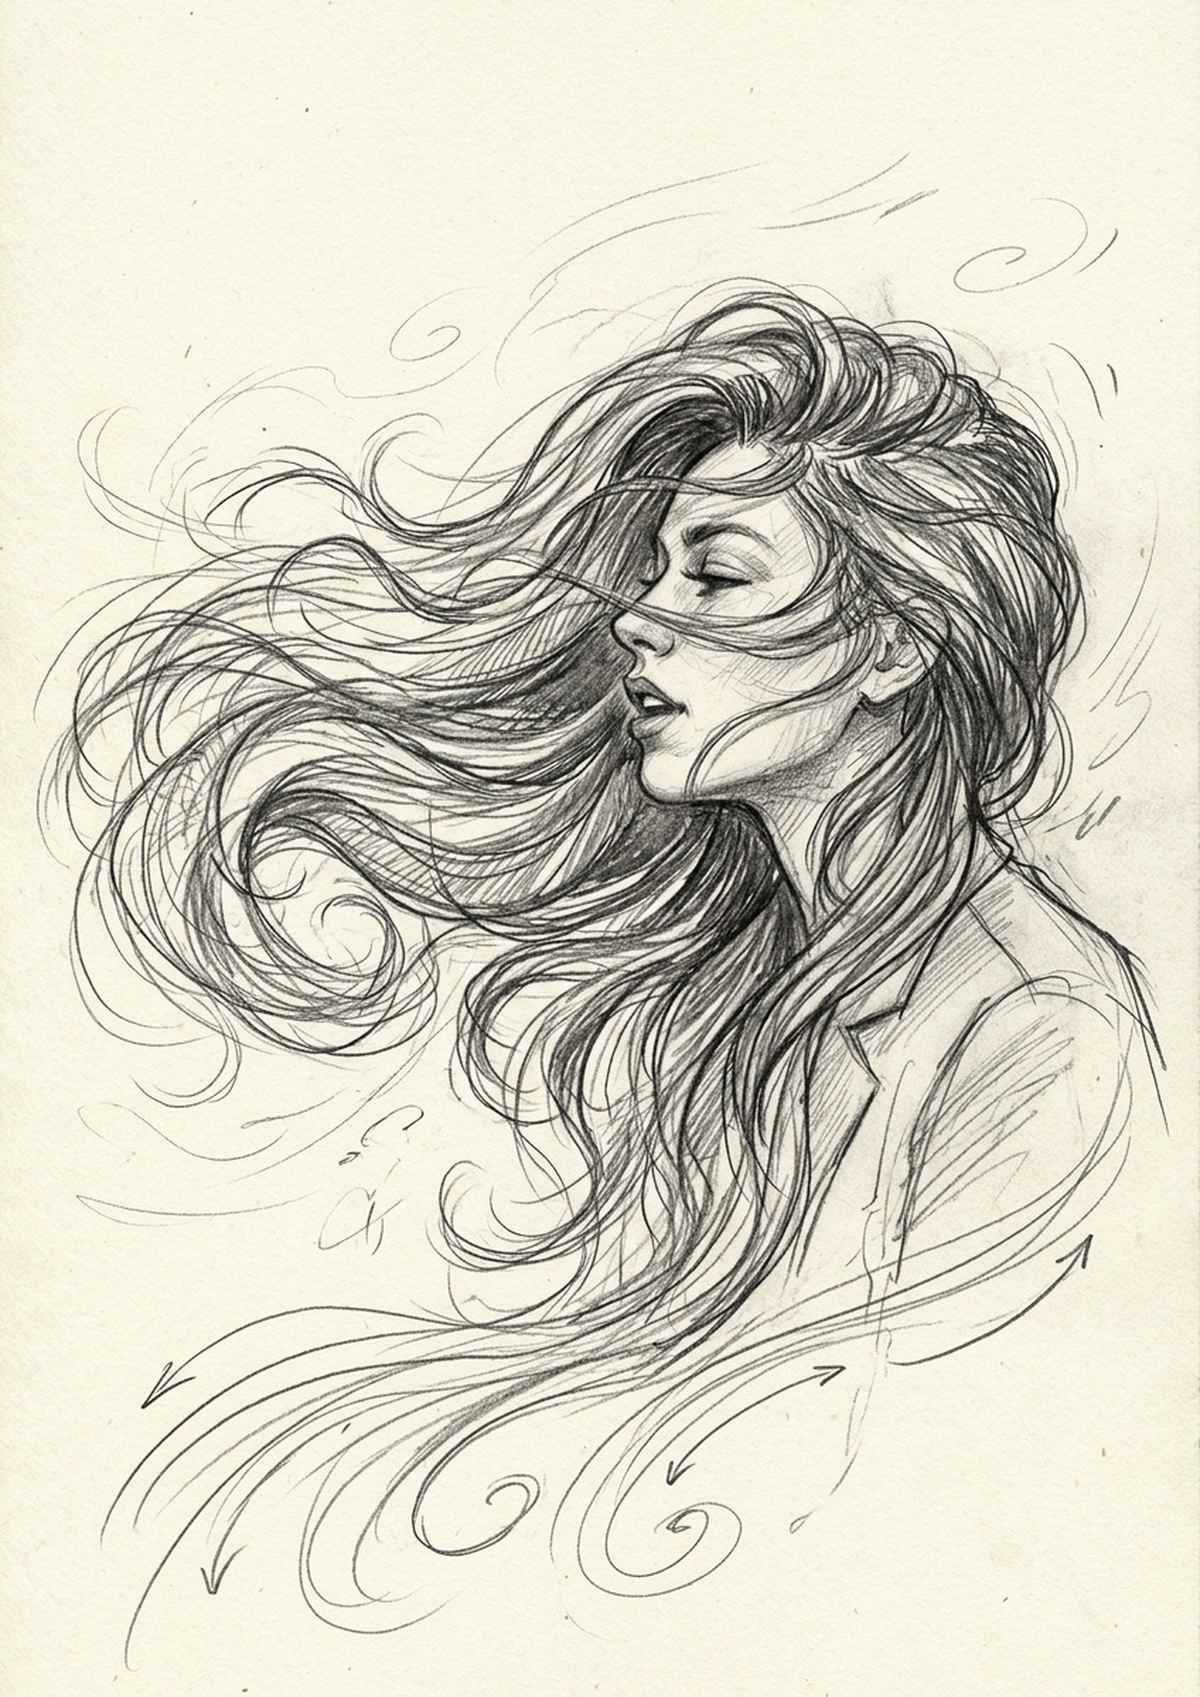
Hair blowing in the wind or swept by movement adds so much life to a drawing. The key is a strong line of action — one flowing direction that all the strands broadly follow — with smaller strands breaking away from it for energy.
Exaggerate a little. Real hair in motion moves more than you expect, so let it stream and curl at the tips. Just keep every strand answering to that main line of movement, or it turns into chaos.
A useful trick is to draw the line of action before any strands at all, as a single sweeping curve, and only then hang the hair off it. Heavier, thicker sections move more slowly and lag behind, while fine wisps whip out ahead. Playing with that difference in weight is what makes wind-blown hair feel like it is genuinely caught mid-movement rather than frozen and stiff.
Hair From Different Angles
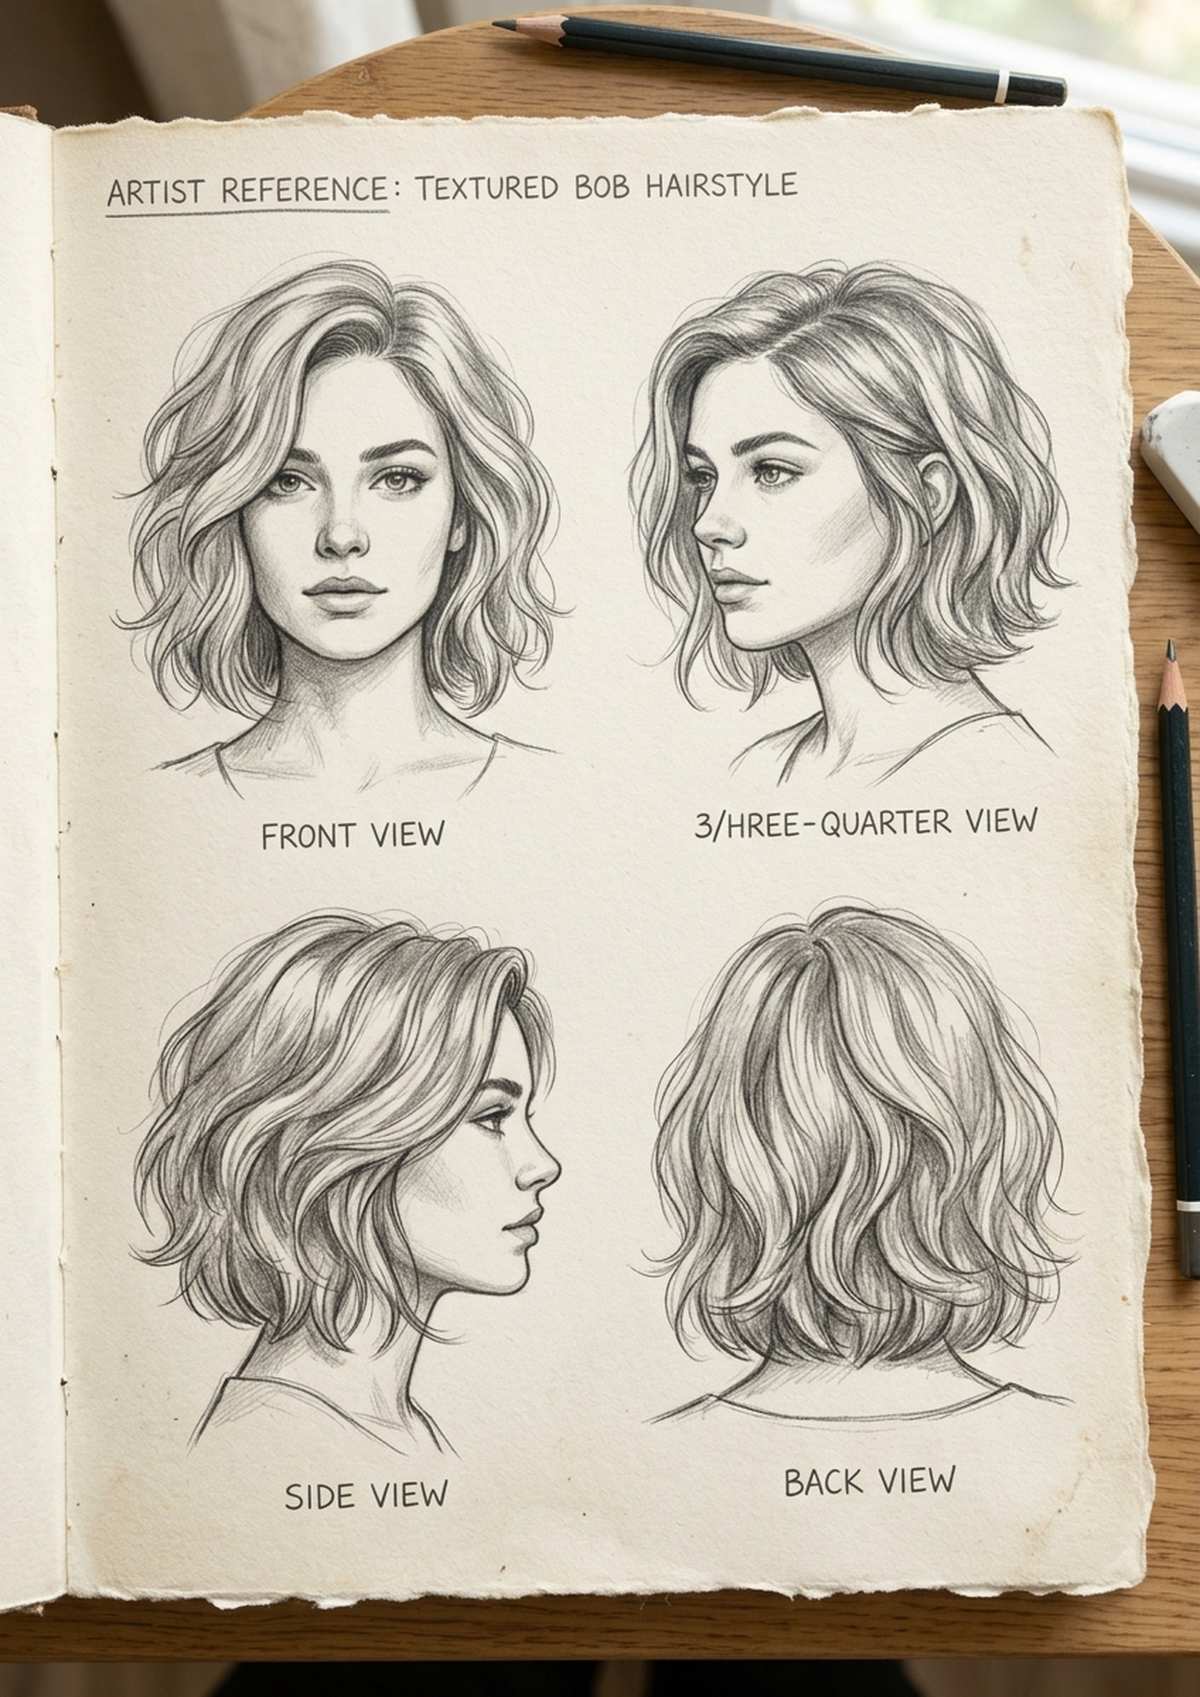
The same hairstyle looks completely different from the front, the side, the three-quarter view and the back. From the front you see the parting and the framing around the face. From the side the silhouette and the way it falls at the nape take over. From behind, it’s all about the flow lines and where the hair gathers.
Practising a single style from all four angles is one of the fastest ways to really understand how hair wraps around a three-dimensional head — and it’s exactly how the templates in the full set are built.
Free Hair Drawing Templates
I have created a set of 25 hair drawing templates you can trace, shade and use as practice guides — every hair type, braids and updos, short cuts, and each style shown so you can study the flow.
Want a free taster? Grab the free hair drawing template using the form above — one clean outline to trace and shade, so you can try the approach today before you dive into the full set.
Ready for the whole lot? You can grab the complete Hair Drawing Reference — all 25 traceable templates for £8, ready to print, trace and shade.
For every style — all 25 traceable templates plus new watercolour templates, Procreate brushes and tutorials each month — my Patreon members get the complete library with early access and behind-the-scenes.
Tips for Drawing Better Hair
- Shape before strands. Block the whole mass first; add fine strands only at the very end.
- Follow the flow. Every stroke should travel the way the hair actually moves, out from the crown.
- Commit to a light source. One consistent highlight band gives instant volume.
- Draw strands in clumps. Groups of hair read as real; single wiry lines do not.
- Leave breathing room. Clean gaps of paper keep hair from going flat and heavy.
- Add a few strays. Loose wisps around the face and neck make any style feel alive.
- Trace first, then freehand. Tracing templates builds an instinct for the shapes before you draw from scratch.
Recommended Art Supplies
You don’t need much to practise drawing hair, but a few nice tools make it more enjoyable:
- Staedtler Mars Lumograph Pencils — a soft 2B and 4B are perfect for building up hair tones.
- Strathmore 400 Series Sketch Pad — smooth paper that takes pencil shading and light washes beautifully.
- A kneaded eraser — the best tool for lifting out those soft highlight bands in hair.
Frequently Asked Questions
How do you draw hair for beginners?
Start with the whole shape, not individual strands. Block in the mass of hair as it wraps around the head, find the parting, then divide it into a few big flowing sections. Add fine strands and shading only at the end. Tracing a template first is a brilliant way to learn the flow.
Why is hair so hard to draw?
Because most people try to draw every strand, which looks thin and messy. Hair is really a soft three-dimensional mass with direction and weight. Once you draw it as flowing shapes with a clear light source, it becomes far more manageable.
How do you draw curly and coily hair?
Treat it as a big, full shape with texture on the surface rather than a tangle of tiny lines. Suggest curls with a bumpy, broken edge and a few defined spirals at the front, then let the rest read as soft volume. Keep a consistent highlight so it doesn’t go flat.
Can I use these hair templates for watercolour?
Absolutely. The templates are clean outlines made for tracing and painting over. Print them on watercolour paper or trace with a lightbox, then add colour. They work beautifully with watercolour, coloured pencils and markers.
Are these templates free?
The free template above is yours to keep — trace it, shade it, use it in your sketchbook. The full 25-template Hair Drawing Reference set is available as an affordable £8 printable in my shop, for personal use — trace them, shade them, use them in your sketchbook.
Ready to practise every style? The complete Hair Drawing Reference set gives you all 25 traceable templates — every hair type, braids, updos, short cuts and every angle — for £8. Print them, trace them, shade them.
More Drawing References
If these hair references helped, you might also enjoy:
- Face Drawing Reference: Proportions, Angles & Expressions
- Eye Drawing Reference: Anatomy, Expressions & Styles
- Hand Drawing Reference: Poses & Templates for Artists
- What to Draw: 100+ Ideas for Your Sketchbook
Written by Dee Maene — artist and founder of Artsydee. I make printable templates, watercolour kits and drawing resources to help beginners find their creative confidence. When I’m not painting, I’m probably drinking tea and plotting my next sketchbook page.