Last Updated on September 16, 2026 by Dee
Drawing people is where a lot of us quietly give up. You can paint a gorgeous loose floral, fill a sketchbook with mushrooms and moons, and still freeze the moment a human body turns up on the page. The proportions go strange, the pose looks stiff, and the whole thing ends up looking like a shop mannequin having a bad day.
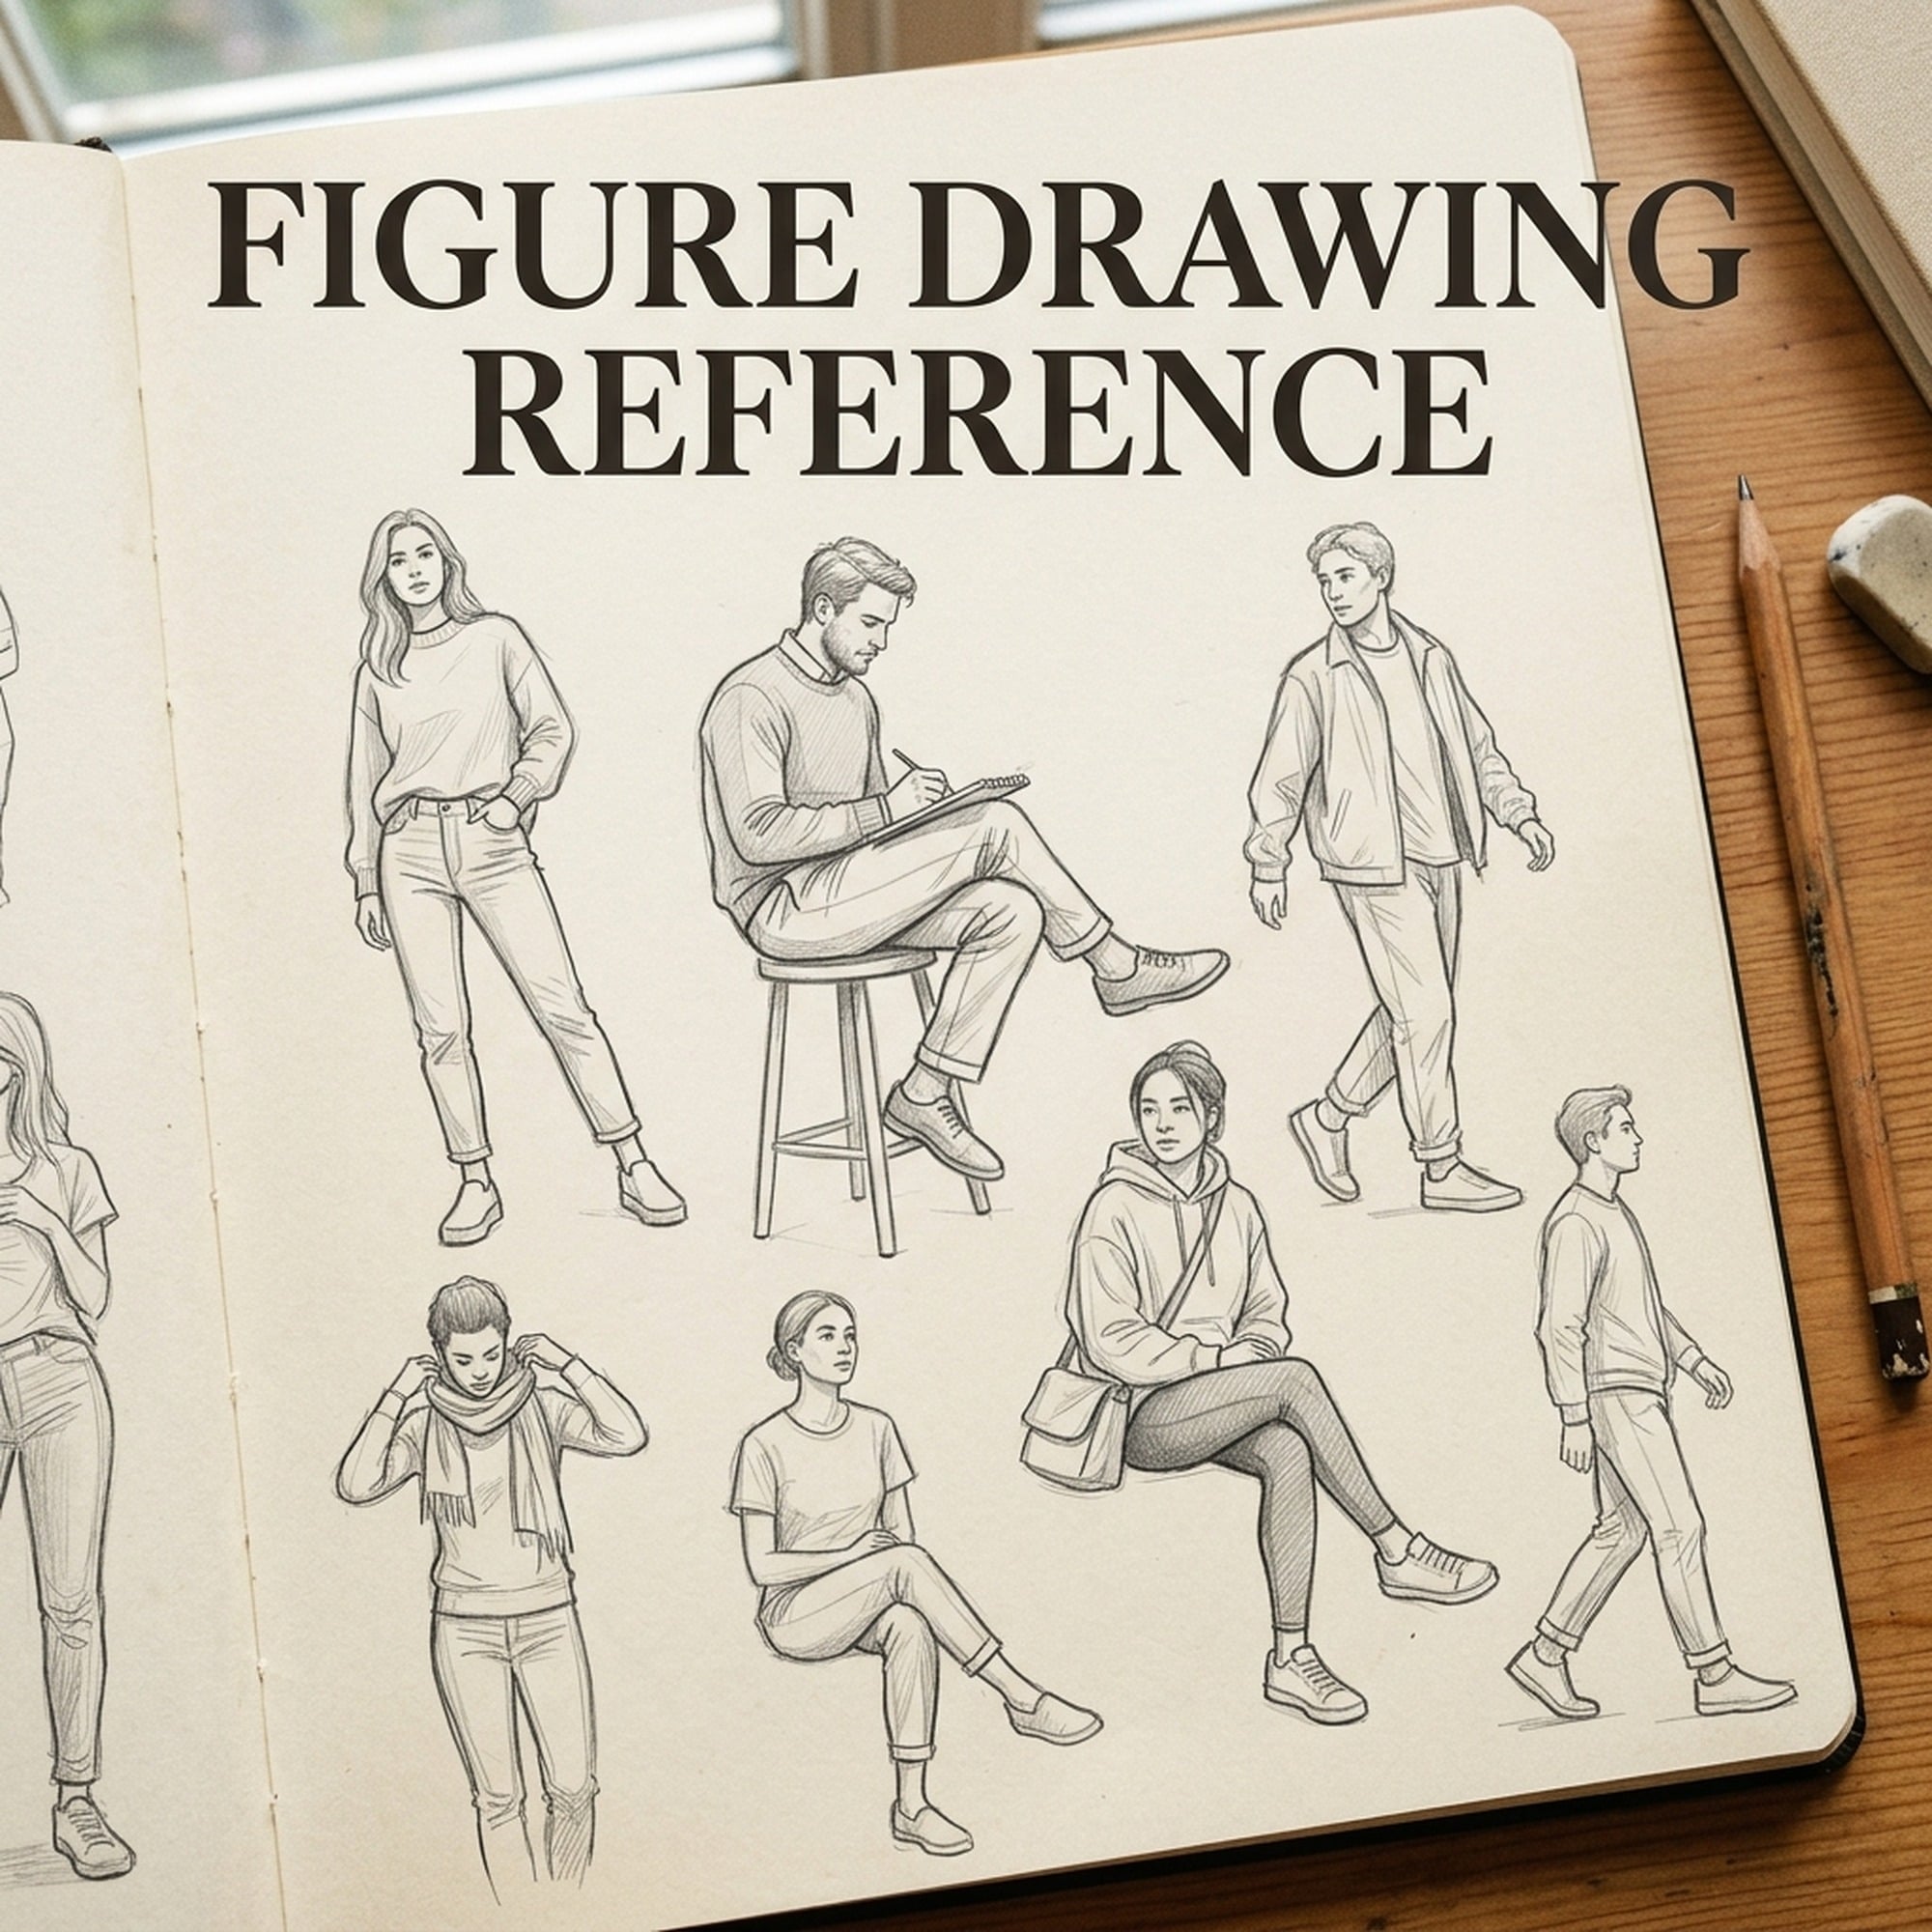
A good figure drawing reference fixes that faster than almost anything else, because it stops you guessing. Instead of trying to remember how a shoulder sits or where the knee lands, you have the shapes in front of you and your hand is free to just draw.
I have put together a free figure drawing template you can print and keep beside your sketchbook. Just pop your email into the box below and it will land in your inbox, then we will walk through how to draw the human figure so it looks balanced, natural and alive.
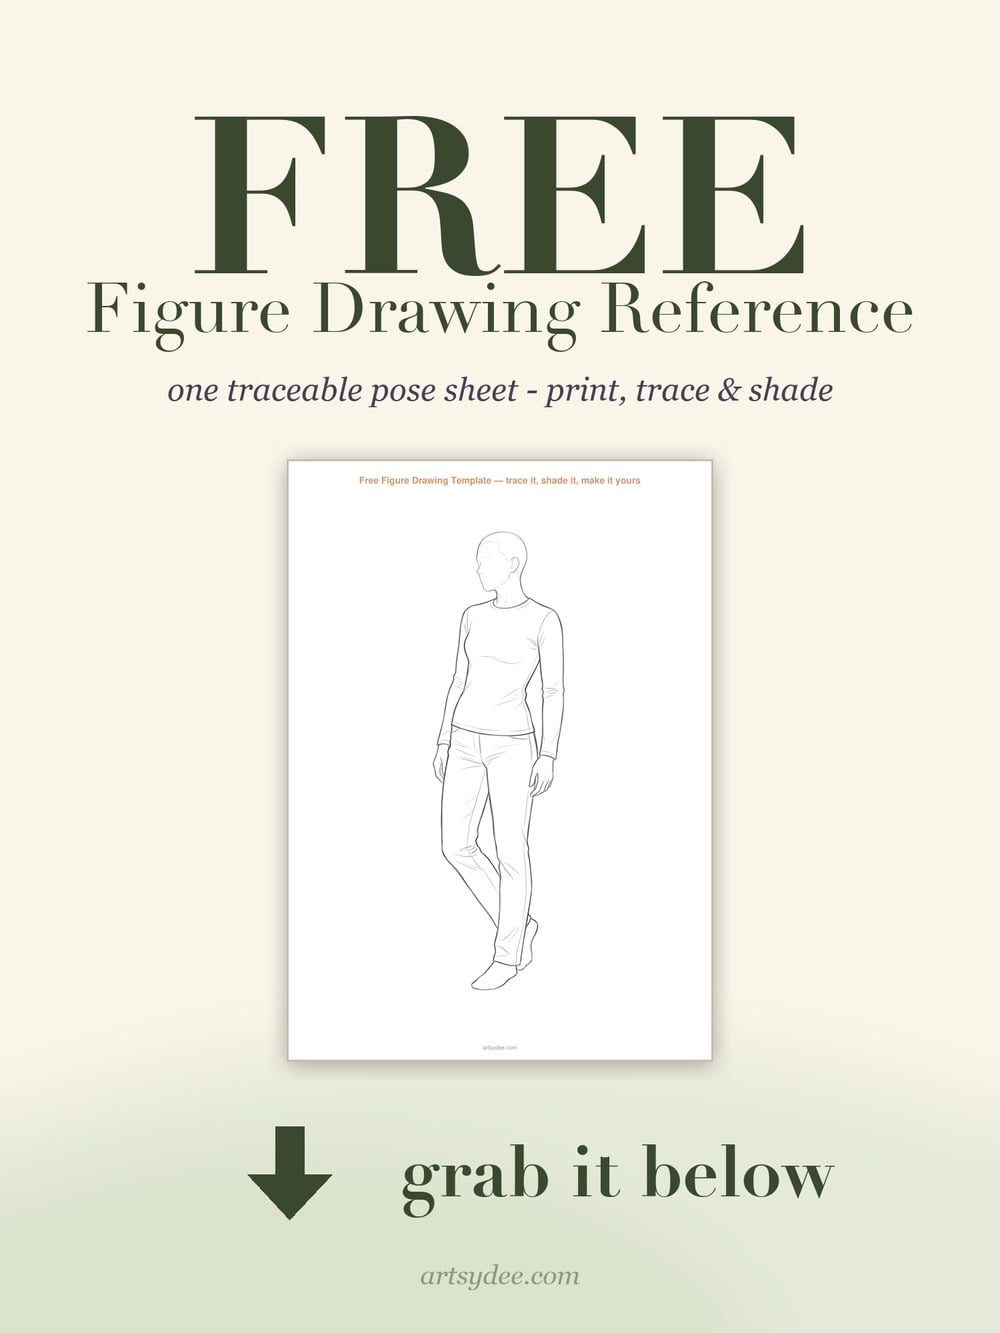
Table of Contents
Why Should You Use a Figure Drawing Reference?
A figure drawing reference shows you how the body actually sits, balances and bends before you commit a single line, so you spend your energy on drawing rather than on remembering. It turns guesswork into something you can see and copy.
Working from reference is not cheating, and it never has been. Every life drawing class in the world is built on it. Your brain stores the idea of a person, not the real angles of a collarbone or the way a hip drops when weight shifts onto one leg. A reference closes that gap.
If you have already worked through my face drawing reference or my hair drawing reference, the full figure is the natural next step. Faces tell you who someone is; the body tells you what they are doing and how they feel doing it.
What Is the Line of Action, and Why Does It Matter?
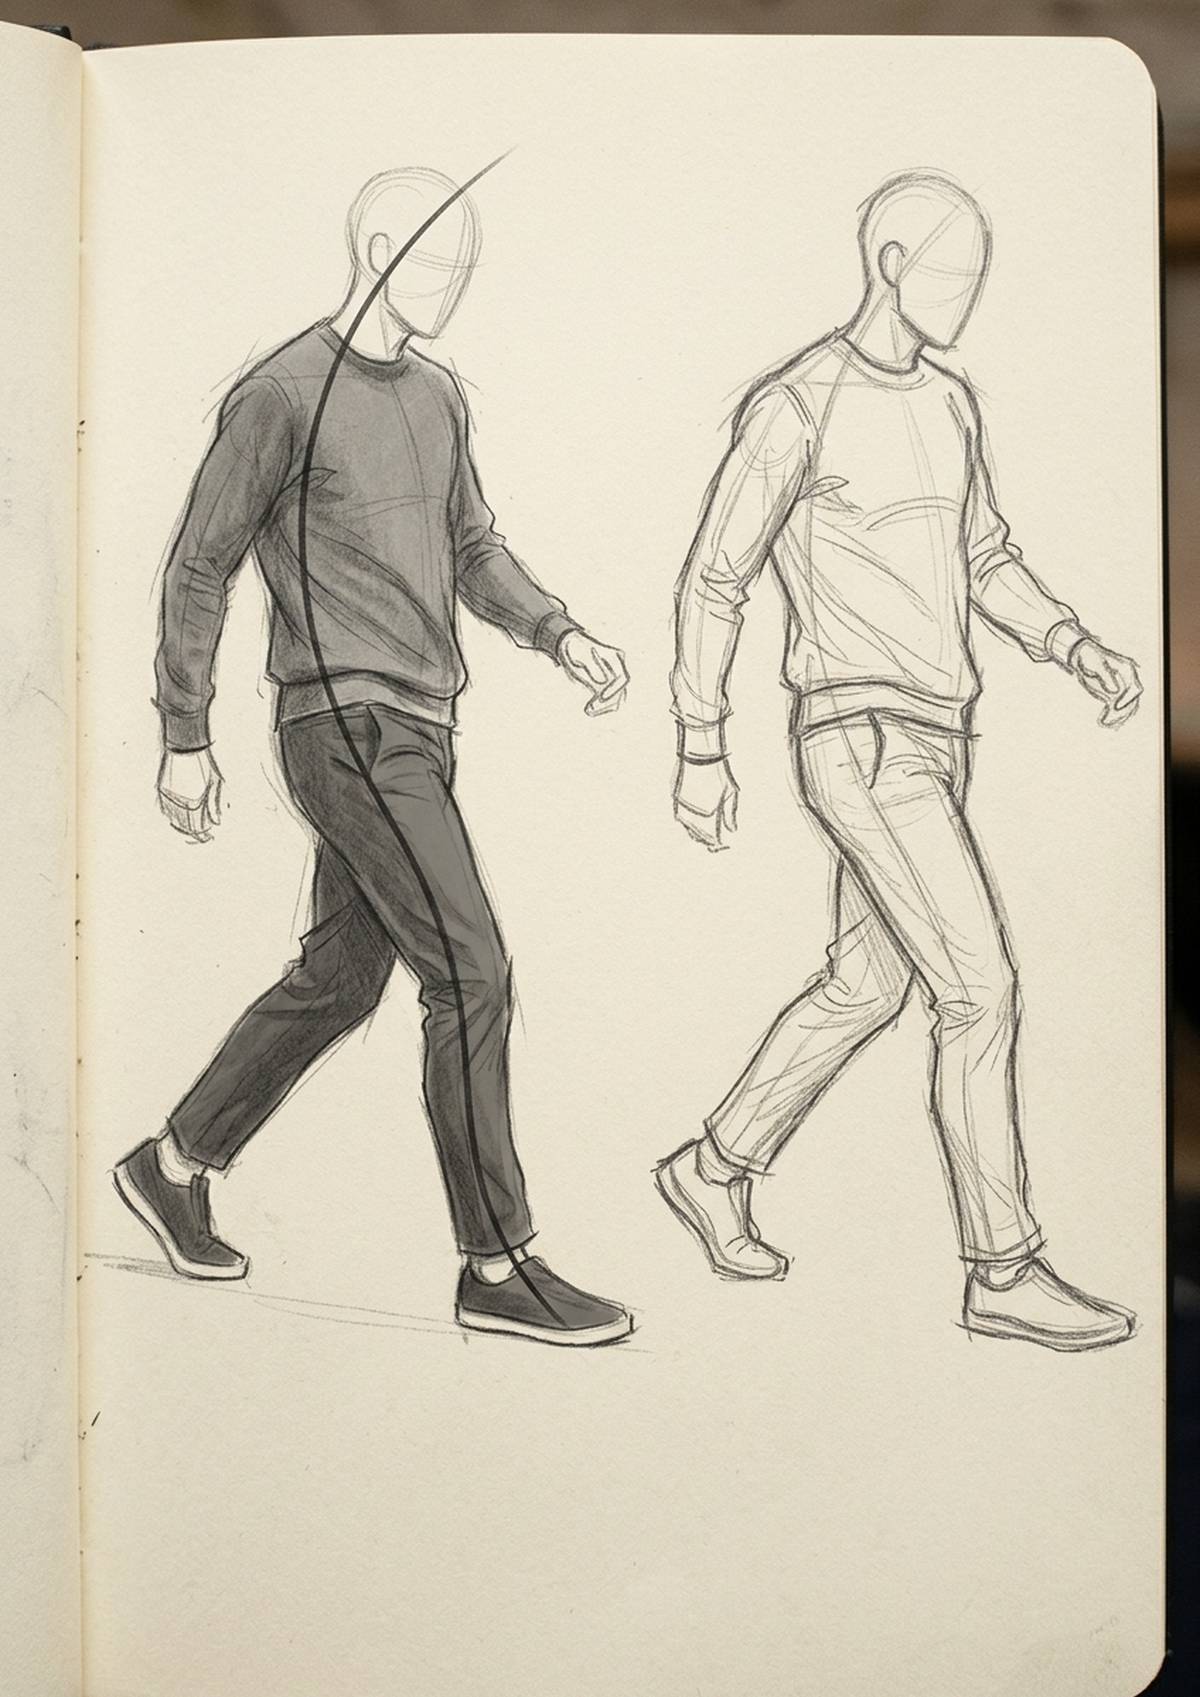
The line of action is a single sweeping curve that runs through the whole pose, from the head down through the spine to the supporting foot. Draw it first, before anything else, and the figure will have movement built into it from the start.
Most stiff drawings are stiff because they were built limb by limb, with no through-line holding them together. When you start with one confident curve, every shape you hang off it inherits that flow. It takes two seconds and it changes everything.
- Draw one curve for the whole pose before any body parts
- Exaggerate it slightly — real poses read as flatter on paper than they look in life
- Let the ribcage and pelvis sit along that curve, not fight it
- If the drawing feels rigid, your line of action is probably too straight
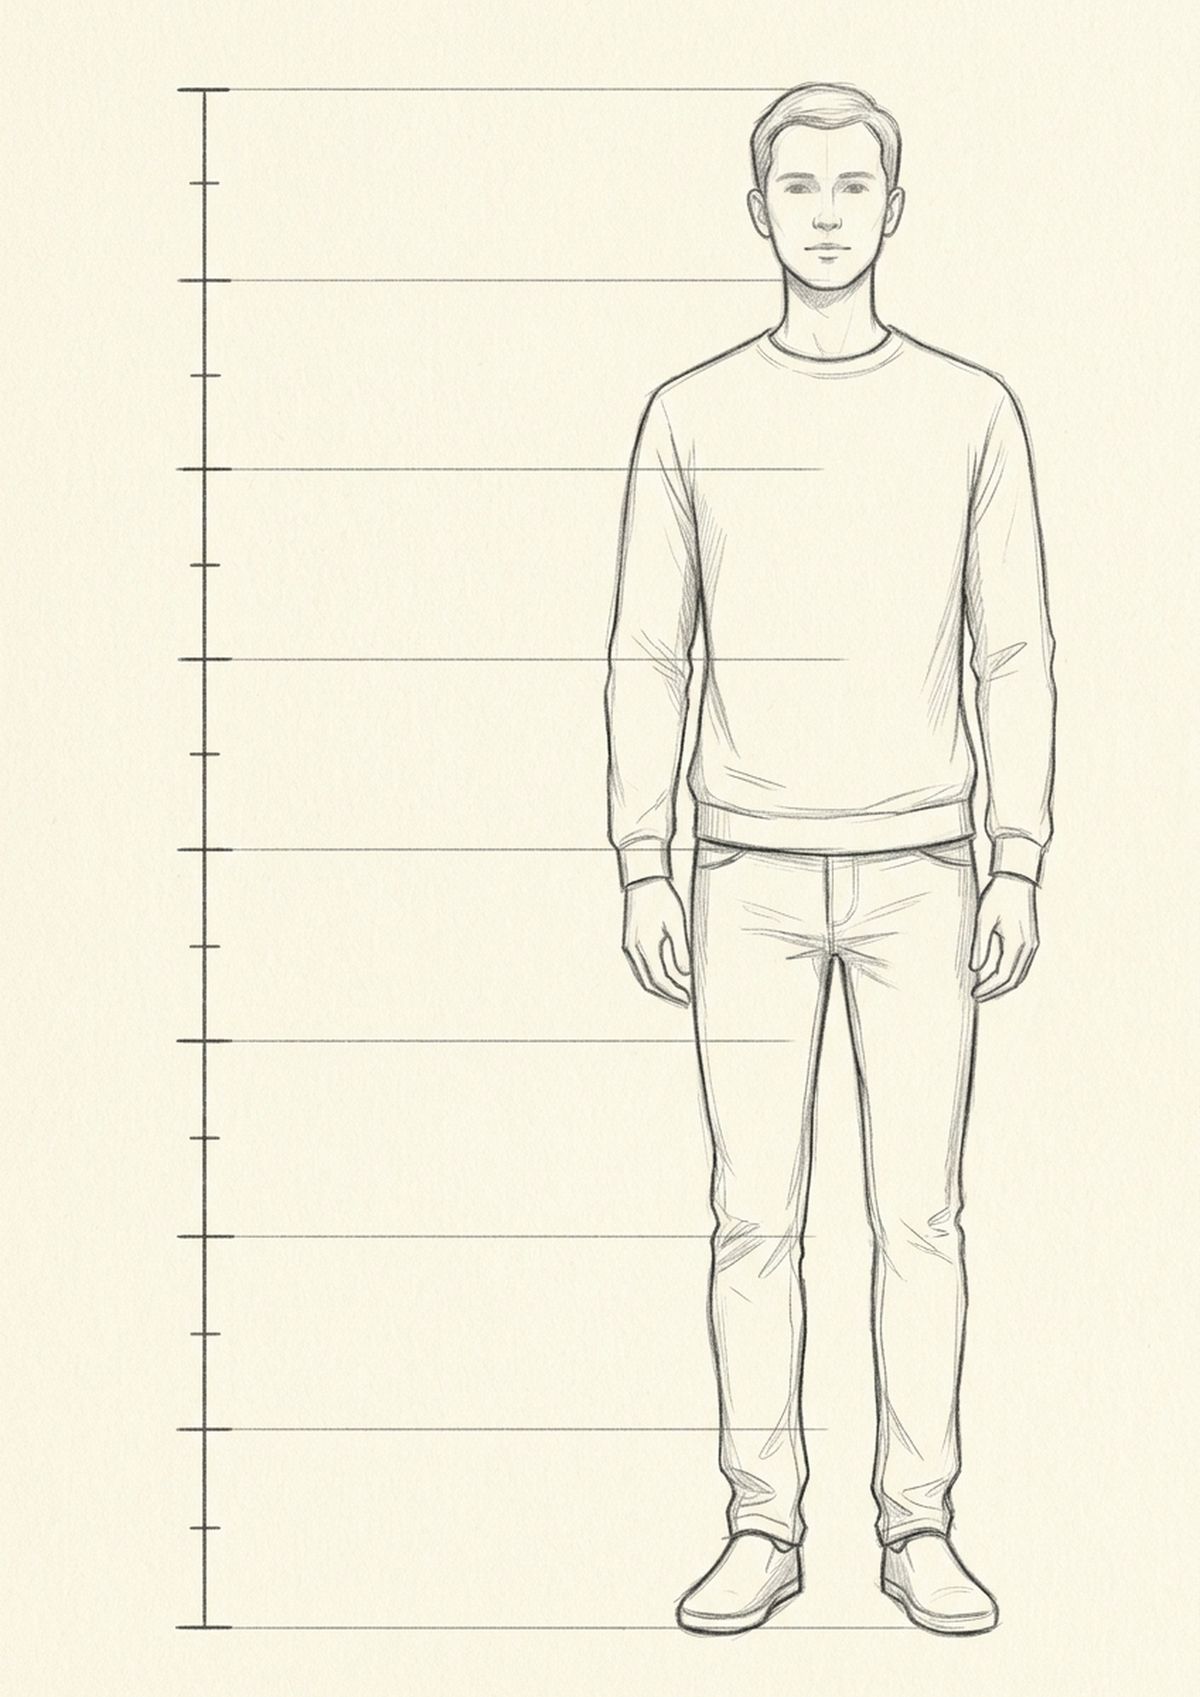
How Do You Get Figure Proportions Right?
The quickest reliable rule is to measure the body in head-heights: an adult figure is roughly seven and a half to eight heads tall, with the halfway point at the hip, not the waist. Get those two landmarks right and everything else falls into place.
That halfway point catches almost everyone out. We feel like the middle of a person is somewhere around the belly button, so beginners draw legs far too short. Measure it once with a pencil held at arm’s length and you will never forget it.
- Adults: about 7.5–8 heads tall, halfway at the hip joint
- Shoulders: roughly two head-widths across on an adult
- Elbows: land level with the bottom of the ribcage
- Wrists: land level with the hip
- Children: far bigger heads — a toddler is only about four heads tall
Stylising is completely fine once you know the rule. Fashion illustration stretches figures to nine or ten heads on purpose. But bend the rule deliberately rather than by accident.
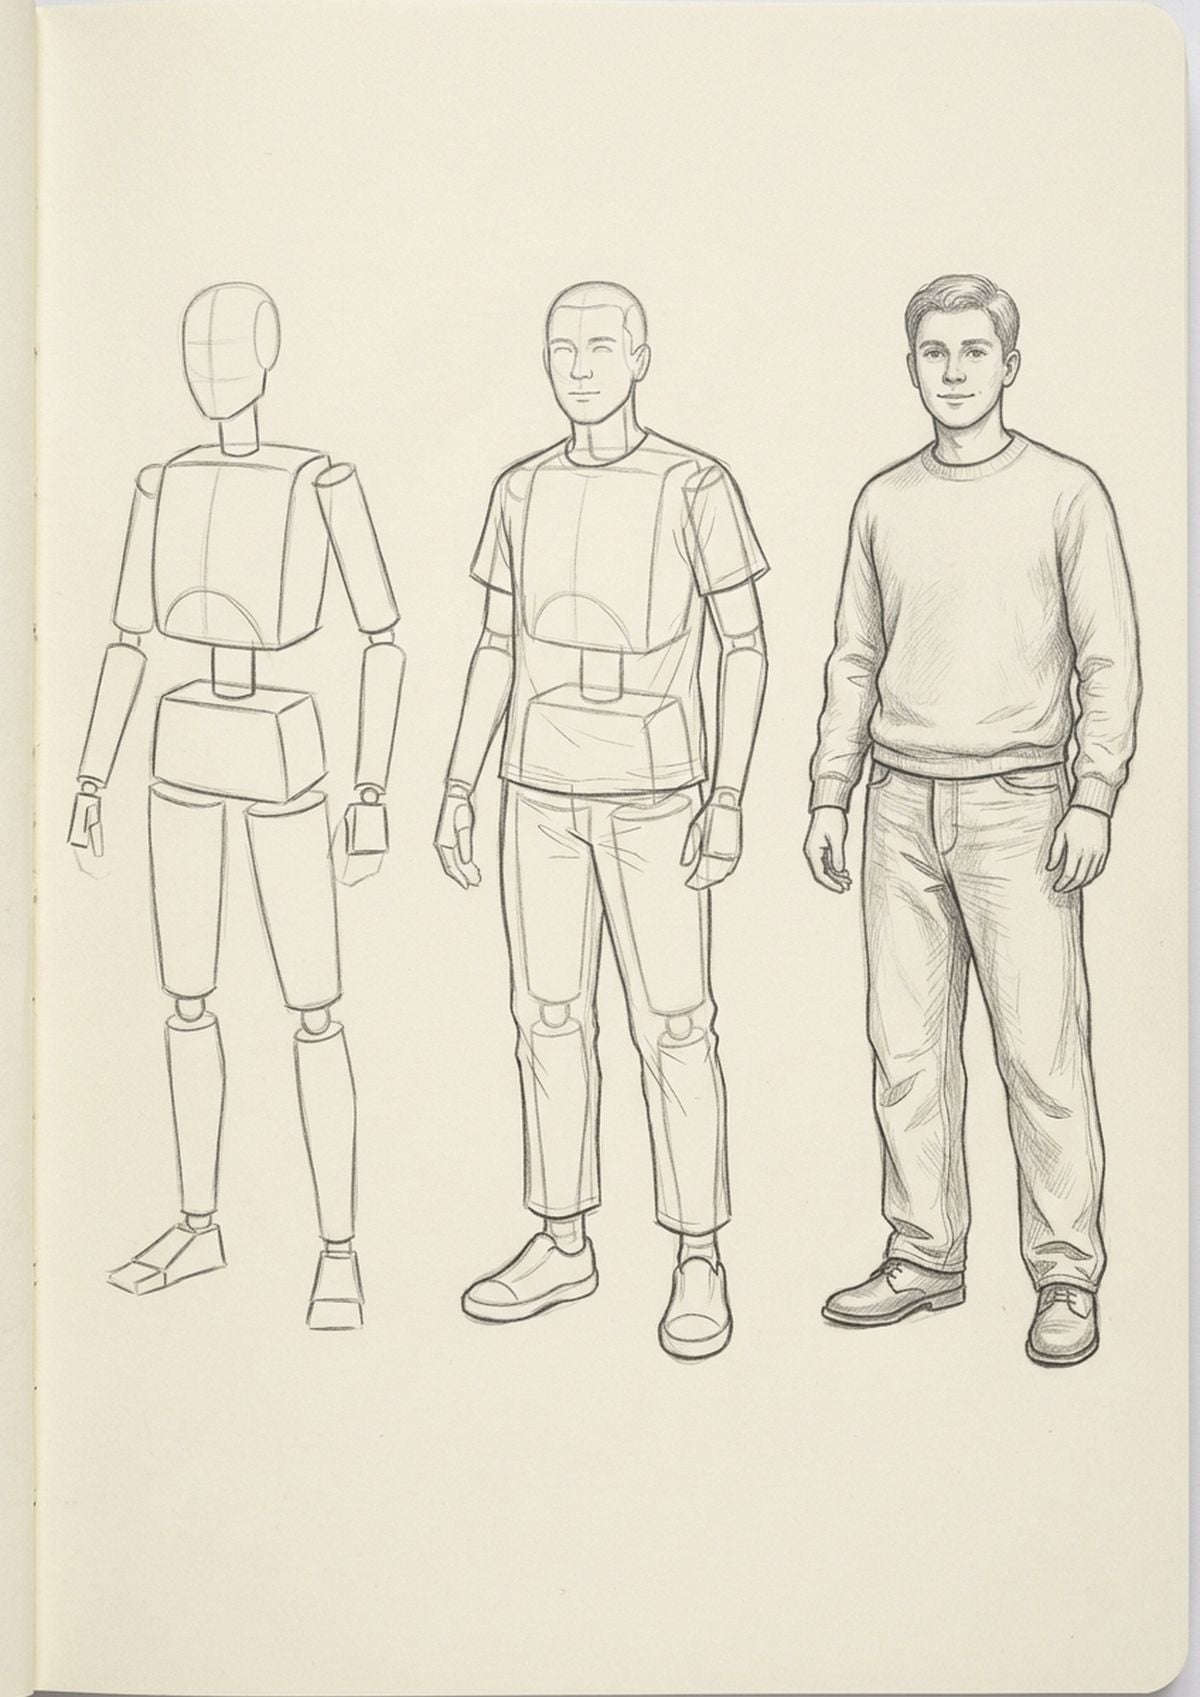
How Do You Simplify the Body Into Shapes?
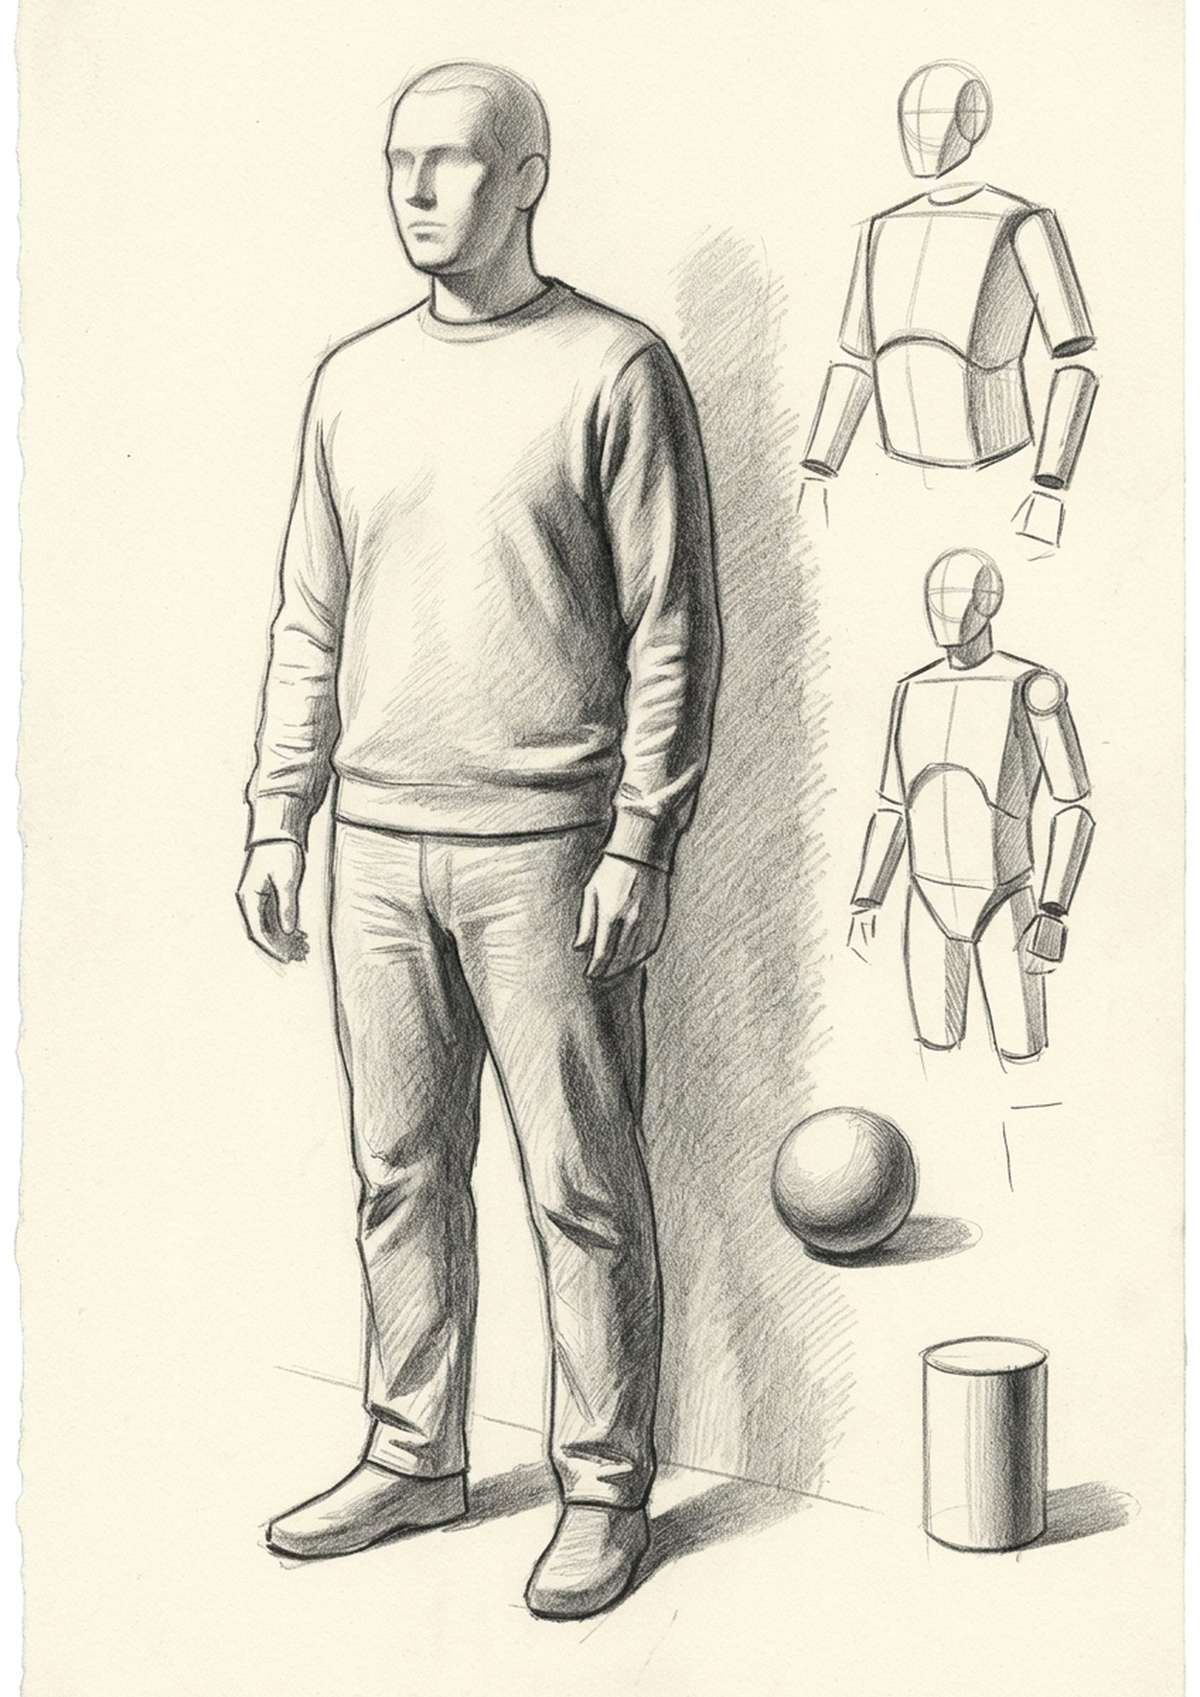
Treat the torso as two boxes — a ribcage box and a pelvis box — joined by a flexible spine, then draw the limbs as tapering cylinders. Almost every figure drawing method in existence is some version of this, because it works.
Those two boxes are the secret to poses that read in three dimensions. They tilt and twist against each other: when someone shifts their weight, the hip box tips one way and the shoulder box tips the other. Draw the boxes, get that opposition right, and the pose will look convincing before you have added a single detail.
Keep the shapes loose and light at this stage. You are building scaffolding, not the finished drawing, and you want to be able to erase it cheerfully.
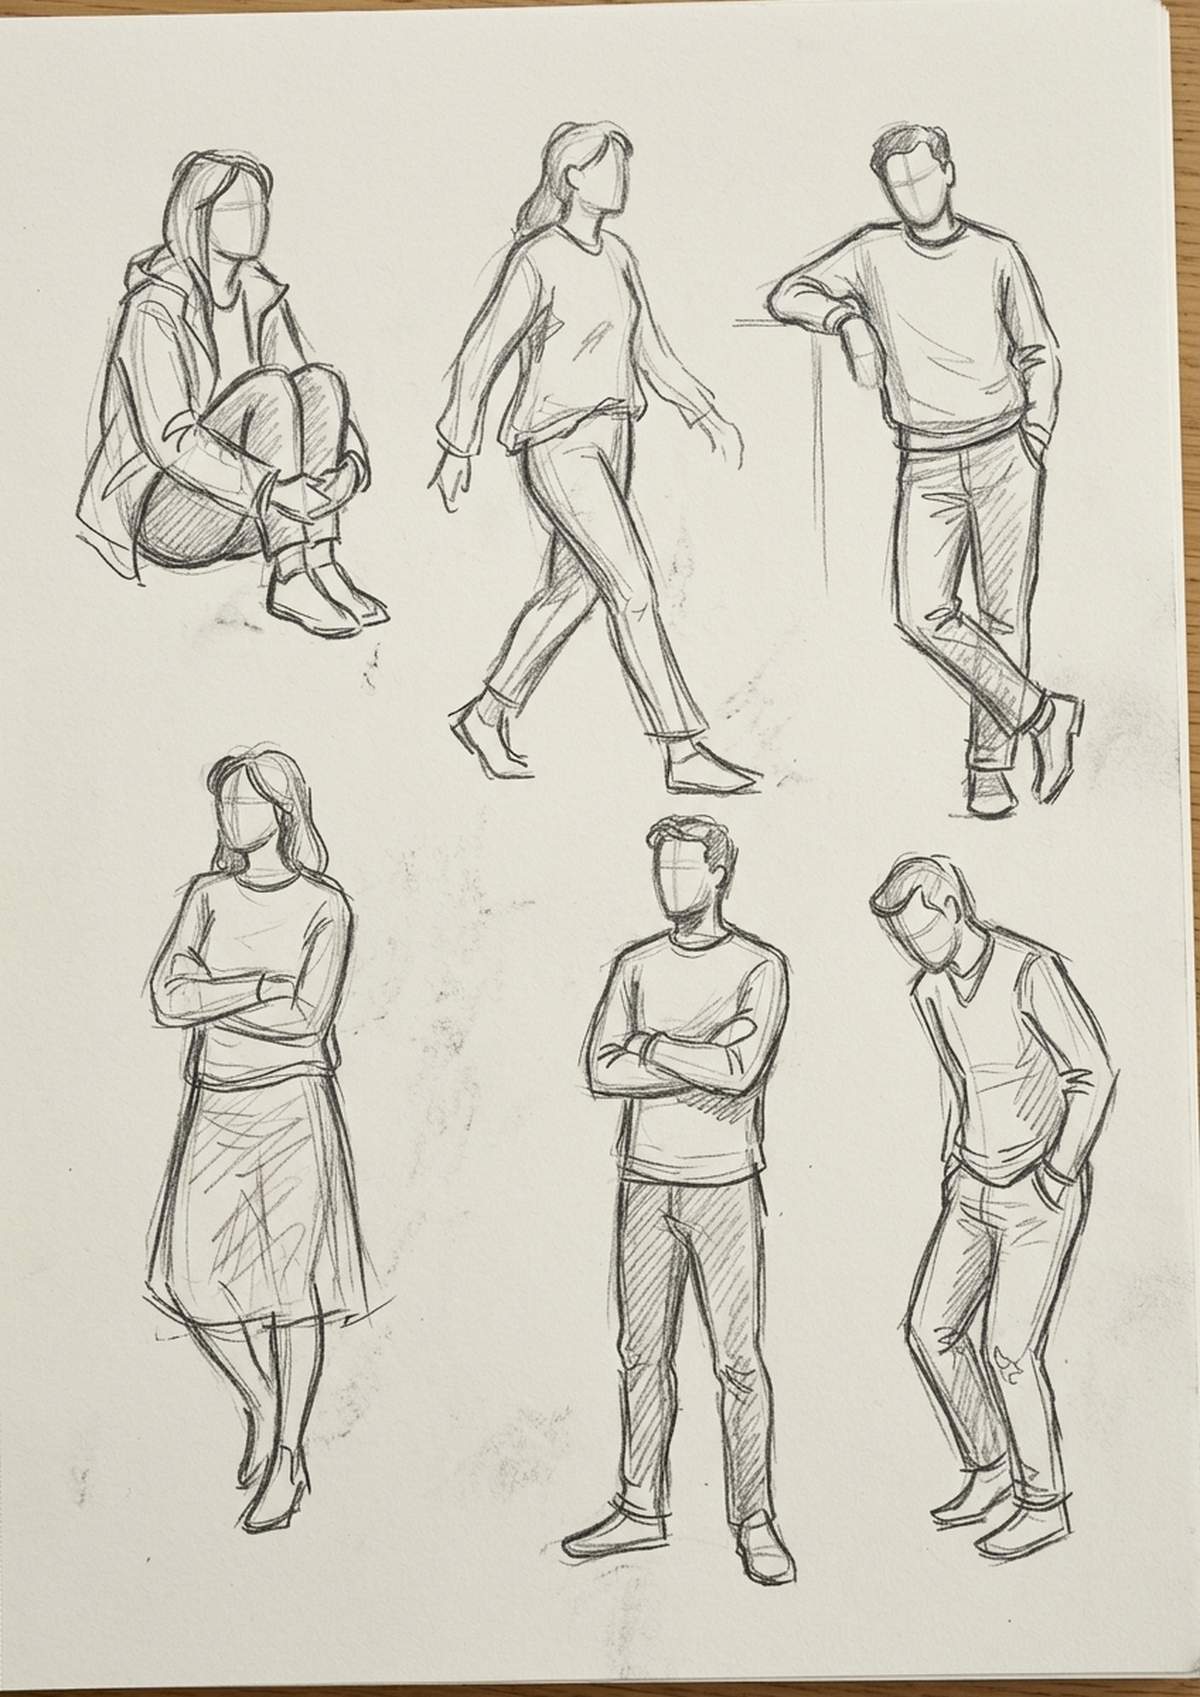
What Is Gesture Drawing and How Do You Practise It?
Gesture drawing is fast, loose sketching — thirty seconds to two minutes per pose — that captures the movement and energy of a figure rather than its outline. It is the single best exercise for loosening up a stiff drawing hand.
The goal is not a good drawing. The goal is to train your eye to find the essential thing about a pose quickly. Set a timer, work big, use your whole arm rather than your fingers, and let the lines be messy. Ten minutes of this before a longer drawing session makes a genuine difference.
- Set a timer for 60 seconds per pose
- Find the line of action and draw it immediately
- Block the ribcage and pelvis in with two quick shapes
- Suggest the limbs with single flowing lines
- Stop when the timer goes, even mid-line, and move on
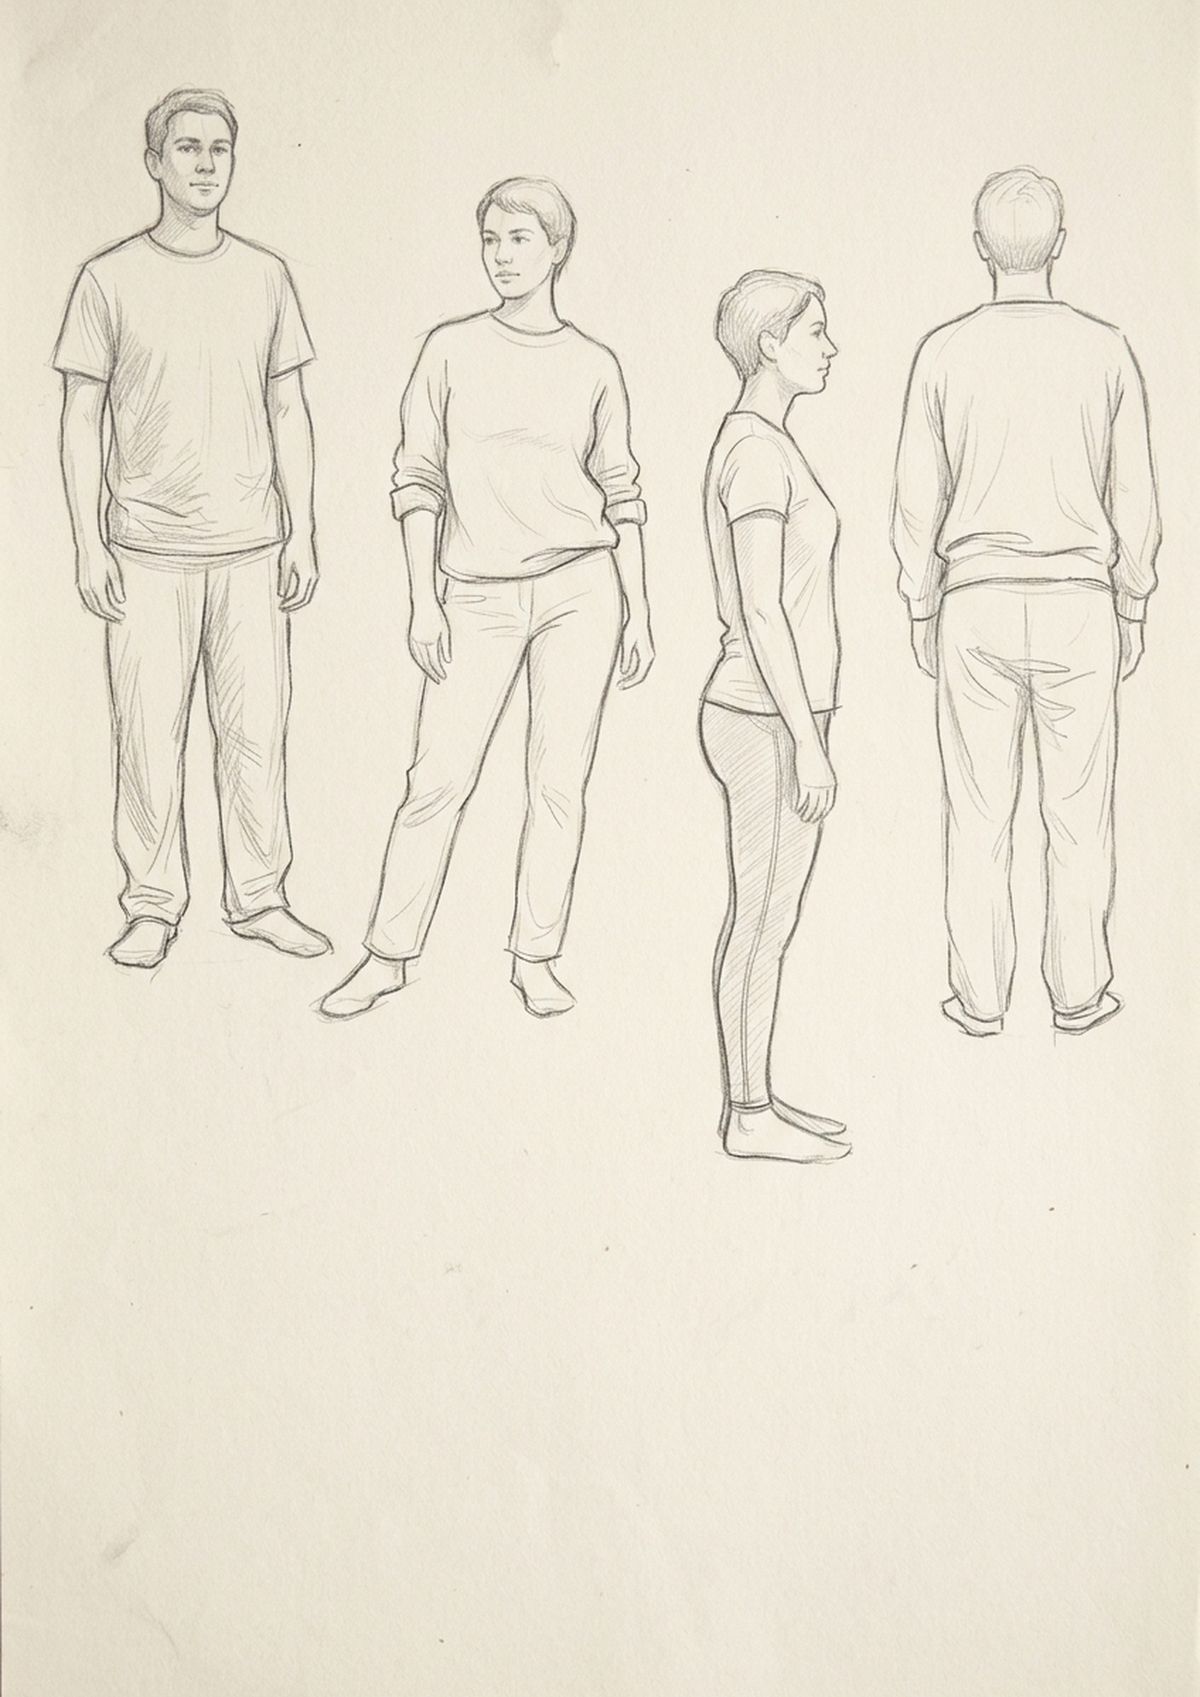
How Do You Draw Standing Poses That Look Balanced?
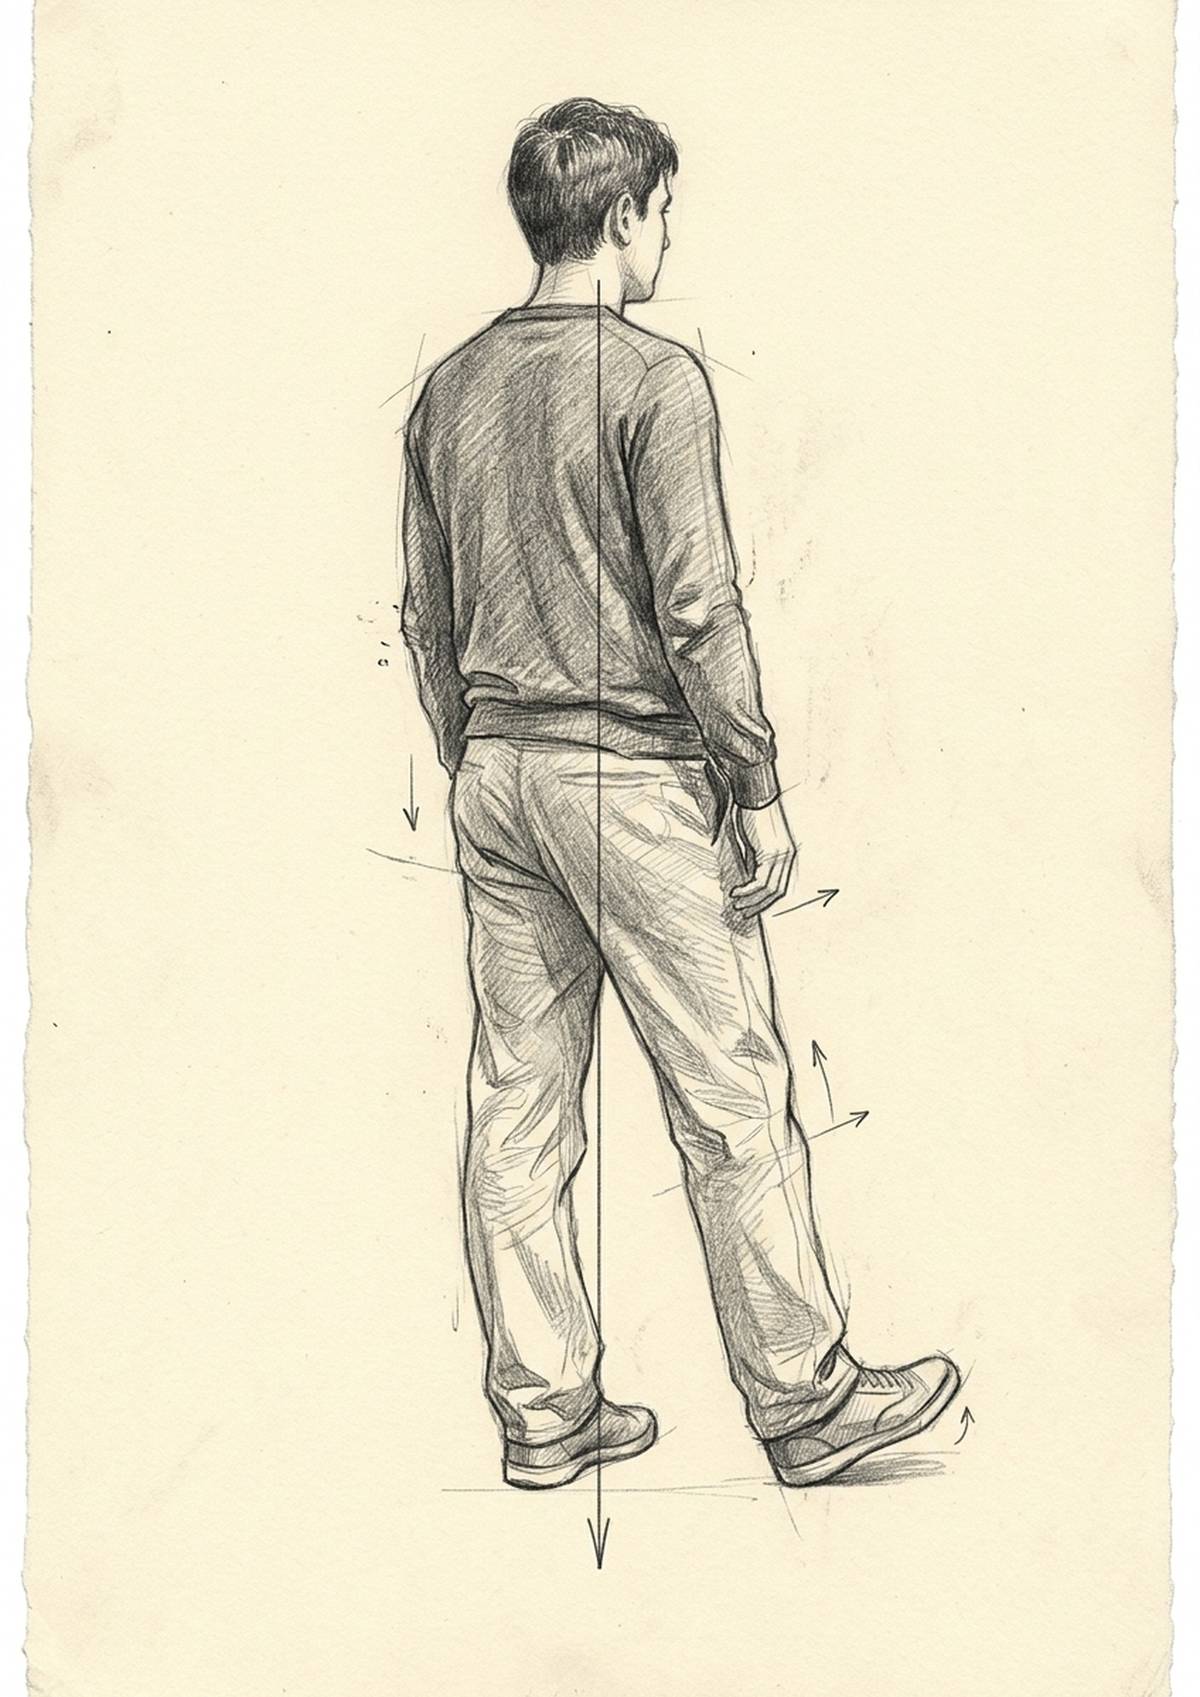
Drop an imaginary vertical line from the pit of the neck straight down: it must land over the supporting foot, or between both feet if the weight is even. If it lands outside them, the figure looks like it is toppling over.
This one check catches more errors than anything else I know. A standing pose with the weight on one leg — contrapposto, if you want the proper word for it — has a tilted hip, a tilted shoulder going the opposite way, and a gentle S-curve through the spine. The straight leg carries the weight; the other one relaxes and bends.
Try drawing the same standing figure from the front, side and back. It is a brilliantly quick way to understand that a pose is a three-dimensional thing rather than a flat silhouette.
How Do You Draw Seated and Kneeling Poses?
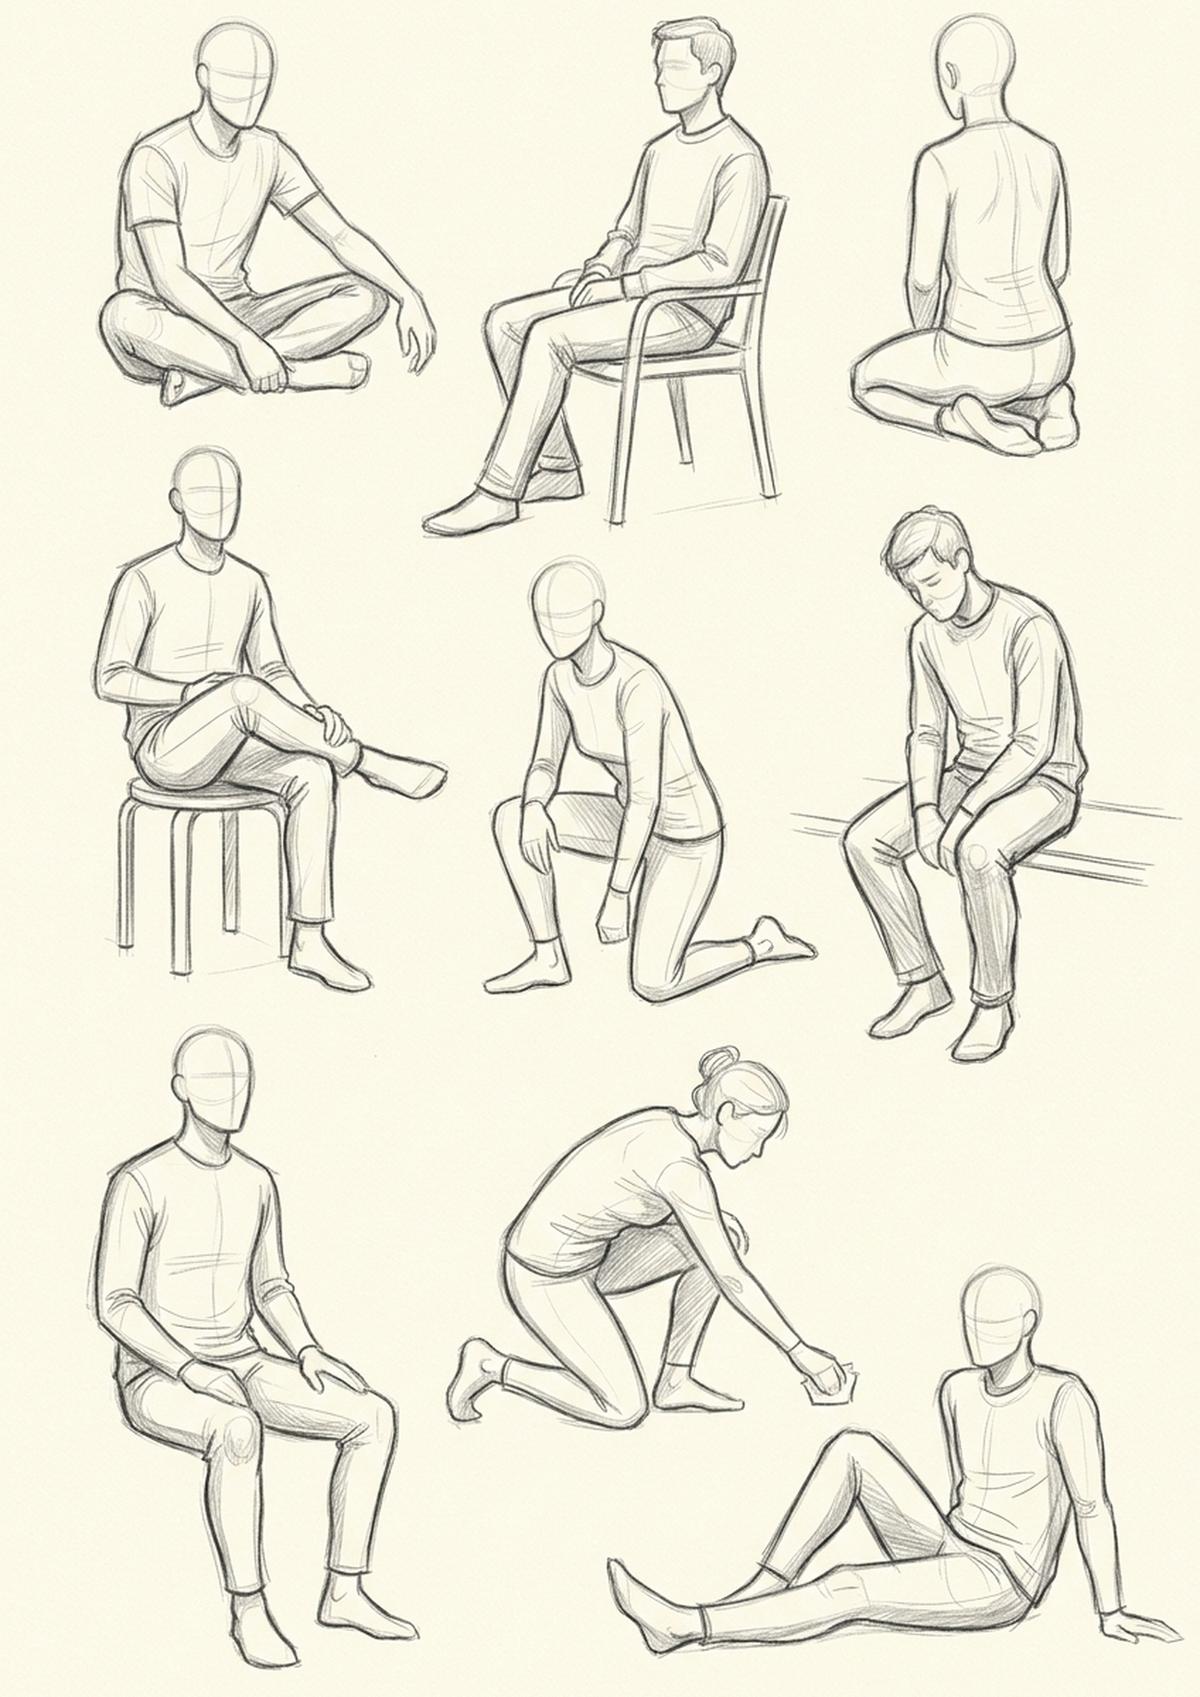
Seated poses are all about where the body folds and where it compresses. Mark the three hinge points first — hip, knee and ankle — then draw the shapes between them, remembering that a thigh squashes and widens when it presses onto a chair.
The mistake I see most often is drawing a seated figure as a standing figure with bent legs. Sitting changes the whole torso: the pelvis tips back, the spine curves differently, and the shoulders often drop. Cross-legged poses on the floor need particular attention to which leg is in front, or the whole thing turns into a puzzle.
Kneeling sits somewhere between the two. Keep the weight line in mind here as well, because a kneeling figure still has to balance.
How Do You Draw Action Poses With Real Energy?
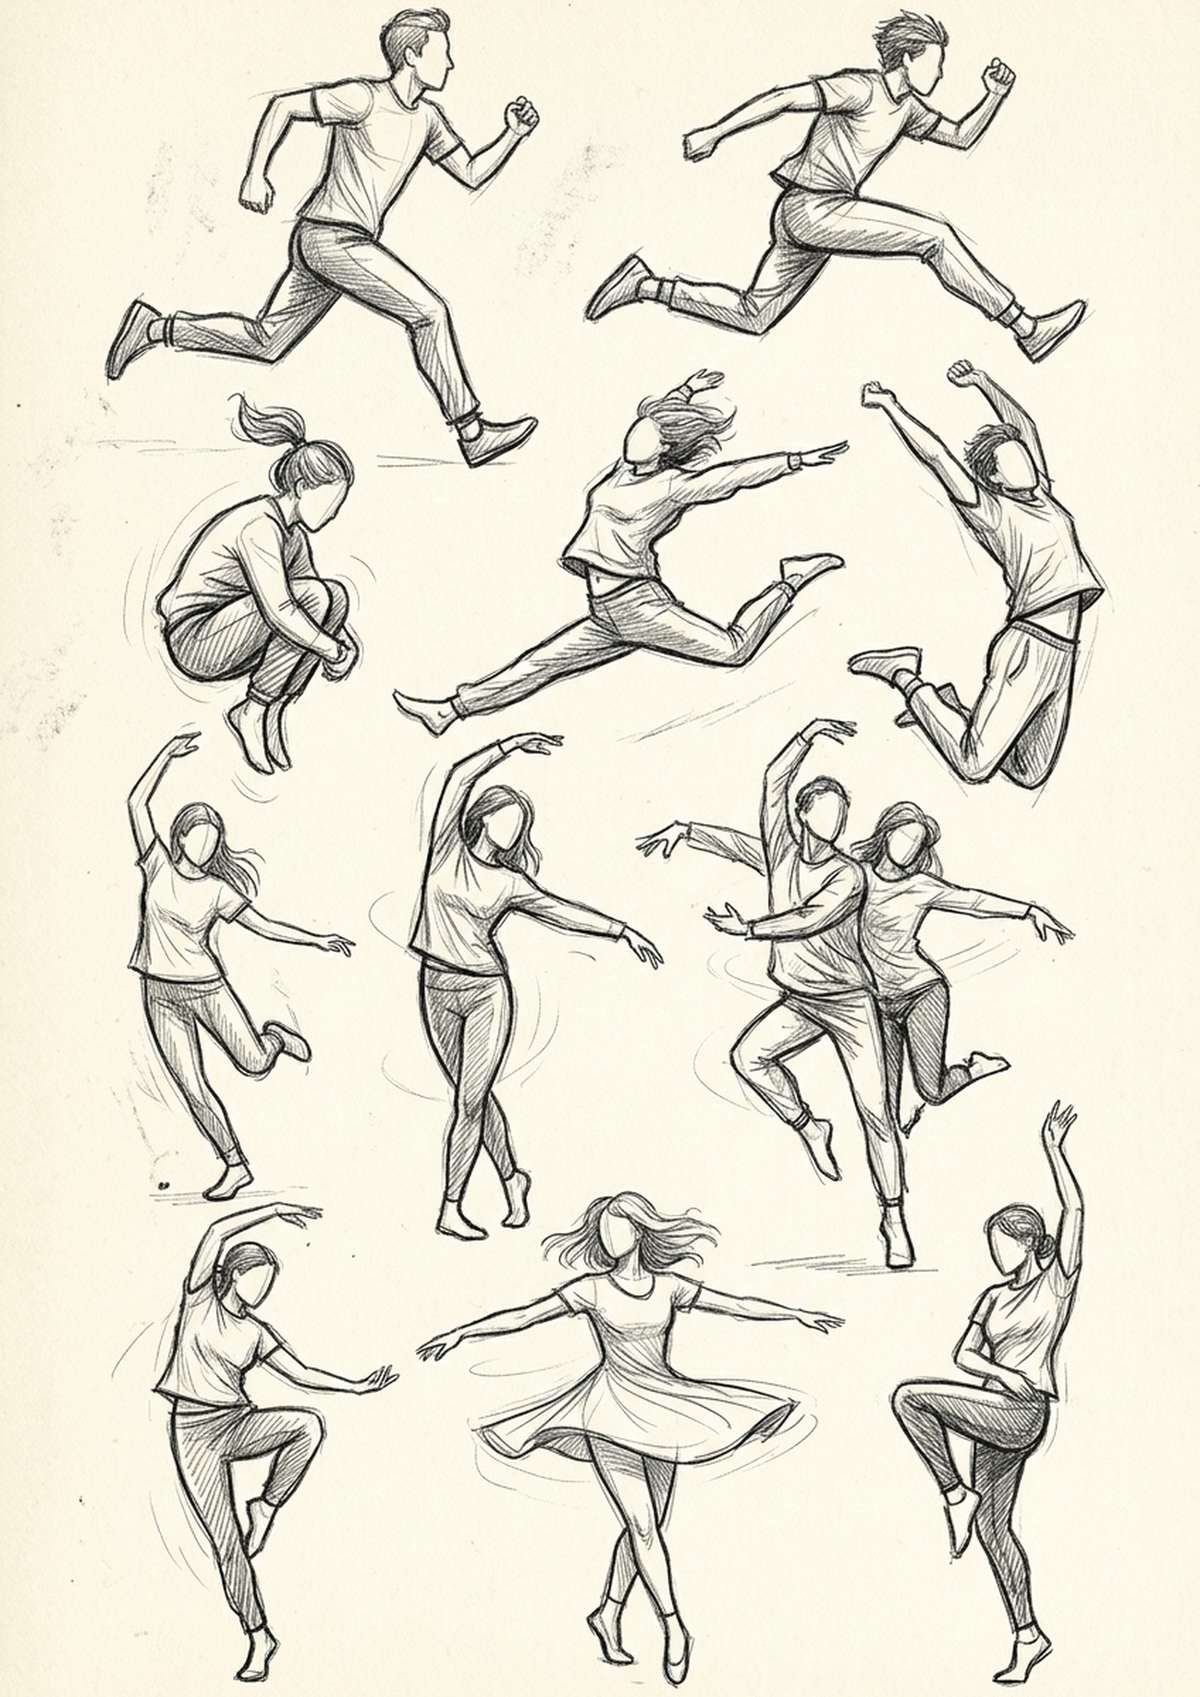
Exaggerate the line of action far more than feels comfortable, and show the pose slightly before or after its peak rather than at the exact moment of impact. Anticipation and follow-through are what make movement read as movement.
A running figure leans forward more than you expect. A jump has a moment of tuck and then a moment of stretch, and the stretch is nearly always the more interesting one to draw. Let clothing and hair lag behind the body — that trailing edge is what tells the eye which way things are travelling.
If an action pose looks frozen, it usually needs more contrast between the compressed side and the extended side of the body. Squash one side, stretch the other.
What Is Foreshortening and How Do You Handle It?
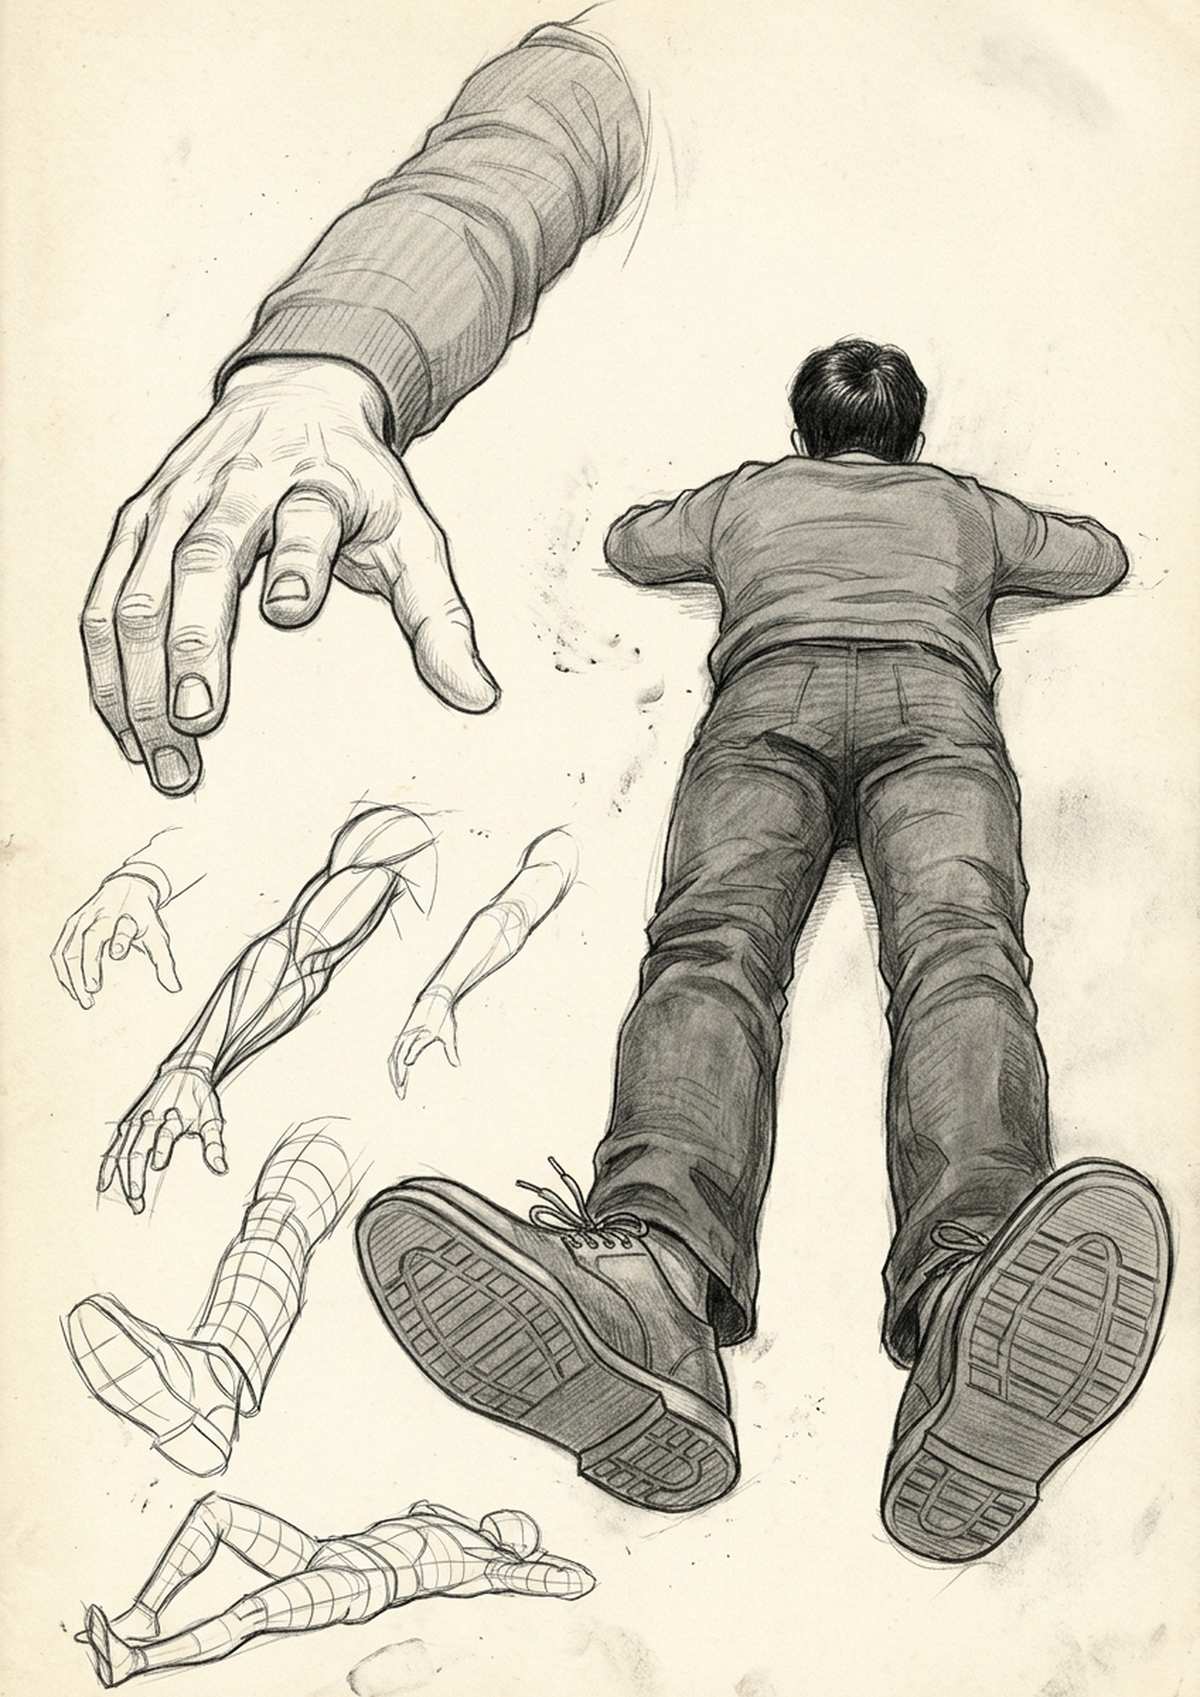
Foreshortening is what happens when part of the body points towards you: it appears much shorter and much wider than you know it to be. The way to handle it is to draw what you actually see, not what you know is there.
A hand reaching towards the viewer can genuinely be larger than the head. Your brain will scream that this is wrong and try to correct it. Don’t let it. Draw the limb as a stack of overlapping cylinders getting rapidly larger, and use those overlaps to say which part is nearest.
It is easily the hardest thing in figure drawing, and it is also the thing that makes a drawing leap off the page when you get it right. Practise it on purpose rather than avoiding the angles that need it.
How Do You Shade a Figure to Give It Form?
Pick one light source and stick to it, then shade each part of the body as if it were a simple cylinder or sphere: light side, mid-tone, core shadow, then a touch of reflected light on the far edge. That sequence turns a flat outline into a solid body.
- Commit to one light direction before you start and never drift from it
- Shade the big forms first — torso, thighs, upper arms — before any small detail
- Keep the darkest core shadow just inside the edge, not on it
- Add a little reflected light along the shadow edge so limbs look round, not cut out
- Leave some clean paper — highlights do more work than extra pencil
Clothing follows the body underneath. Draw the form first, then let the folds wrap around it, and your figures will stop looking like flat paper dolls.
What Are the Most Common Figure Drawing Mistakes?
Almost every wobbly figure comes down to one of five habits, and each has a quick fix once you can name it:
- Legs too short. The halfway point of an adult body is the hip, not the waist. Measure it.
- No weight line. Drop a vertical from the neck pit; it must land over the supporting foot.
- Shoulders and hips parallel. In a relaxed standing pose they tilt in opposite directions. Parallel reads as robotic.
- Starting with the outline. Build from the inside out — action line, then boxes, then limbs, then contour.
- Avoiding hands and feet. Hiding them in pockets forever will not help. Block them in as simple wedges and mittens first.
Hands in particular deserve their own practice session — my hand drawing reference breaks them down into shapes that are far less frightening than they look.
Where Can You Get Free Figure Drawing Templates?
Grab the free figure drawing template using the form near the top of this post — it is one clean pose outline you can print, trace and shade as many times as you like, so you can try this whole approach today.
I have built a set of 25 figure drawing templates covering standing, seated, kneeling, action and gesture poses, plus proportion and construction charts. Each one is a clean A4 outline made for tracing, so you can practise shading and form without fighting the drawing underneath.
The complete set — along with new watercolour templates, Procreate brushes and tutorials every month — lives with my Patreon members, who get the full library plus early access to everything new.
Fancy something a bit gentler between practice sessions? My pumpkin watercolour card template is a lovely low-pressure palate cleanser when your brain has had enough of anatomy.
What Supplies Do You Need for Figure Drawing?
Very little, honestly. A pencil, paper and an eraser will take you a long way. But a few well-chosen tools make longer sessions more comfortable:
- Faber-Castell Pitt Graphite tin — a range of grades so you can keep gesture lines light and push shadows properly dark.
- Canson XL sketch pad — smooth, forgiving paper that takes repeated erasing without pilling.
- Tombow Mono Zero eraser — a fine retractable eraser for lifting narrow highlights along an arm or a jaw.

|

|

|
This post contains affiliate links, which means I may earn a small commission at no extra cost to you if you make a purchase. I only recommend products I genuinely love and use myself.
Beyond that, a timer for gesture practice and a big cheap newsprint pad you are not precious about are worth more than any expensive pencil.
Frequently Asked Questions
How do you start figure drawing as a complete beginner?
Start with gesture drawing rather than detailed work. Set a one-minute timer, draw the line of action, block the ribcage and pelvis in as two simple shapes, and suggest the limbs. Do ten of those before you attempt any longer drawing. Tracing a template first is a brilliant shortcut for learning where things sit.
How tall should a figure be in head heights?
An adult figure is roughly seven and a half to eight heads tall, with the halfway point at the hip joint. Children are proportionally much bigger-headed — a toddler is only about four heads tall. Stylised fashion figures are often stretched to nine or ten heads on purpose.
Why do my figure drawings always look stiff?
Almost always because they were built outline-first, limb by limb, with no line of action holding the pose together. Draw one sweeping curve through the whole figure before anything else, and tilt the shoulders and hips in opposite directions rather than keeping them parallel.
Can I use these figure templates for watercolour or Procreate?
Absolutely. They are clean outlines built for tracing, so they work beautifully with watercolour, coloured pencil and markers. Print them on watercolour paper, or import a page into Procreate and trace on a layer above it.
Is tracing a figure drawing template cheating?
Not at all. Tracing builds muscle memory for shapes and proportions your hand has not learnt yet, which is exactly how a lot of classical training worked. It is a stepping stone, not a destination — trace for a while, then draw the same pose freehand and see how much has stuck.
More Drawing References
If this helped, you might also enjoy:
- Face Drawing Reference: Proportions, Angles & Expressions
- Hair Drawing Reference: Styles, Textures & Templates
- Hand Drawing Reference: Poses & Templates for Artists
- Eye Drawing Reference: Anatomy, Expressions & Styles
- Free Pumpkin Watercolour Card Template
Written by Dee Maene — artist and founder of Artsydee. I make printable templates, watercolour kits and drawing resources to help beginners find their creative confidence. When I’m not painting, I’m probably drinking tea and plotting my next sketchbook page.
Pin this for later!