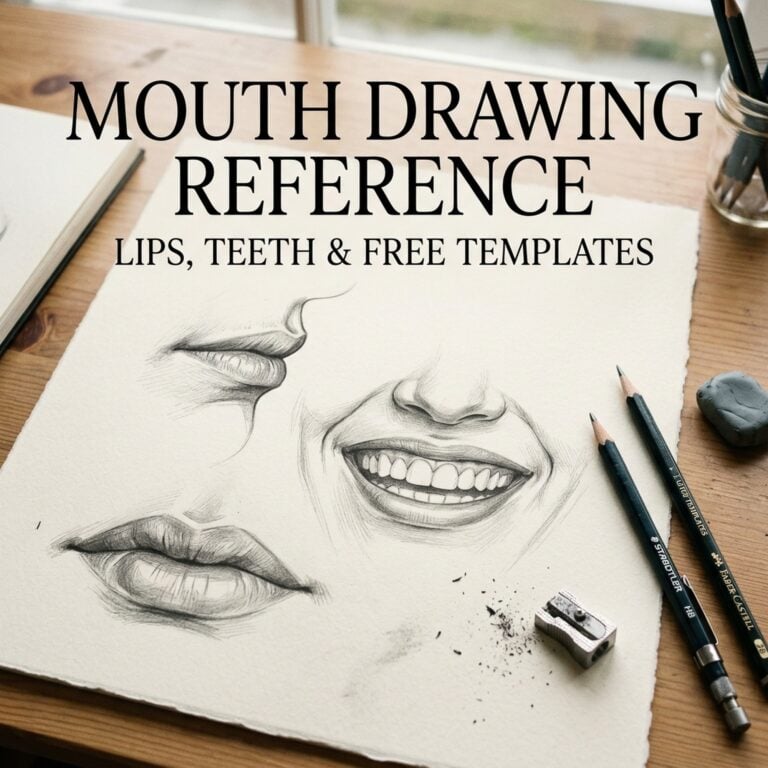
Here’s a mouth drawing reference for artists, from lip shapes and teeth to expressions, plus a free printable mouth and lips reference sheet.
I’ve put together a free mouth and lips reference template you can print and trace. Pop your email into the box below and it’ll land in your inbox in a minute or two — then let’s go through how to draw a mouth that actually looks like it belongs on the face.
You can spend an hour on a portrait, get the eyes right, get the nose right, and then the mouth turns the whole face into a stranger. It’s the feature that carries the most expression and the one that goes wrong fastest — which is exactly why a good mouth drawing reference is worth keeping next to your sketchbook.
Table of Contents
Why Is the Mouth So Hard to Draw?
The mouth is hard because it is the only feature that changes shape completely, and most people draw the idea of a mouth rather than the thing in front of them. Your brain stores a symbol — two curved lines — and hands it to you the moment you pick up a pencil.
A real mouth is a soft, three-dimensional form wrapped around the curve of the teeth and jaw underneath. It has a top plane that tips away from the light, a lower lip that catches it, and corners that tuck back into the cheeks. Once you draw it as a form instead of a symbol, everything loosens up. That is all a reference does: it swaps the symbol in your head for the shapes that are genuinely there.
If you have already worked through my face drawing reference, the mouth is the natural next stop — it is the feature that decides whether a face reads as warm, tired, wary or amused.
What Shapes Make Up the Mouth?
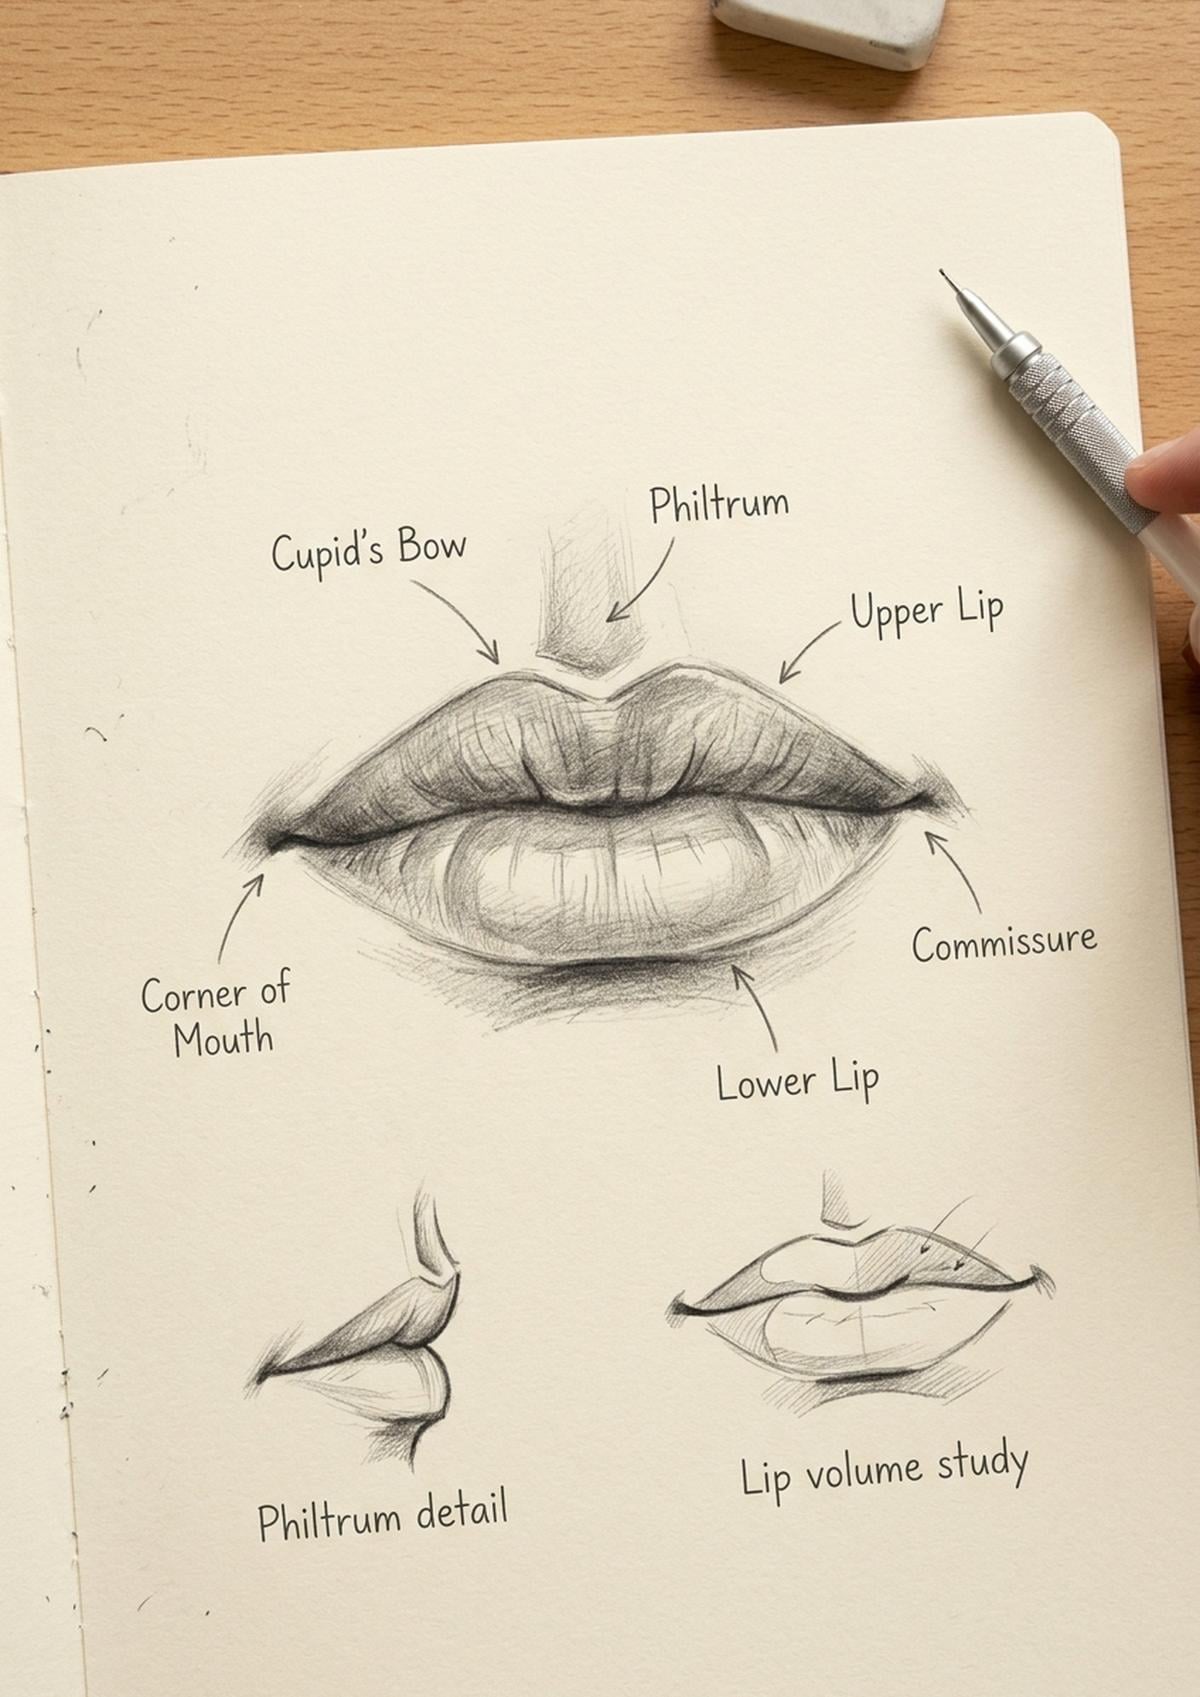
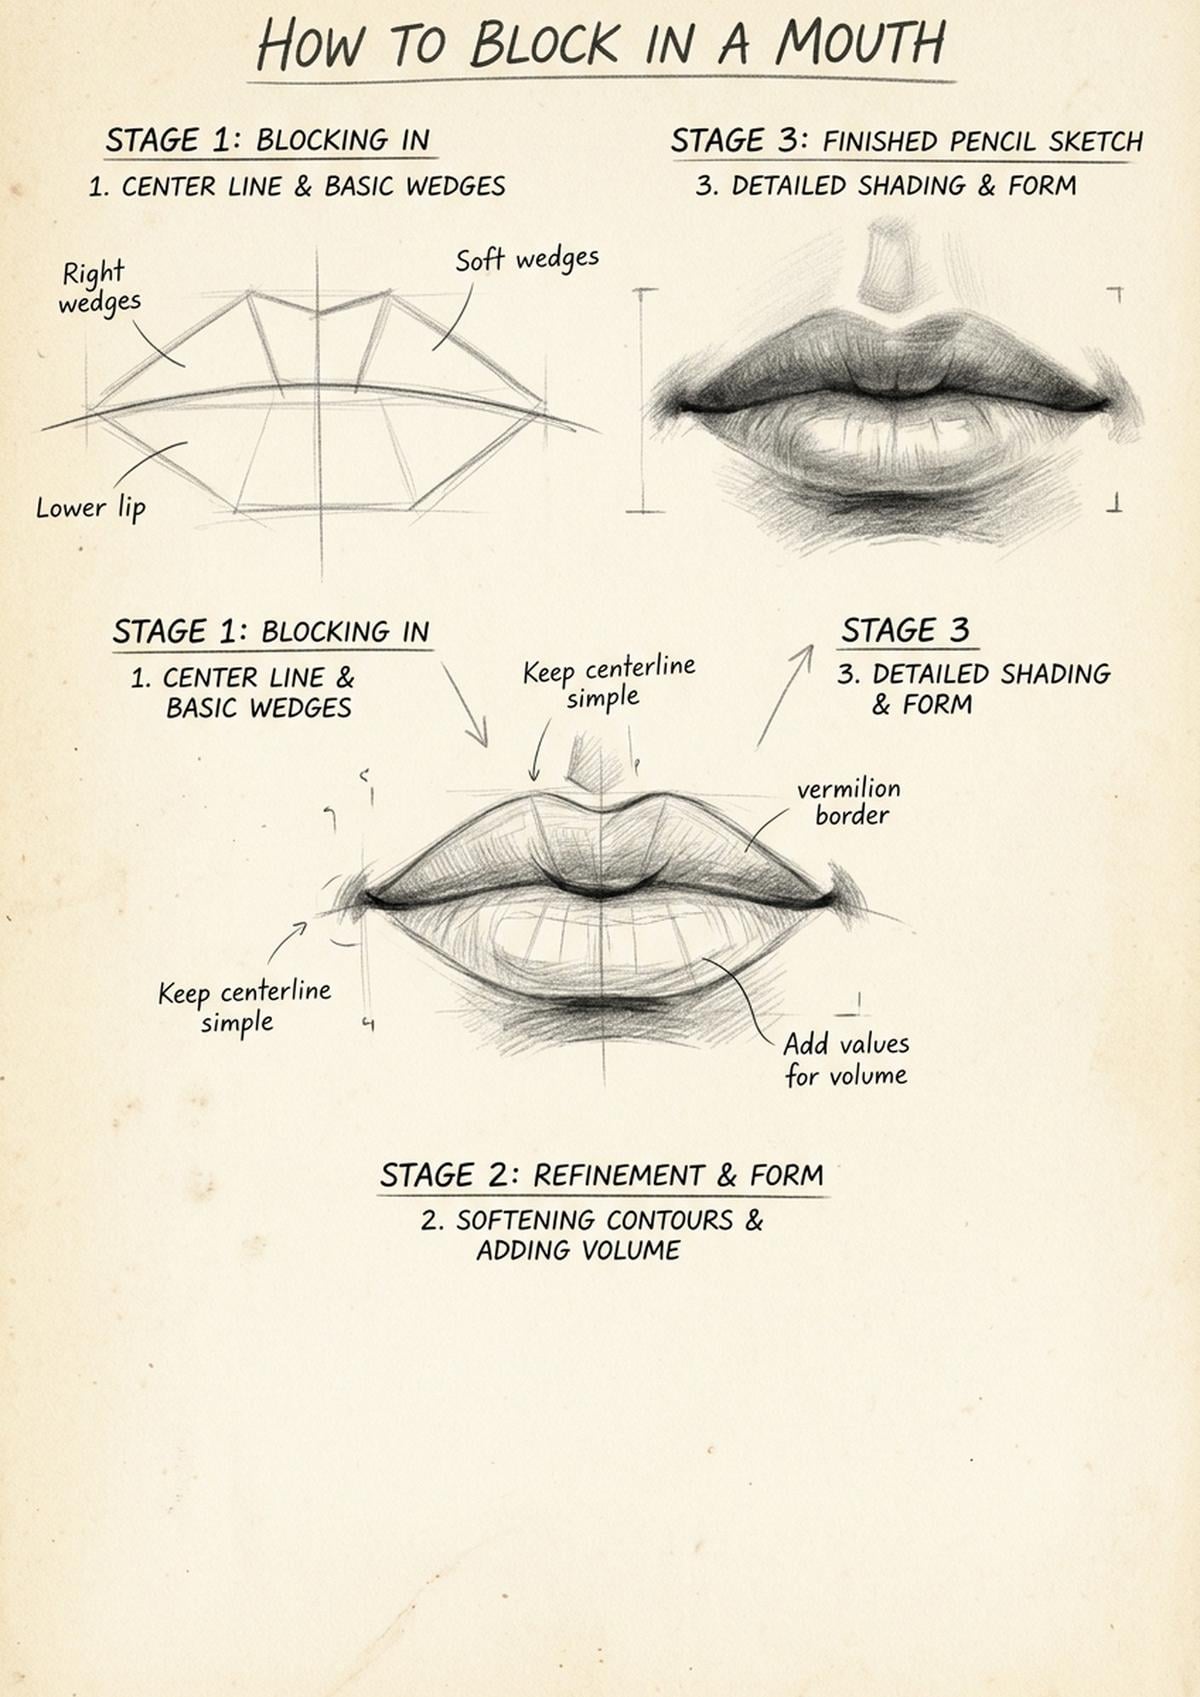
The mouth breaks down into five simple shapes: the two soft wedges of the upper lip either side of the cupid’s bow, the single fuller wedge of the lower lip, and the two corners. Get those blocked in and the detail almost draws itself.
Start with the line between the lips, because it is the darkest, most expressive line and it sets everything else. It is never straight — it dips gently at the centre under the cupid’s bow, lifts a little on the way out, then turns down into each corner. Draw that one wavy line well and you are already most of the way there.
- The centre line — the shadow line where the lips meet, and the darkest mark on the mouth
- The cupid’s bow — the small double curve at the top of the upper lip
- The philtrum — the shallow groove running from the nose down to the bow
- The upper lip — thinner, tipped away from the light, so it reads darker
- The lower lip — fuller and rounder, catching the light along the middle
- The corners — small pockets of shadow that tuck back, never sharp points
Block those in lightly first. I use the softer grades in a Faber-Castell Pitt Graphite tin for construction lines, because a soft pencil lifts off cleanly when you inevitably want to nudge the whole mouth two millimetres to the left.

|

|

|
This post contains affiliate links, which means I may earn a small commission at no extra cost to you if you buy something through them. I only ever recommend supplies I actually use.
How Do You Draw Lips Step by Step?
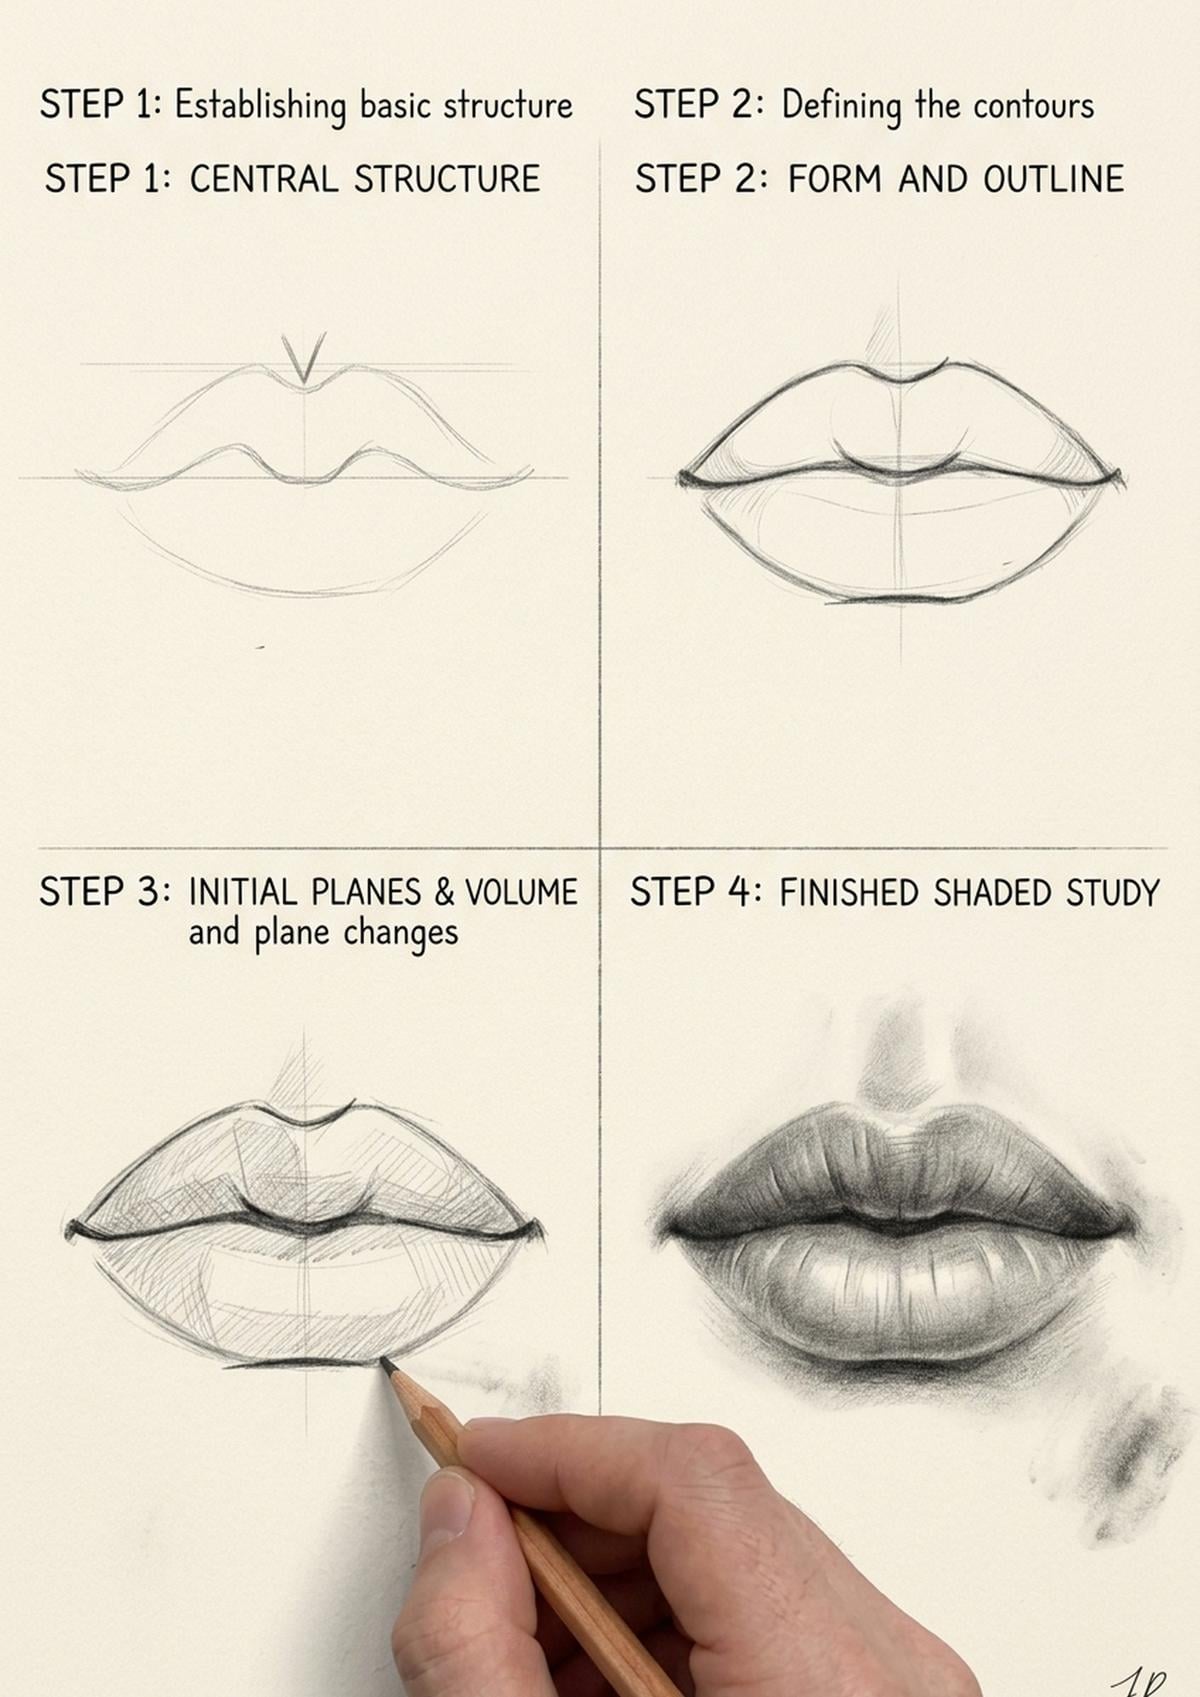
Draw lips in four passes: the centre line first, then the outer silhouette, then the shading, then the highlight. Working in that order stops you fussing over detail before the shape is right.
- Draw the centre line. One soft wavy line with a dip in the middle and a gentle turn down at each end. Keep it light for now.
- Add the cupid’s bow and the upper lip. Two shallow wedges rising from the centre dip, then sloping out to the corners.
- Add the lower lip. One fuller, rounder shape — usually about one and a half times the depth of the upper lip. Leave the outer edge softer than the top one; the lower lip melts into the chin rather than stopping dead.
- Shade. Darken the centre line hardest, put a soft shadow under the whole lower lip where it meets the chin, and keep the upper lip a touch darker overall.
- Lift the highlight. Take out a soft band of light along the fullest part of the lower lip and a smaller one on the bow.
A lips drawing reference earns its keep in step two, because the cupid’s bow is where beginners drift. It is a much smaller, softer feature than the symbol in your head — on most faces it is a gentle ripple, not two sharp peaks. Trace over a reference a few times and your hand starts making the softer version automatically.
What Are the Main Lip Shapes to Know?
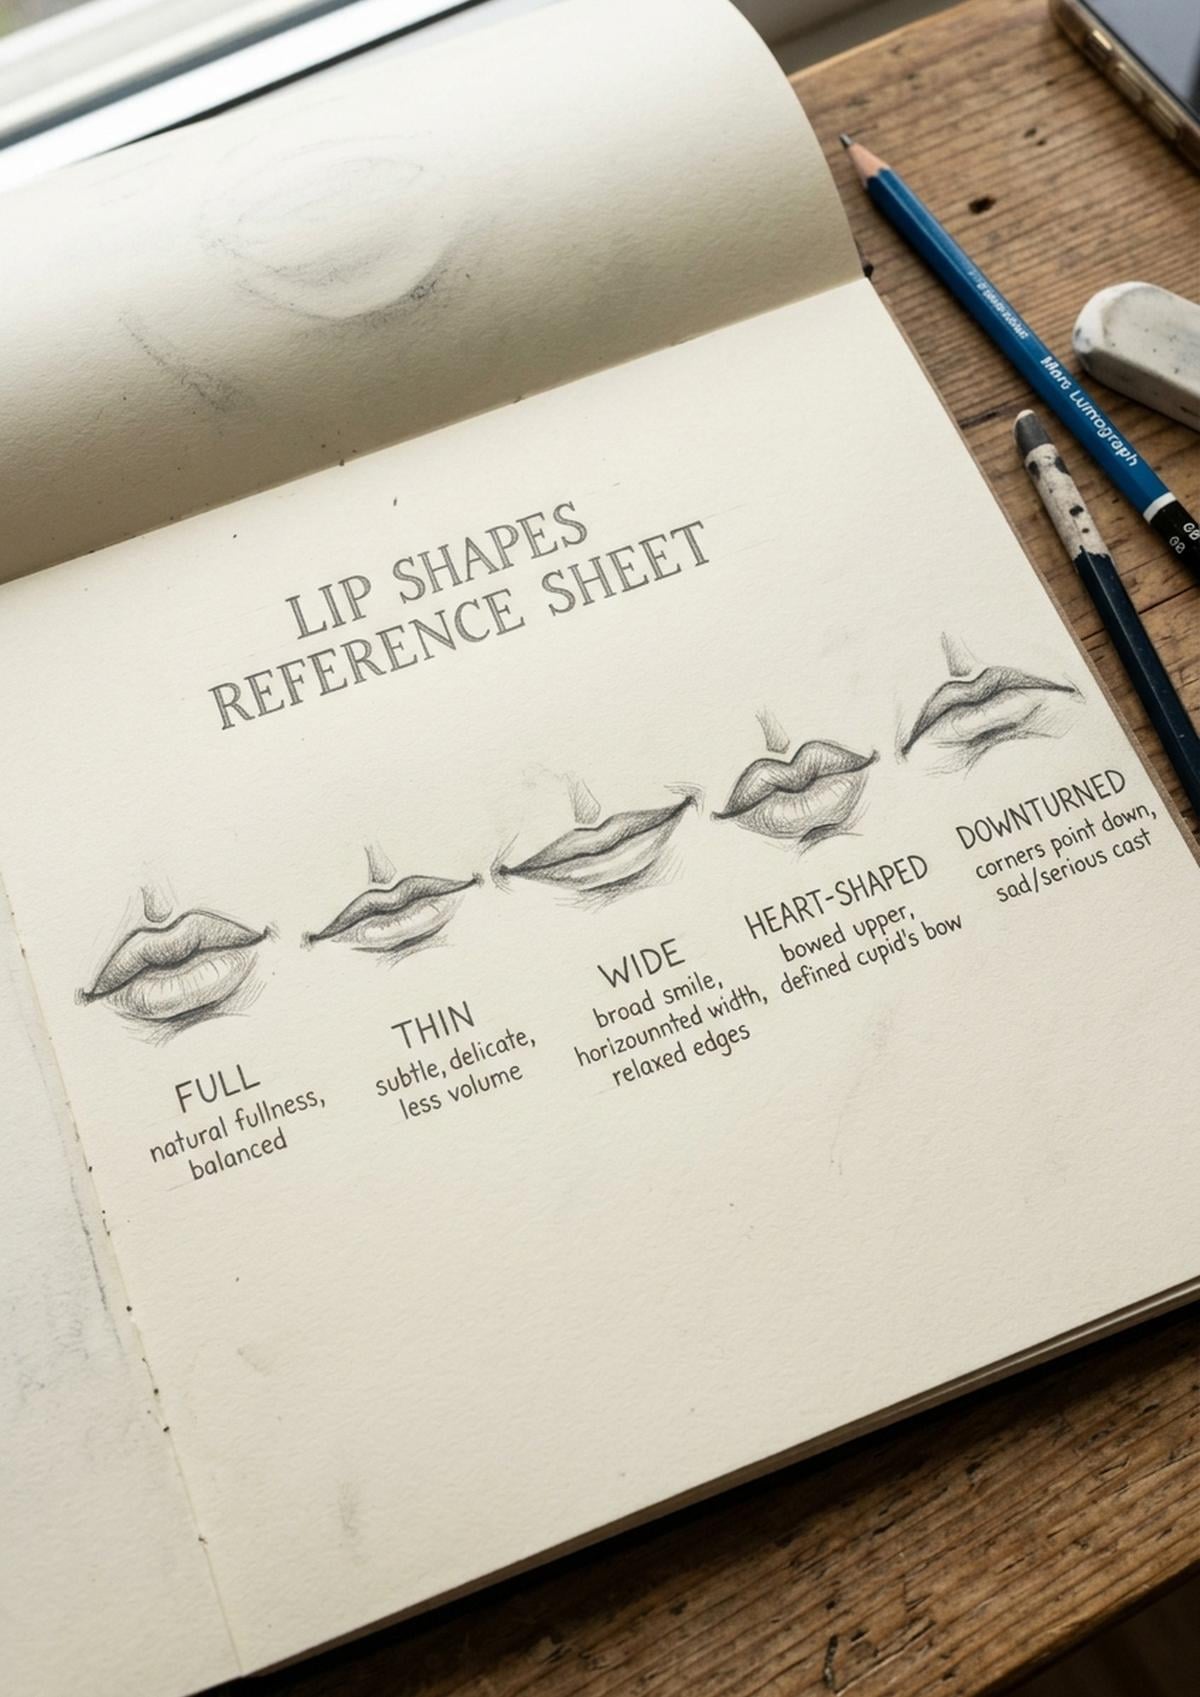
There are five shapes worth learning: full, thin, wide, heart-shaped and downturned. Almost every mouth you will draw is a blend of two of them, and choosing deliberately is what stops all your portraits sharing one generic mouth.
- Full lips — both lips deep and rounded, with a broad highlight band and a short distance between nose and mouth.
- Thin lips — very little depth above and below the centre line, so the line itself does most of the work. Keep your shading subtle or they turn into a scar.
- Wide mouth — the corners sit further out towards the pupils. Reads as open and expressive even at rest.
- Heart-shaped — a pronounced cupid’s bow with a defined double peak and a fuller lower lip beneath it.
- Downturned or upturned corners — a tiny change in the last few millimetres of the centre line that completely changes the mood of the face.
The corners are the cheapest place to buy character. Lift them a hair and the face is content; drop them a hair and it is weary. Nothing else in the drawing has to change.
How Do You Draw a Mouth From the Side and Three-Quarter View?
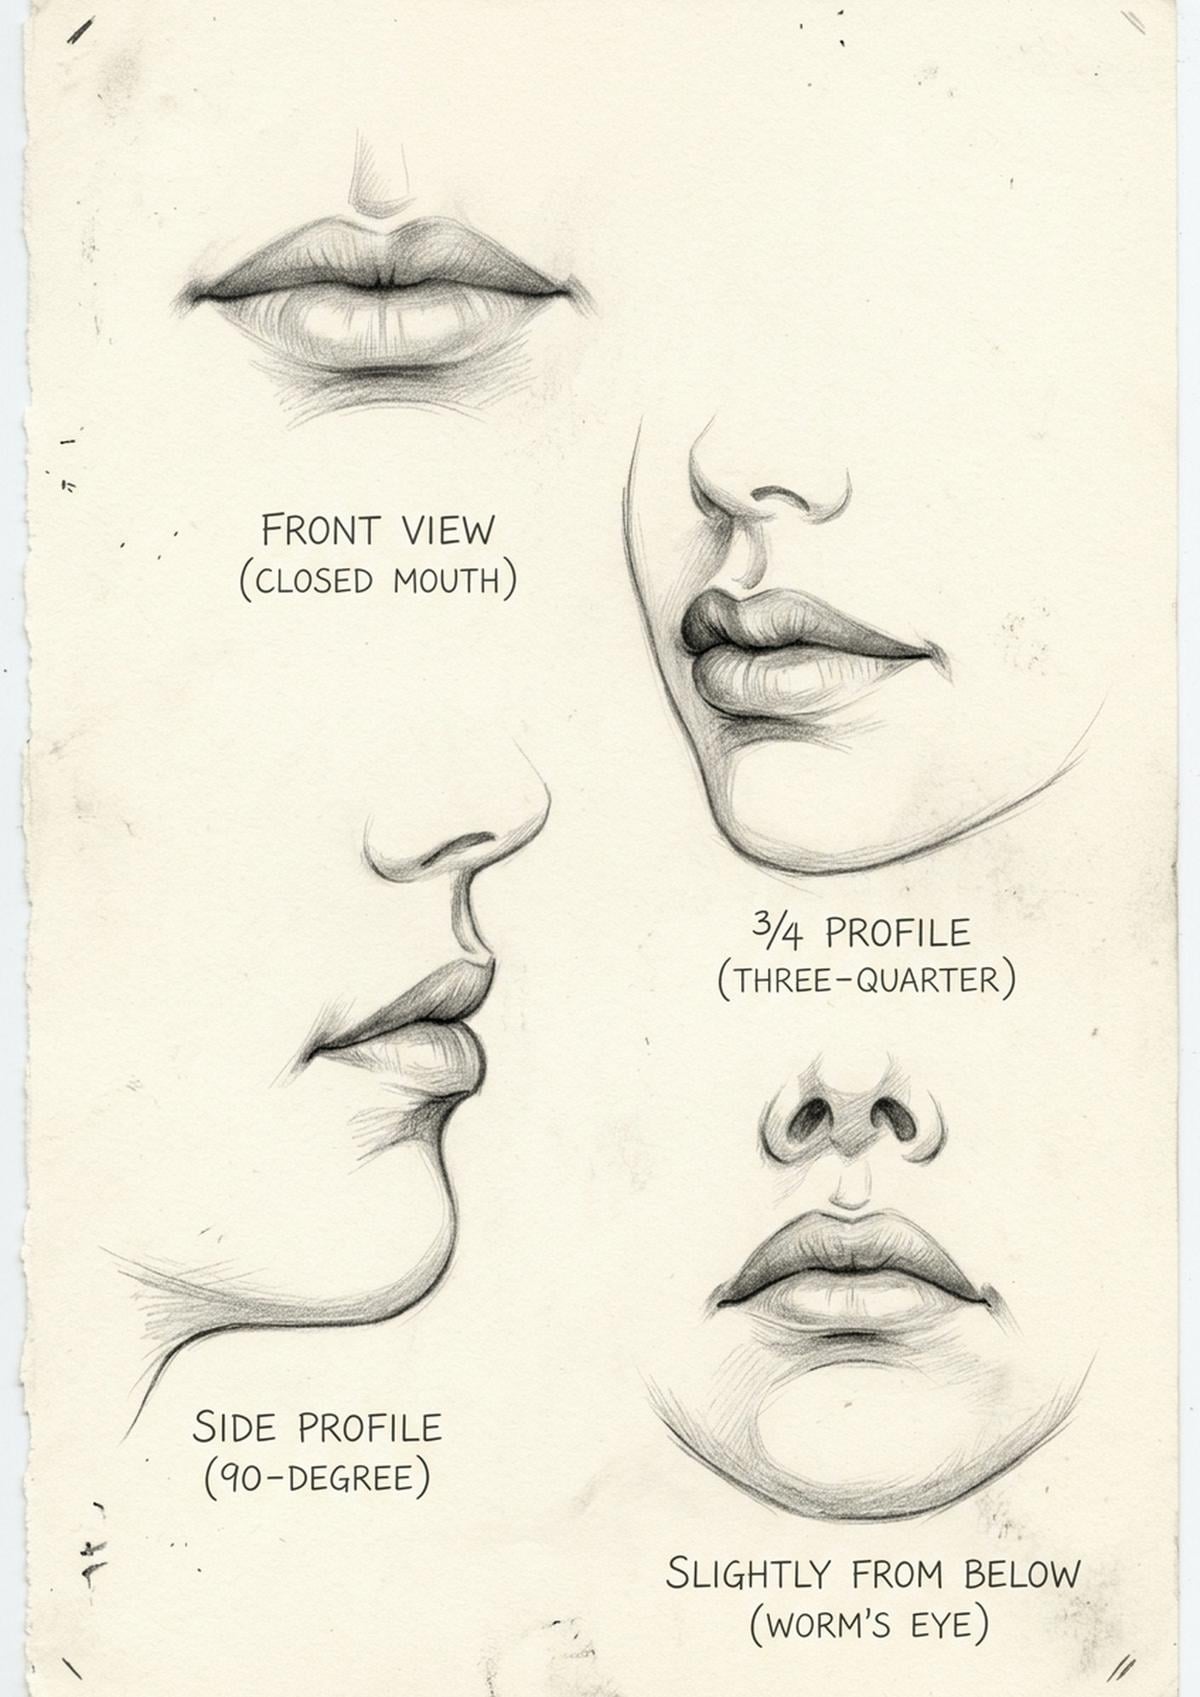
From the side and three-quarter view the mouth wraps around the curved arch of the teeth, so the far half gets shorter and the centre line curves away from you. The single most common error is drawing a front-view mouth on a turned head, which flattens the whole face instantly.
In profile the upper lip usually sits slightly forward of the lower one, and both sit behind the tip of the nose. In three-quarter view, the near half of the mouth stays close to its full width while the far half compresses — often to little more than half. Follow the curve of the centre line around the form the way you would follow a stripe around a jar.
It is worth drawing the same mouth from four angles in one sitting. It is a twenty-minute exercise and it does more for your portraits than a week of drawing front views.
How Do You Draw Teeth Without Them Looking Scary?
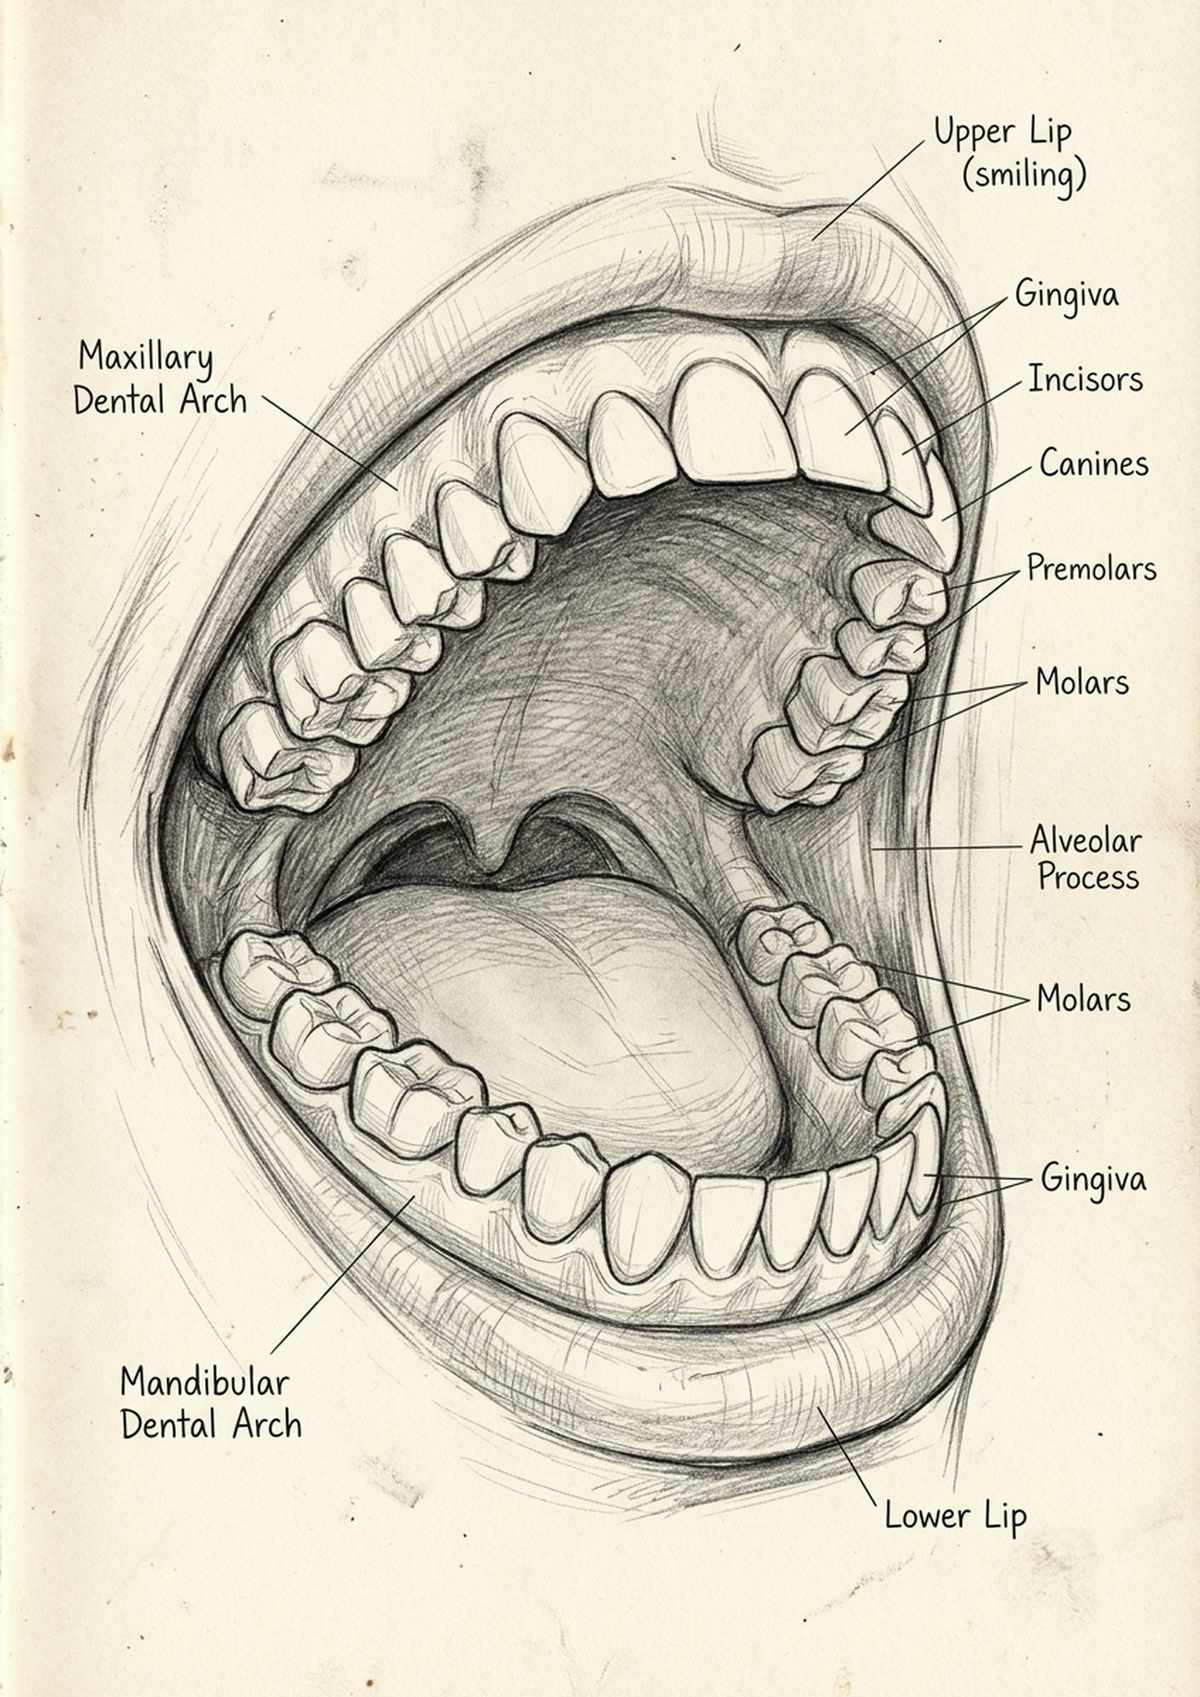
Draw teeth as one soft, curved block first, and only suggest the divisions between them. Outlining every tooth individually in dark pencil is what turns a friendly smile into something unsettling.
Teeth follow the arch of the jaw, so they curve back away from you — the front two are largest and brightest, and each one after that is a little smaller and a little greyer. Shade the ones towards the corners so the row turns properly instead of sitting flat like a fence.
- Draw the whole row as one shape, then hint at the gaps with short, light marks — never full outlines
- Keep the upper edge of the teeth tucked under the shadow of the upper lip; that shadow is what makes them read as being inside the mouth
- Leave the front teeth as clean paper. Grey teeth are the number-one cause of an unfriendly smile
- The lower teeth are usually hidden or very dim — resist drawing them at full strength
- A gentle dark gap between the two front teeth is enough; anything more reads as a grimace
How Do You Draw a Smiling Mouth?
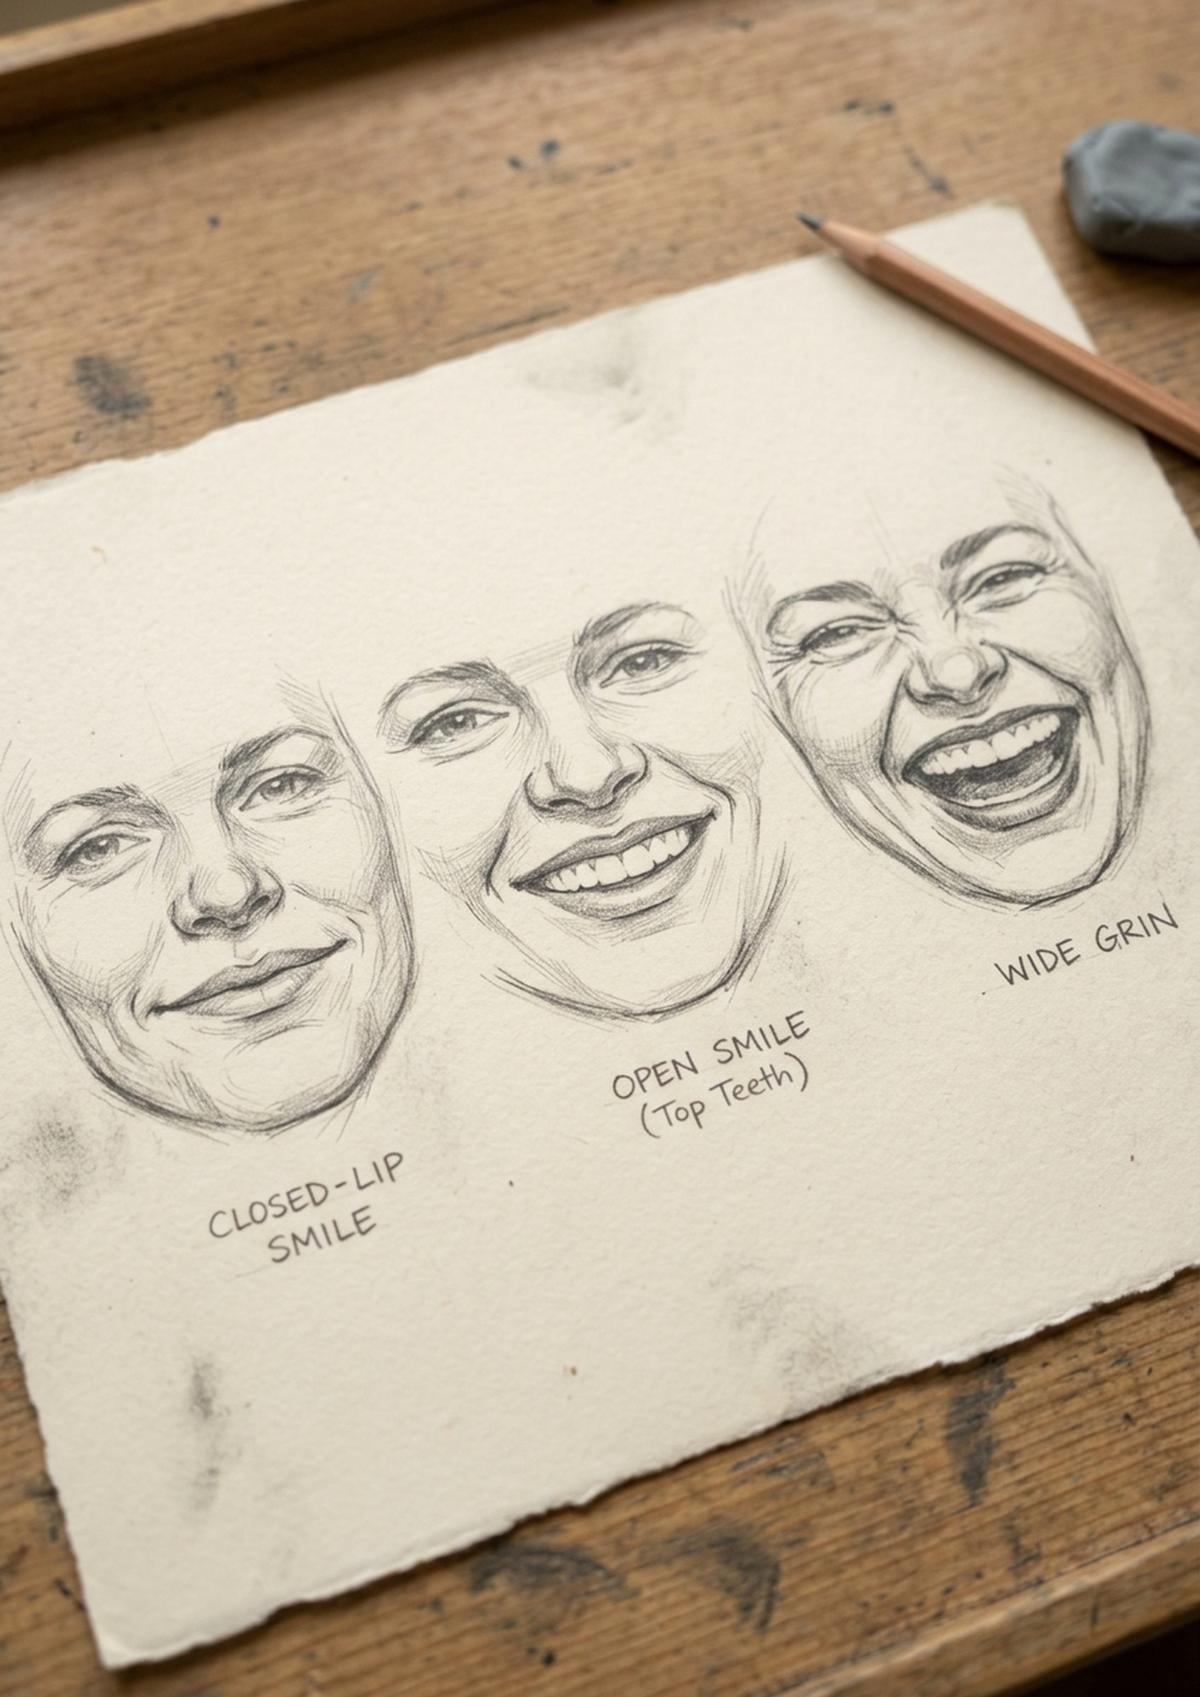
A smile is not a wider mouth — it is a mouth pulled up and back into the cheeks, which stretches the lips thinner and deepens the corners. Draw it as a change in direction and tension, not as a bigger curve.
When someone smiles, the upper lip flattens and thins, the corners lift and disappear into a small fold beside the cheek, and the lower lip stretches taut. If the mouth is open, the lower lip drops and the top row of teeth appears with the shadow of the upper lip laid across it. The cheeks push up too, and a true smile always shows in the eyes — which is why a smiling mouth pasted onto a neutral face never quite convinces.
Keep the corner shadows small and soft. Two heavy dots at the ends of a smile read as a puppet, and it is a hard thing to un-see once you have noticed it.
How Do You Shade Lips So They Look Full?
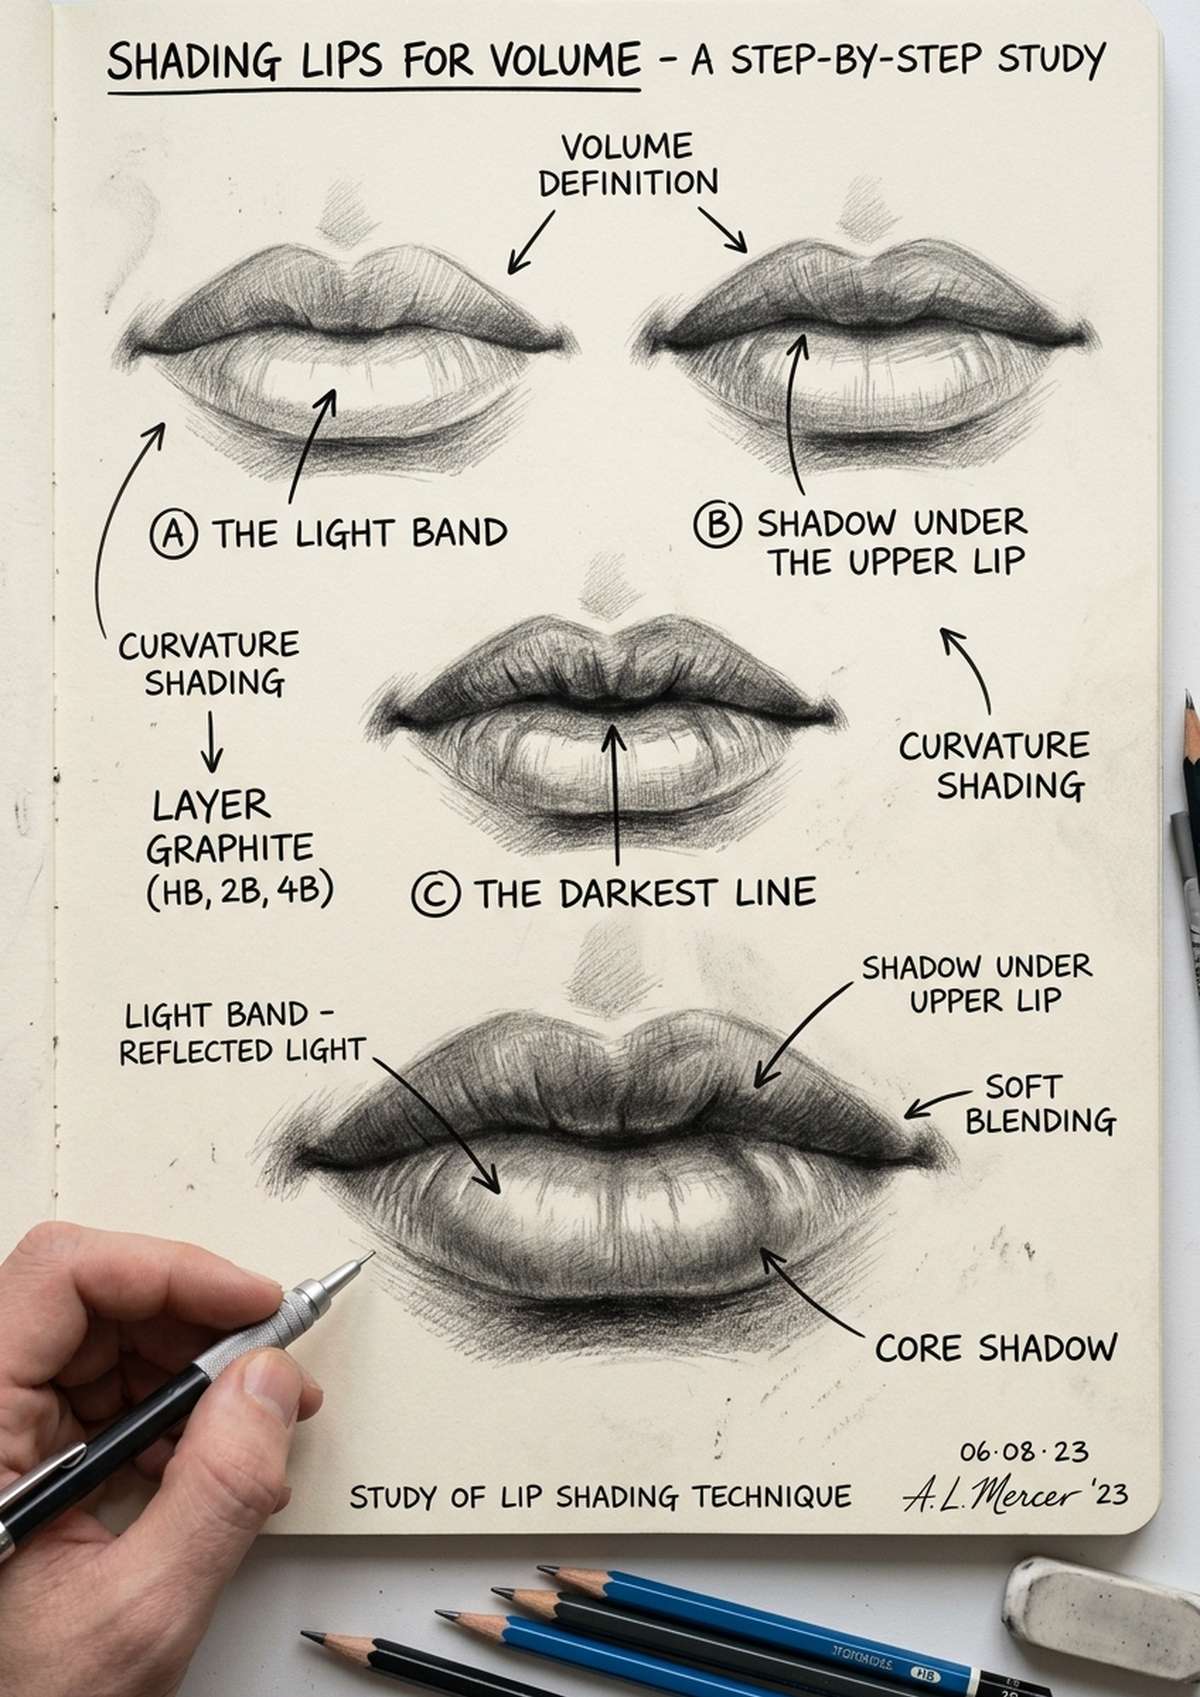
Volume in lips comes from one rule: the upper lip faces down and away from the light, so it stays darker, and the lower lip faces up towards it, so it carries the highlight. Commit to that and even a simple outline suddenly reads as three-dimensional.
- Darkest of all is the centre line — push it harder than feels comfortable
- Keep the whole upper lip a shade or two darker than the lower one, everywhere
- Run your pencil strokes outwards from the centre line, following the little vertical creases in the lips
- Put a soft shadow in the dip below the lower lip, above the chin — this is what pushes the mouth forward off the page
- Lift the highlight rather than drawing around it. A Tombow Mono Zero eraser gives you a clean, precise band of light without touching the shading either side
Leave a little paper showing. Lips that are shaded edge to edge go flat and heavy, and there is no recovering the sparkle once it has gone.
How Does the Mouth Change With Expression?
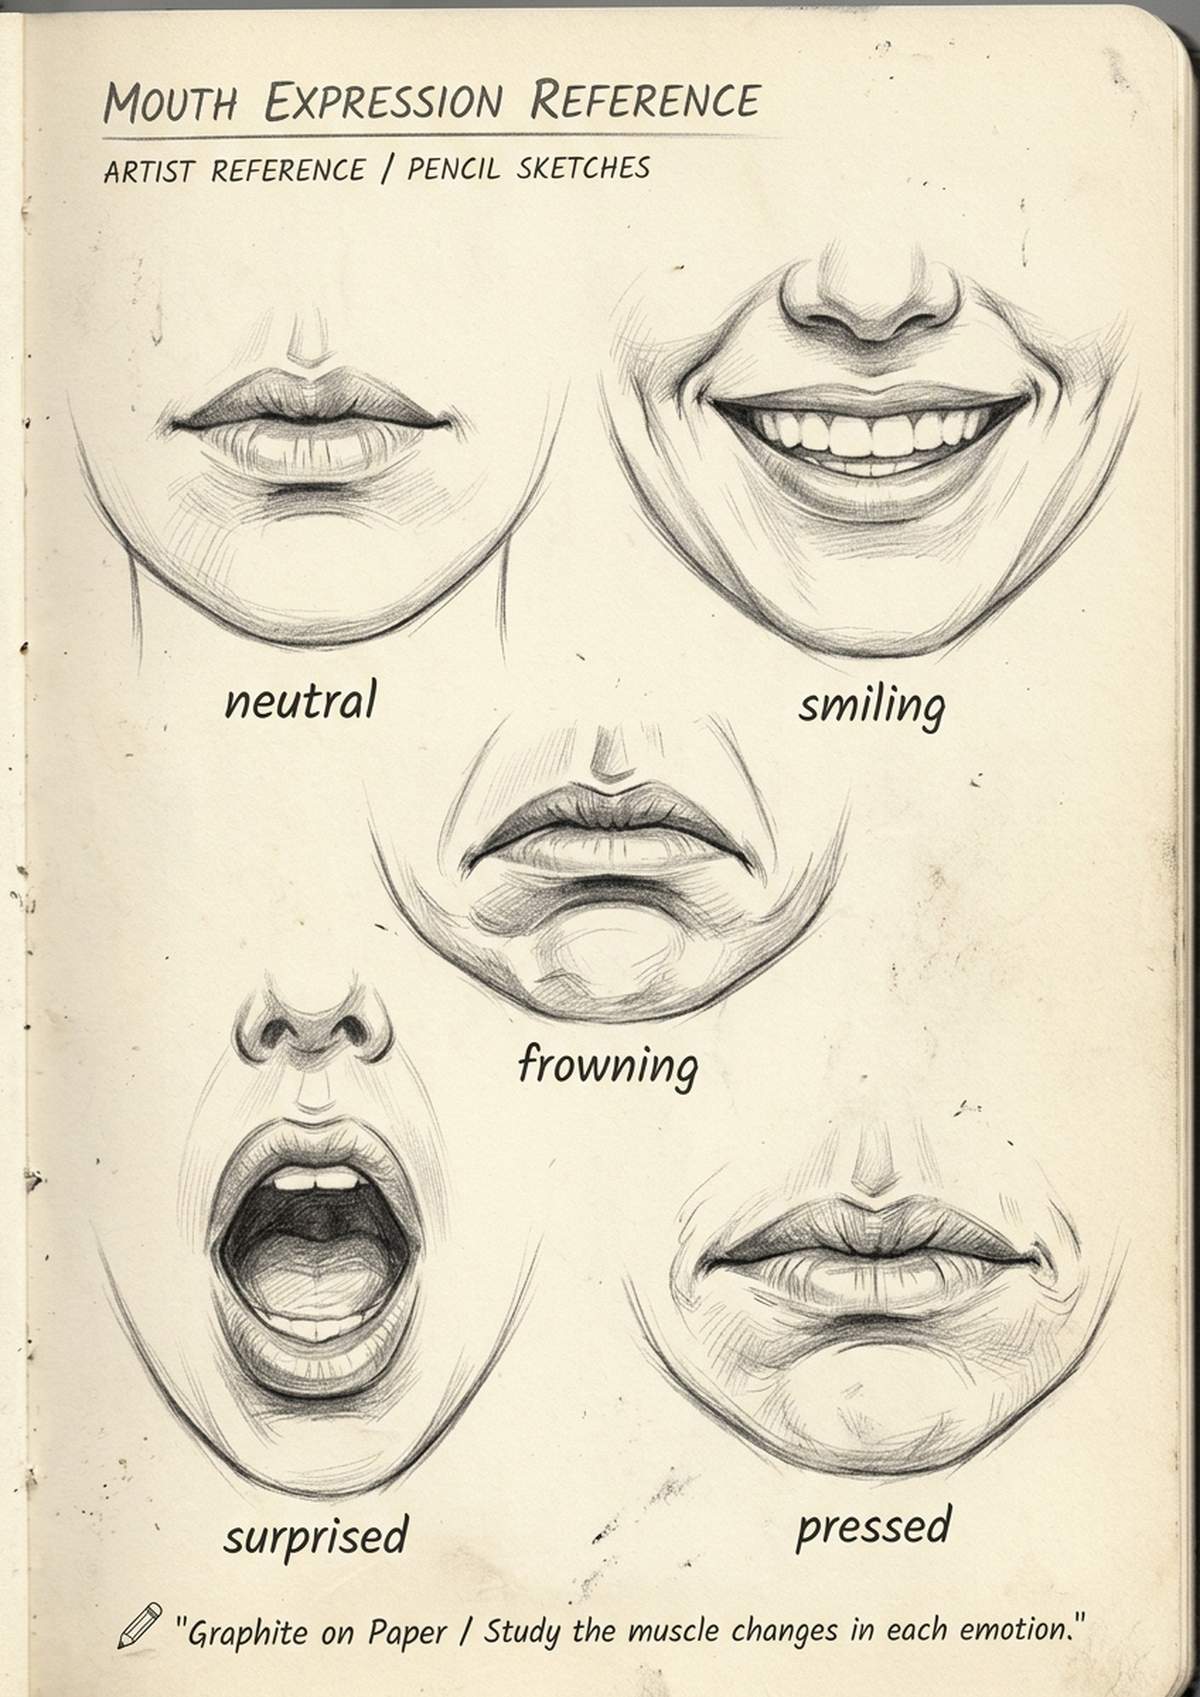
Almost all of a mouth’s expression lives in the corners and the tension of the centre line. Big emotional changes need surprisingly small drawing changes, which is good news and also why so many portraits accidentally look cross.
- Neutral — the centre line is soft and almost level, the lips relaxed and slightly parted
- Content — the corners lift a millimetre or two and the lips stay closed
- Sad — the corners drop, the lower lip pushes forward a little and the centre line curves down
- Pressed or tense — the lips flatten, thin out and the centre line goes hard and straight
- Surprised — a small round opening, the lips forming a soft ring rather than an oval
- Speaking — vowels give you the classic shapes: rounded for an ‘oh’, stretched wide for an ‘ee’
Try drawing the same mouth six times, changing only the corners and the pressure of the centre line. It’s a quick page in a sketchbook and it teaches you more about faces than almost anything else.
Where Does the Mouth Sit on the Face?
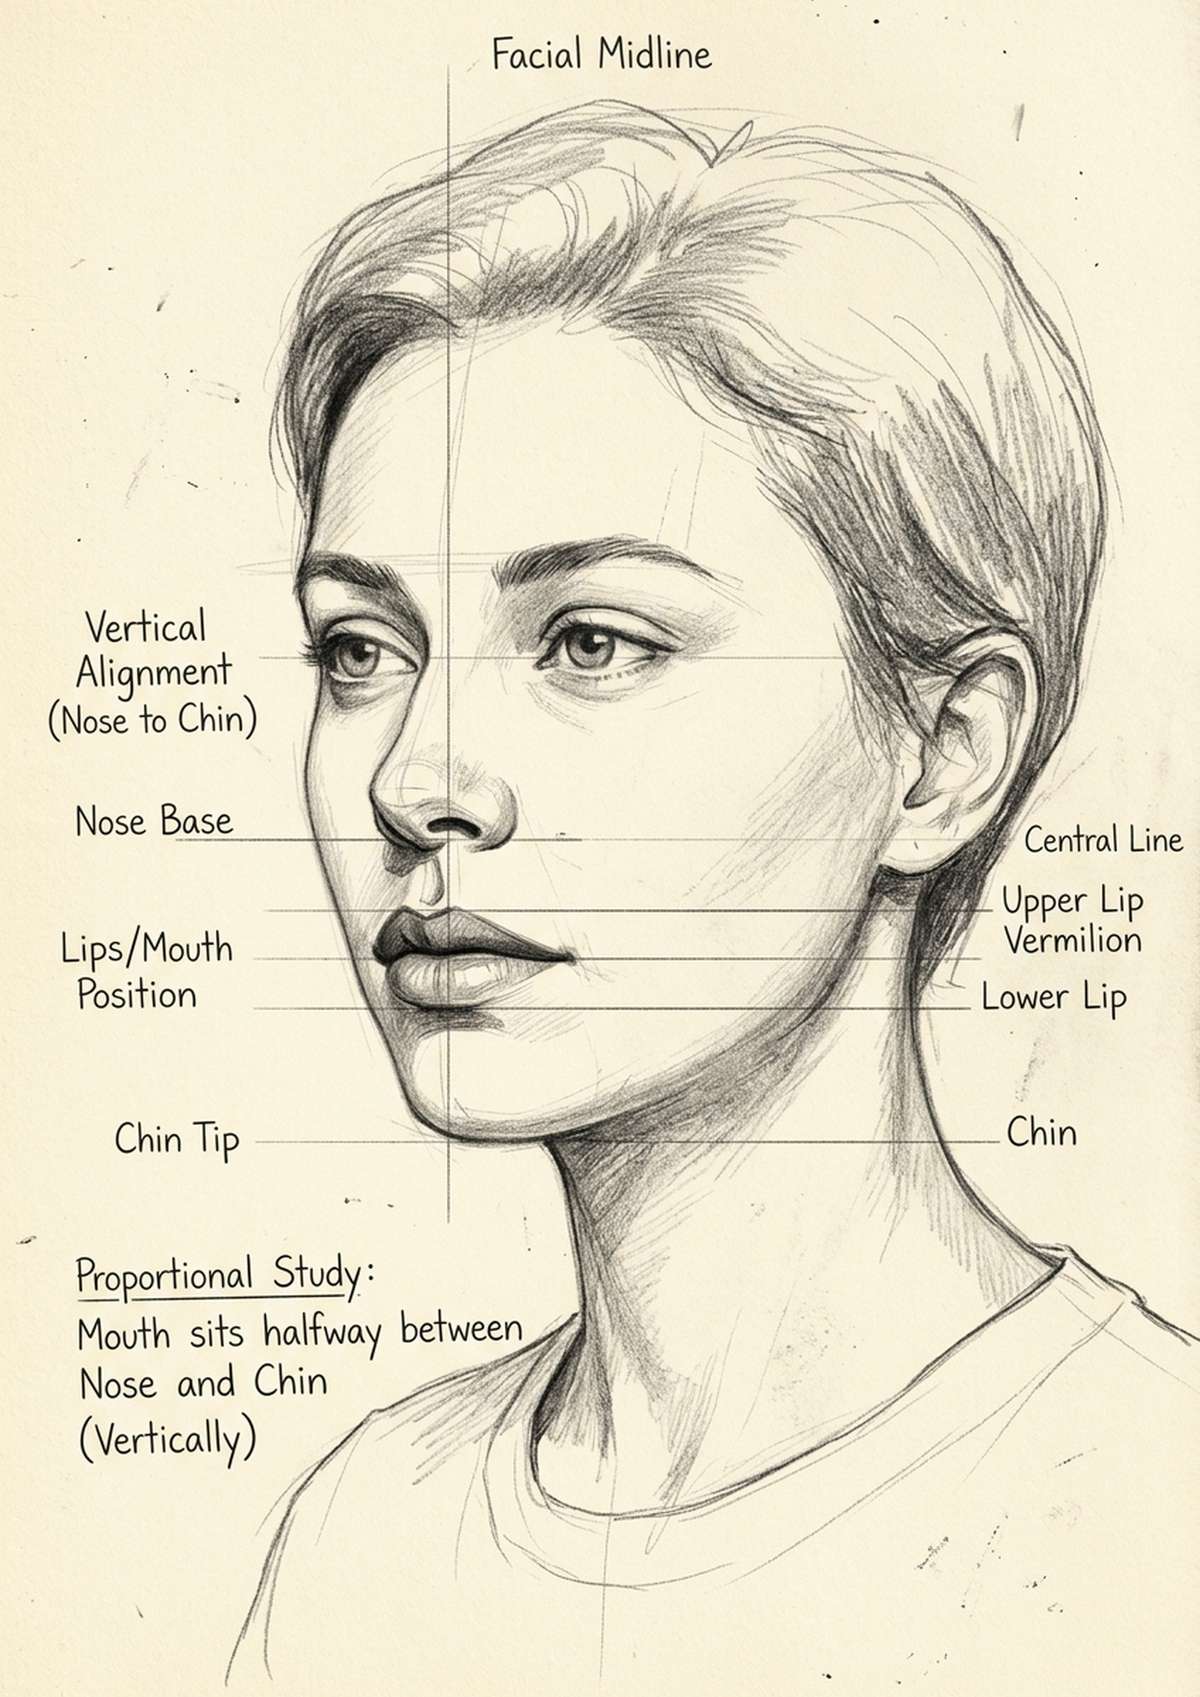
On an adult front view, the mouth sits roughly a third of the way down between the base of the nose and the bottom of the chin — much closer to the nose than most beginners place it. The corners line up under the centre of each eye when the face is relaxed.
Those are starting points, not laws, and they shift with age and angle. Children have proportionally smaller, higher mouths; when a head tips back the mouth moves up towards the nose; when it tips forward it drops. Sketch the guideline first, check it against the nose and chin, then draw. A mouth in the wrong place ruins a likeness far more thoroughly than a mouth drawn slightly clumsily.
It also pays to think about the mouth alongside the rest of the head. My hair drawing reference and the eye drawing reference cover the other two features that make or break a portrait.
What Are the Most Common Mouth Drawing Mistakes?
Nearly every mouth that looks wrong has one of five problems, and each has a quick fix:
- A hard outline all the way round. Only the centre line should be a firm line. Let the outer edges of both lips be soft and tonal.
- The mouth is too low. Check it against the base of the nose before you commit.
- A cupid’s bow with sharp peaks. Soften it. On most faces it is a gentle ripple.
- Teeth outlined individually. One curved block, faint divisions, front teeth left as clean paper.
- A flat mouth on a turned head. The centre line has to curve around the form and the far side has to shorten.
When something feels off and you can’t name it, run this list top to bottom. It is almost always placement or that hard outline.
What’s Inside the Mouth Drawing Template Set?
The full set is 25 traceable A4 studies: closed mouths from the front, three-quarter and profile, the cupid’s bow and philtrum in close-up, the five main lip shapes, smiles from a closed curve to a wide grin, a teeth-structure sheet, the speaking vowel shapes, expressions from neutral to frown, and a planes-of-the-lips page for shading practice.
Want a free taster? The free mouth drawing template from the form above is one clean outline to print, trace and shade, so you can try the approach today.
For the whole set — plus new watercolour templates, Procreate brushes and tutorials every month — my Patreon members get the complete library with early access and behind-the-scenes.
What Supplies Do You Need for Drawing Mouths?
Very little, honestly. A soft pencil, something to lift highlights with, and paper that doesn’t fight you:
- Faber-Castell Pitt Graphite tin — a 2B for construction and a 4B for the centre line and the deep corners.
- Tombow Mono Zero eraser — a 2.3mm tip, which is exactly the width of the highlight band on a lower lip.
- Canson XL heavyweight pad — heavy enough to take repeated erasing and light shading without pilling, and it takes a wash if you want to trace a template and paint over it.
- A blending stump, or just a clean fingertip, for softening the shadow beneath the lower lip.
Frequently Asked Questions
How do you draw a mouth for beginners?
Start with the line between the lips, not the outline. Draw it as a soft wavy line that dips in the middle and turns down at each corner, then build the upper lip as two wedges above it and the lower lip as one fuller shape below. Shade the upper lip darker than the lower one and lift a highlight along the lower lip. Tracing a template a few times is the fastest way to teach your hand the shapes.
Why do my lips look flat?
Almost always because the outline is doing all the work and the tonal difference between the two lips is missing. Soften the outer edges, keep the whole upper lip darker than the lower one, and leave a clean band of paper along the fullest part of the lower lip. Add a soft shadow in the dip between the lower lip and the chin and it will push forward immediately.
How do you draw teeth in a smile?
Draw the whole row as one softly curved block and only hint at the divisions with short, light marks. Keep the top edge tucked under the shadow cast by the upper lip, leave the front teeth as clean paper, and let the teeth get smaller and greyer as they turn towards the corners of the mouth.
Can I use these mouth templates for watercolour or Procreate?
Yes. They are clean outlines made for tracing and painting over. Print them on heavier paper and wash colour over the top, or import a page into Procreate, drop the layer opacity and draw on a layer above it. Coloured pencil and marker work just as well.
Are the mouth drawing templates free?
The template that comes through the form above is yours to keep and use however you like. The full 25-template set lives in my Patreon library alongside the rest of the drawing references.
Where Can You Find More Drawing References?
If this one helped, these are the closest siblings:
- Face Drawing Reference: Proportions, Angles & Expressions
- Hair Drawing Reference: Styles, Textures & Templates
- Eye Drawing Reference: Anatomy, Expressions & Styles
- What to Draw: Ideas for Your Sketchbook
Written by Dee Maene — artist and founder of Artsydee. I make printable templates, watercolour kits and drawing resources to help beginners find their creative confidence. When I’m not painting, I’m probably drinking tea and plotting my next sketchbook page.